HX5-D20: Tactile Sensing in Isaac Sim
How the contacts that PhysX computes in Isaac Sim become HX5-D20 fingertip readings, laid out like the real tactile sensor: 5 × 3 × 3 values from 0 to 255.
The full demo, recorded with an earlier version of this sensor, before the scale in Section 5 was set.
1. Why Touch in Isaac Sim?
In short: ROBOTIS robots learn in Isaac Sim, but the HX5-D20's fingertips could not sense anything there.
More and more robots learn their skills in simulation first and then use them on real hardware. Research teams have started to give simulated robots a sense of touch as well, and report that skills trained this way can carry over to real robots (Rotating without Seeing, 2023; Beyond Binary, 2026; Factorized Tactile Representation and Control, 2026).
ROBOTIS trains its robots in NVIDIA Isaac Sim too, with Cyclo Lab, its robot learning framework. The real HX5-D20 already has a sense of touch: each fingertip carries a 3 × 3 tactile sensor that reports nine values from 0 to 255 (Hardware Specifications). On AI Worker, these readings have already been used by real-robot policies, for example when the hand hides an object from the camera (ACT with Tactile Sensors).
In Isaac Sim, however, the fingertips reported nothing. PhysX, the physics engine inside Isaac Sim, worked out where each finger touched an object, but nothing turned those contacts into the readings a robot gets from its real sensor.
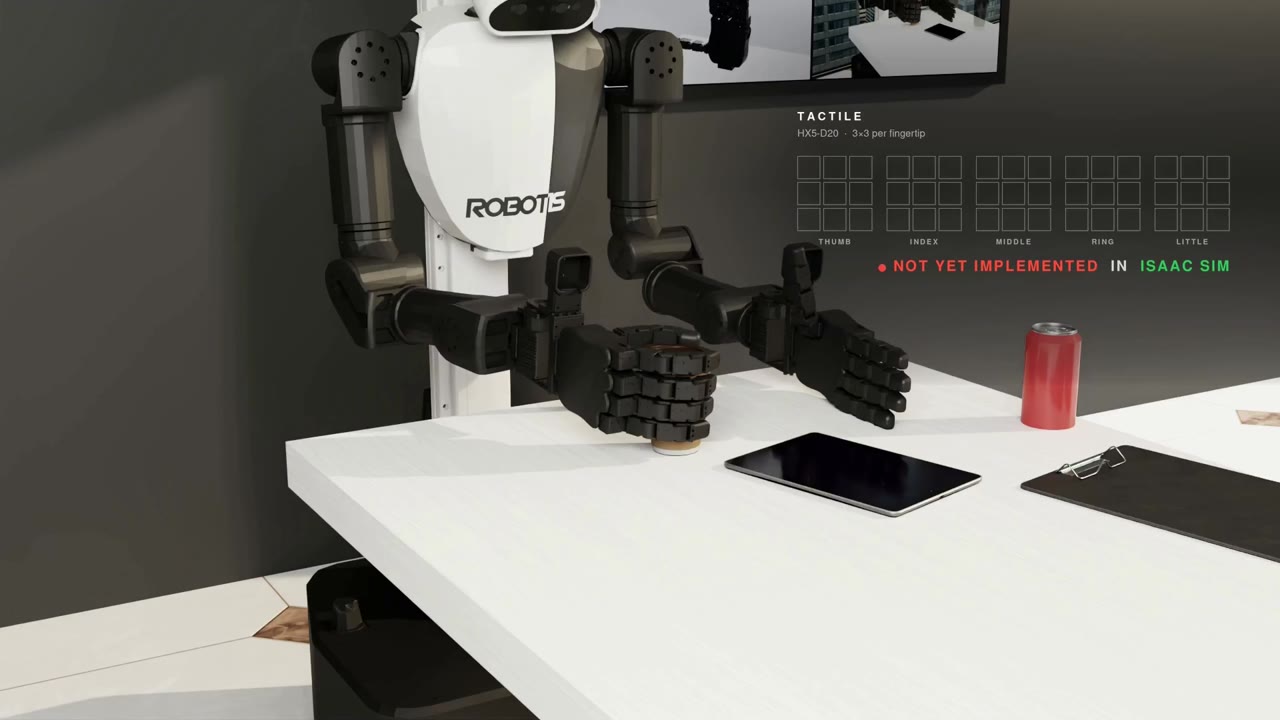
AI Worker holds a cup in Isaac Sim, but every fingertip reading stays empty.
So we built that missing sensor.
2. What We Built
In short: A virtual tactile sensor on each fingertip turns the contacts PhysX already computes into 5 × 3 × 3 readings, laid out like the real hand's.
We gave every fingertip of the simulated HX5-D20 a virtual tactile sensor. It adds no new physics. It reads the contacts that PhysX already computes and turns them into readings laid out like the real sensor's: five fingers, nine cells each, one value from 0 to 255 per cell.
Isaac Sim and Isaac Lab already include contact sensors. They report one total force for a whole body, or a raw list of contact points. Neither is laid out like the real HX5-D20, which reports nine values per fingertip, so the simulated sensor sorts each touch into cells.
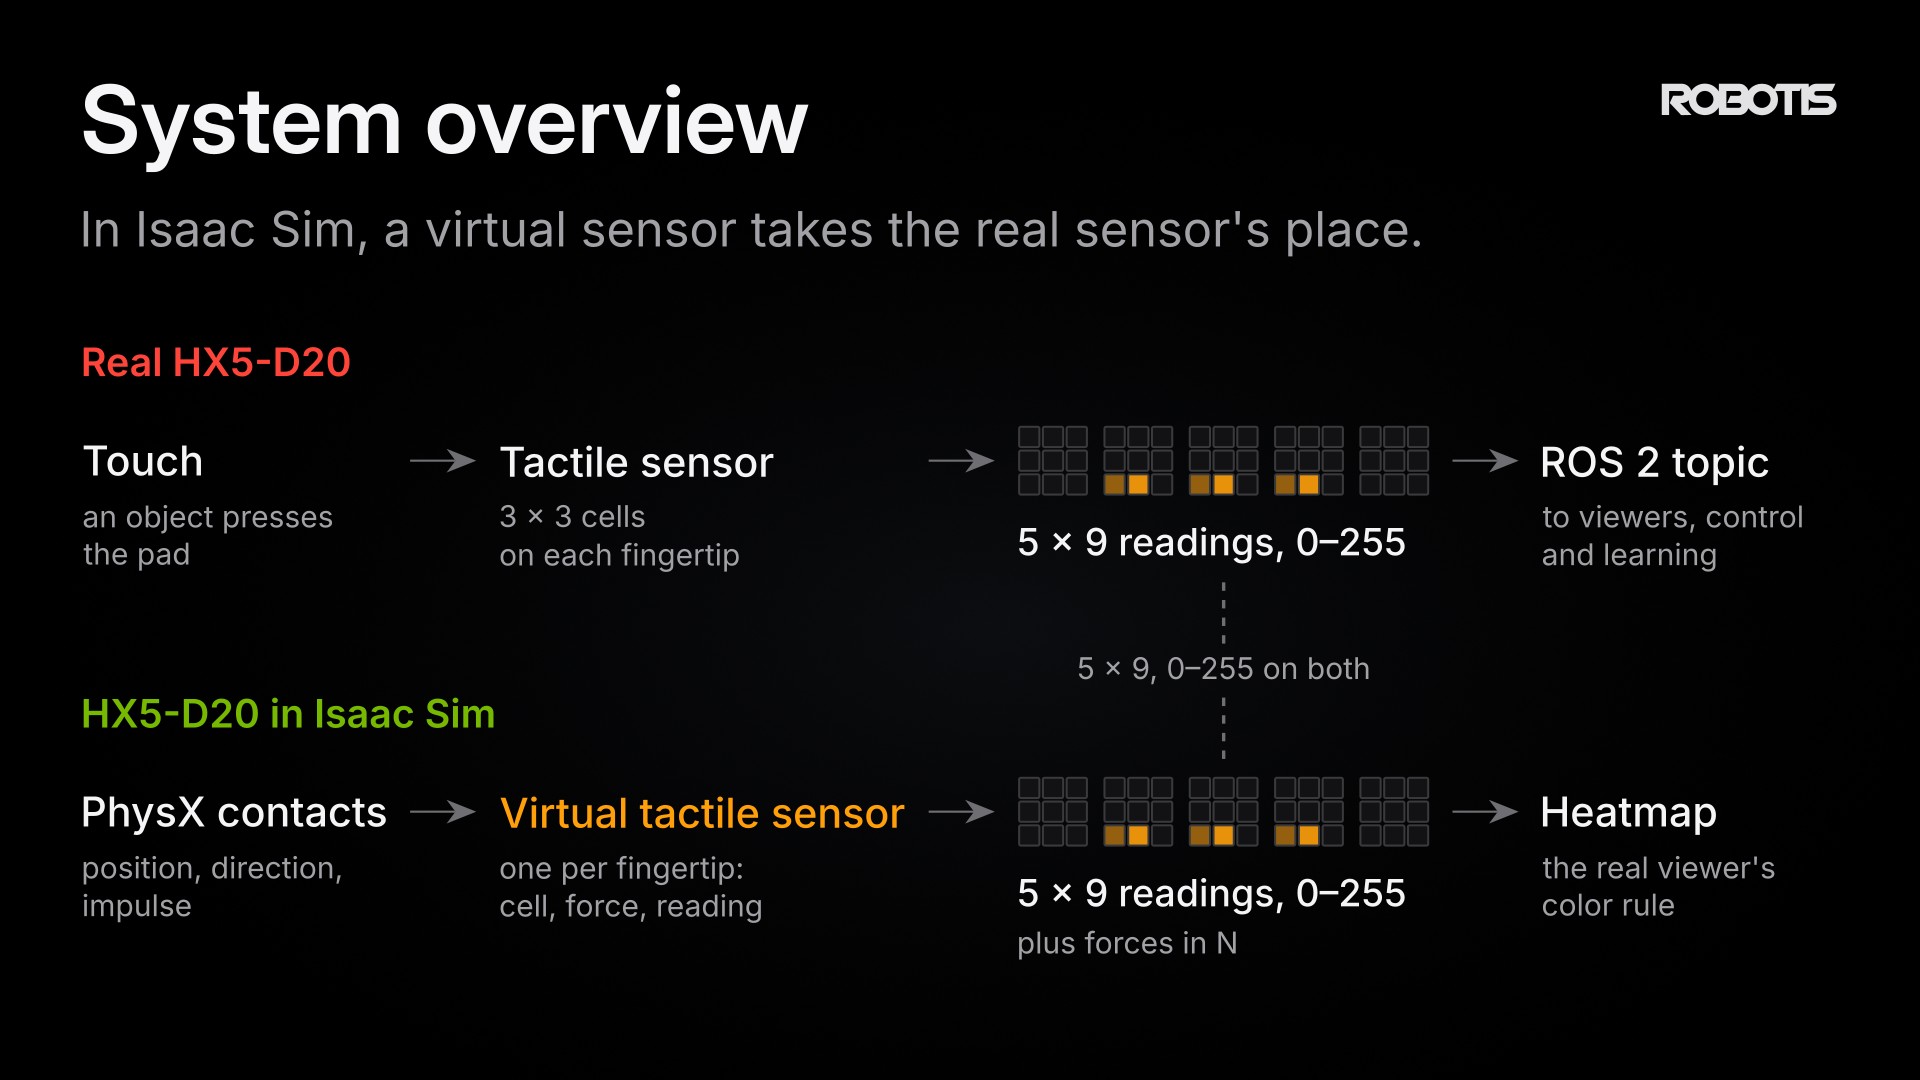
The real hand and the simulated hand side by side: in Isaac Sim, a virtual sensor turns PhysX contacts into readings in the real sensor's layout, 5 × 3 × 3 values from 0 to 255.
The sensor is part of Cyclo Lab. Section 3 shows how to run it, and Section 4 explains how it works.
Five words are used throughout this story:
| Term | Meaning |
|---|---|
| Pad | The sensing area on the inside of a fingertip. |
| Cell | One of the pad's nine squares, also called a taxel. |
| Contact point | A point where PhysX finds the fingertip touching something. |
| Reading | A cell's value from 0 to 255, in the same range as the real sensor's. |
| Physics step | One update of the simulation. Isaac Sim moves the world forward in short slices of time, 120 per second in the demo. |
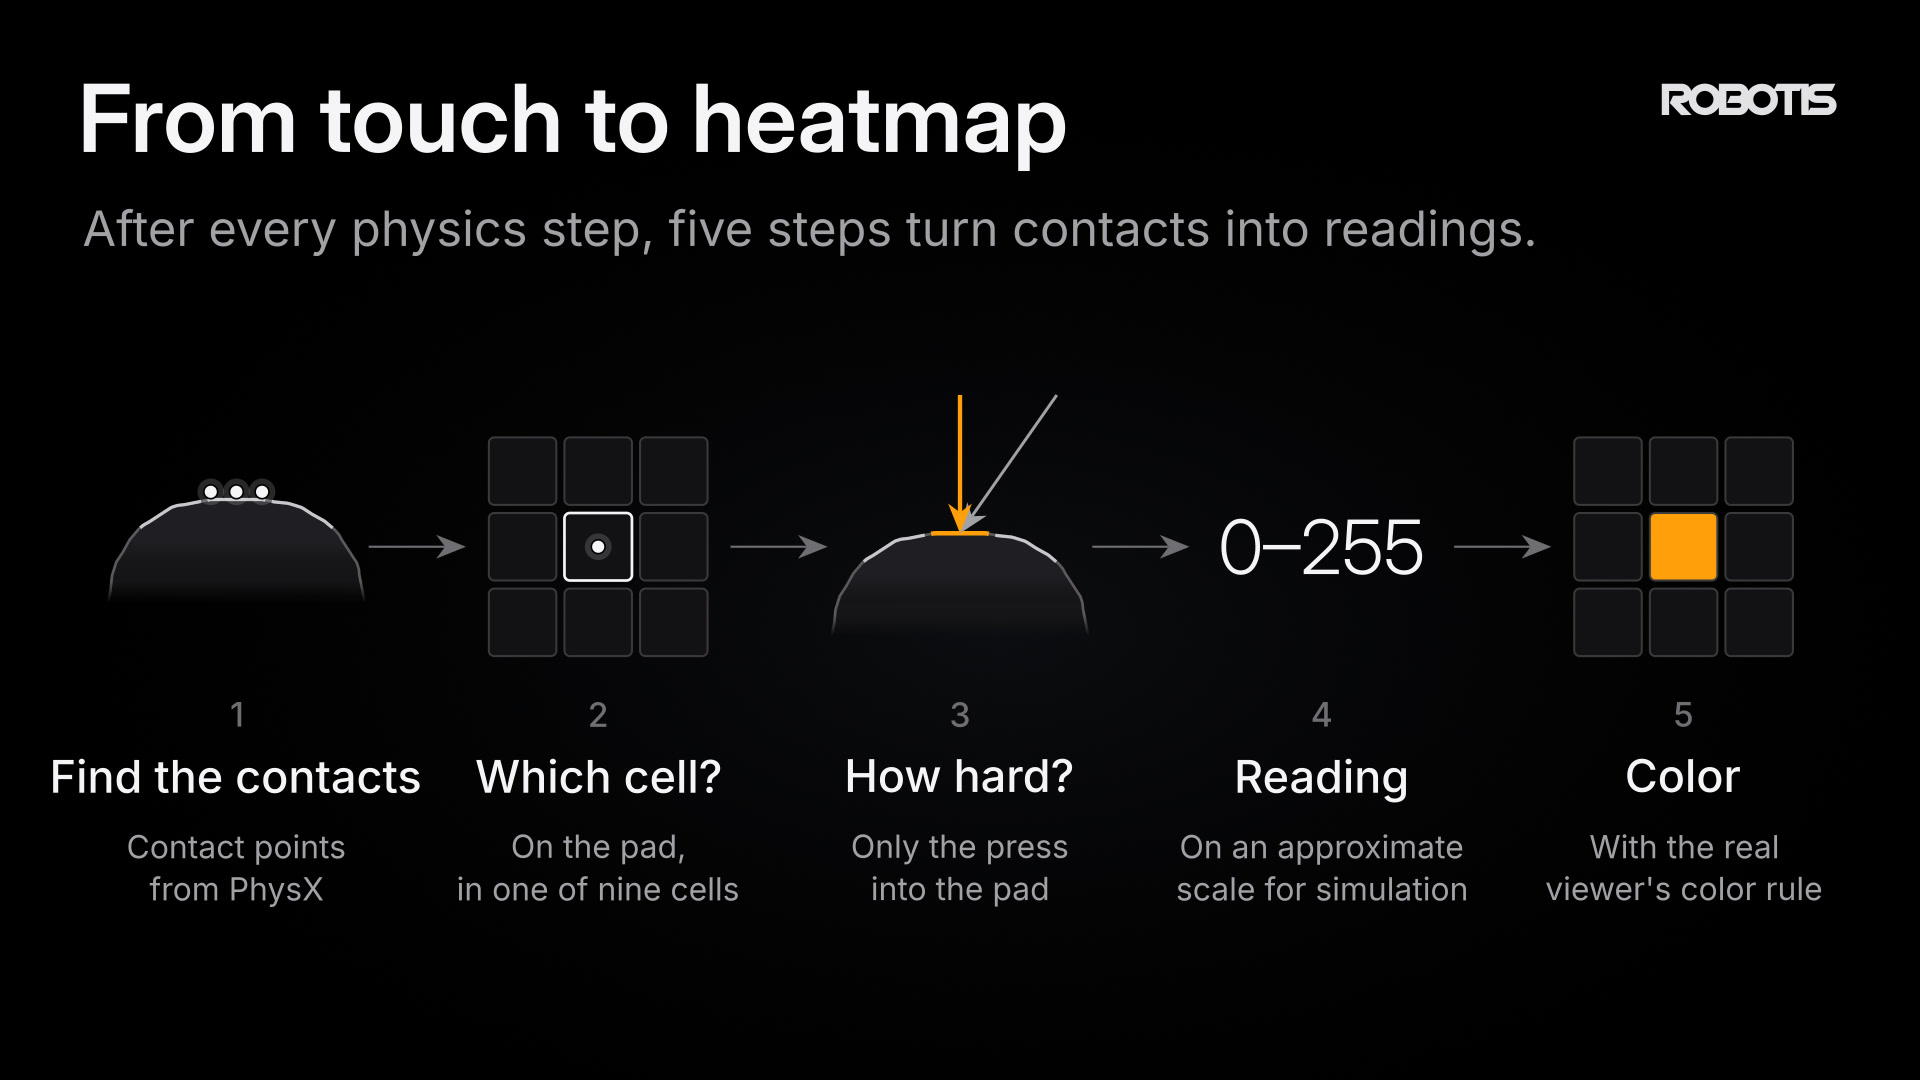
From contacts to a heatmap, in five steps (Section 4).
3. Start Guide
In short: One command tries the sensor without any hardware. One task name turns it on during the VR teleoperation of AI Worker, and two settings add it to your own scene.
3.1 Requirements
- A Linux PC with an NVIDIA GPU and its driver.
- Docker with Docker Compose, and the NVIDIA Container Toolkit.
These are the requirements of Cyclo Lab itself (Installation). Run the steps at the PC itself, not over SSH, so that the Isaac Sim window can open.
3.2 Get Cyclo Lab and Open Its Container
If you used an older Cyclo Lab on this PC, its container has the same name, cyclo_lab, and start would start that old container again. Remove it first. The images and your files stay:
docker rm -f cyclo_lab
Run these lines in a terminal on the PC.
cd ~
git clone https://github.com/ROBOTIS-GIT/cyclo_lab.git
cd ~/cyclo_lab
git submodule update --init
docker pull robotis/cyclo-lab:latest
./docker/container.sh start
./docker/container.sh enter
git submodule update --init fetches the projects that Cyclo Lab builds on, as in Cyclo Lab's own installation steps.
docker pull downloads the Cyclo Lab image that ROBOTIS publishes, with Isaac Sim inside. The download is about 35 GB and takes a while, and the image can use up to about 105 GB of disk. To build the image on your PC instead, run ./docker/container.sh build in place of docker pull. enter opens a terminal inside the container, in the cyclo_lab folder. Run the commands of the next steps in that terminal.
If you already have ~/cyclo_lab, update it instead of cloning, then run the docker pull, start and enter lines above:
cd ~/cyclo_lab
git checkout main
git pull
git submodule update --init
docker pull also replaces an older Cyclo Lab image of the same name, so start uses the new one.
3.3 Try It Without Hardware
python scripts/demos/sensors/hand_tactile.py
Isaac Sim opens on a close-up of AI Worker's left hand. The first start can take a few minutes.
On the Tactile Remote tab, next to the Property panel, pick a hand, a finger, a cell from 1 to 9, and a force. A small probe then presses that cell: the cell lights up on the fingertip and in the hand's heatmap window, and the remote shows the cell's force and reading. Press all 9 presses the nine cells of the finger one after another, and Lift off stops.
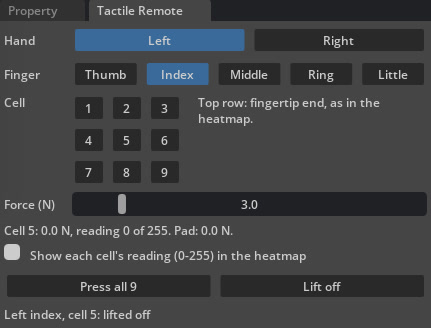
The Tactile Remote tab.
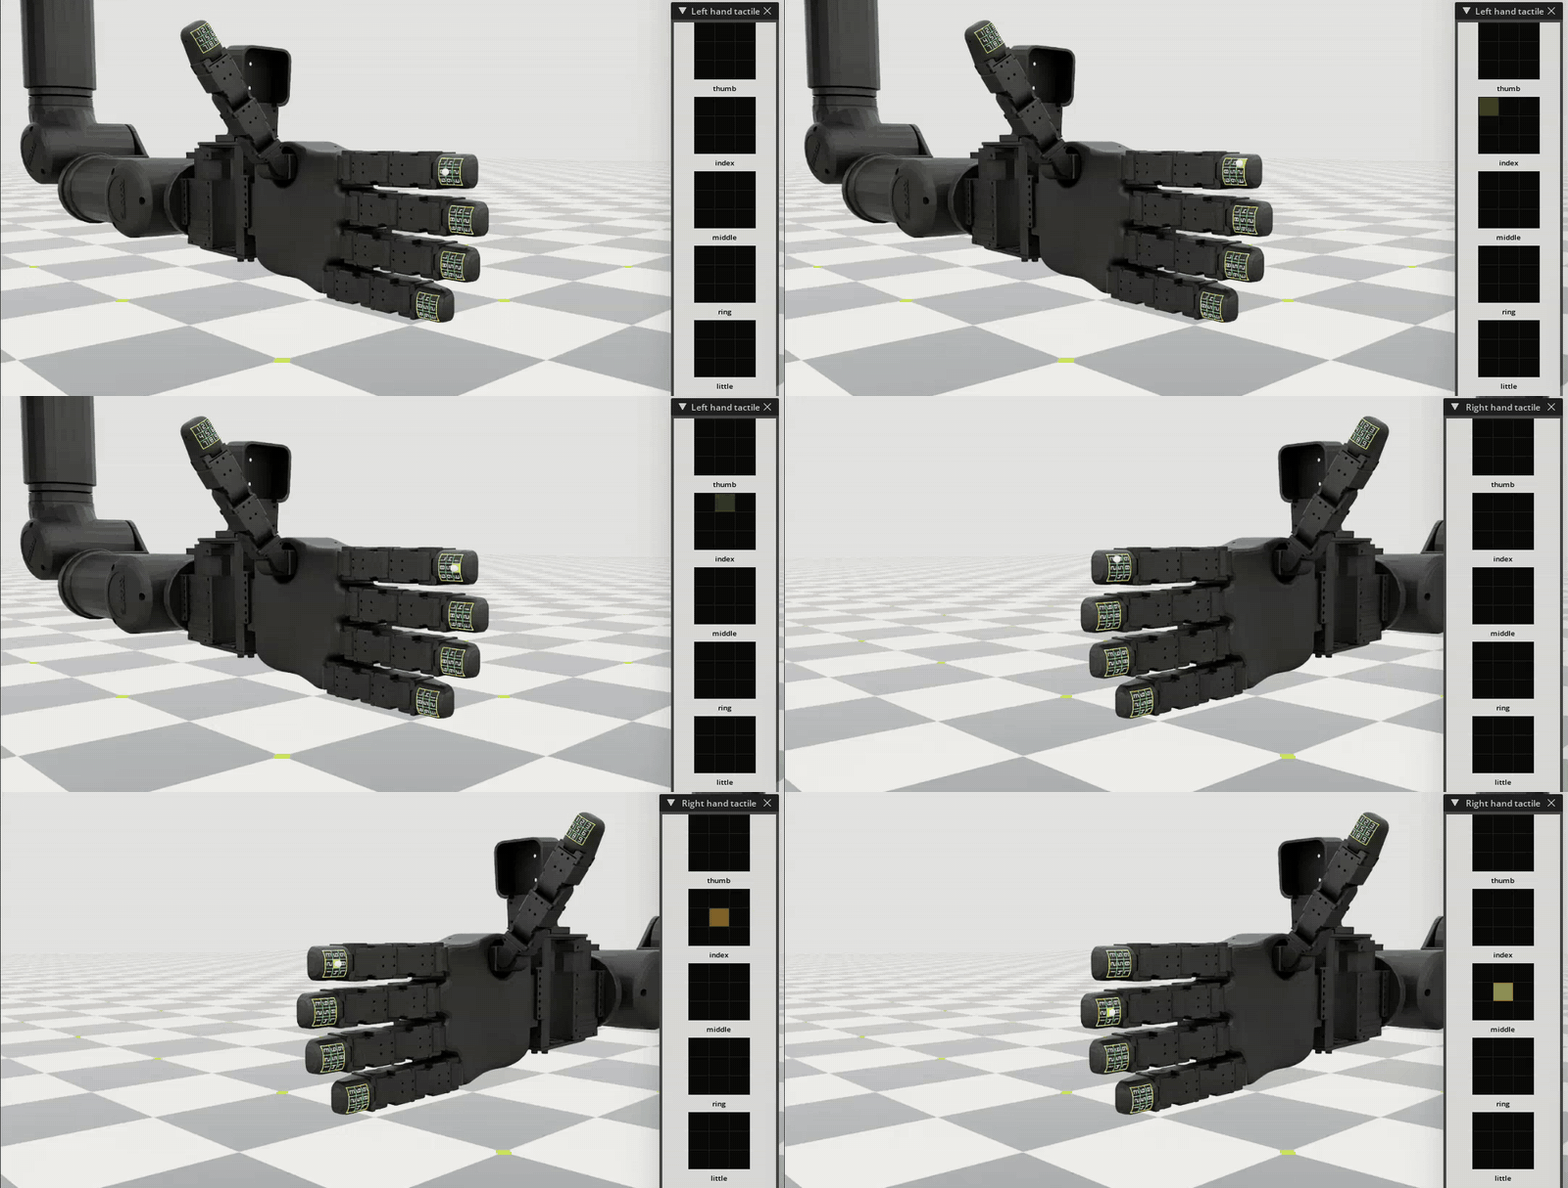
Pressing cells on the left hand, then on the right hand (sped up). The pressed cell lights up on the fingertip and in the heatmap window.
To check the setup without opening a window:
python scripts/demos/sensors/hand_tactile.py --headless
It presses the center cell of each of the ten fingertips once and prints one line per fingertip. If every press lit the pressed cell with about the force asked for, the last line reads RESULT: PASS.
If No Window Opens After a Restart
If no window opens after the PC has restarted, and the terminal shows Cannot setup ExternalDragDrop without a default window, the container has lost its permission to draw on the screen. That permission is a file in /tmp, which a restart empties, and start does not write it again for a container that already exists. In a terminal on the PC, make the container again:
cd ~/cyclo_lab
./docker/container.sh recreate
./docker/container.sh enter
recreate makes a new container from the image you already have, with a new permission file. The image and your files in ~/cyclo_lab stay, so nothing is downloaded again.
3.4 Turn It On in VR Teleoperation
In VR teleoperation, AI Worker SH5 in Isaac Sim follows the hands of an operator wearing a Meta Quest 3 (AI Worker SH5 Isaac Sim VR Teleoperation describes the system). To turn the tactile sensors on, run Cyclo Lab's bringup with the tactile task, as Terminal 2 below does.
Cyclo-Bringup-FFW-SH5-Tactile-v0 is Cyclo Lab's Cyclo-Bringup-FFW-SH5-v0 with the tactile sensors added, and a heatmap window opens for each hand at the top right of the Isaac Sim window. With Cyclo-Bringup-FFW-SH5-v0, the bringup runs as before, without the sensors. --bridge ffw_sh5 connects the robot to the VR side over Zenoh, and --viz kit opens the Isaac Sim window. The tactile task checks the pads more loosely and draws brighter heatmaps than the demo (Section 7).
The robot stands on an empty floor, so the heatmaps stay dark until a fingertip pad presses on something. To have something to grasp, add your own objects to the scene (Section 3.5).
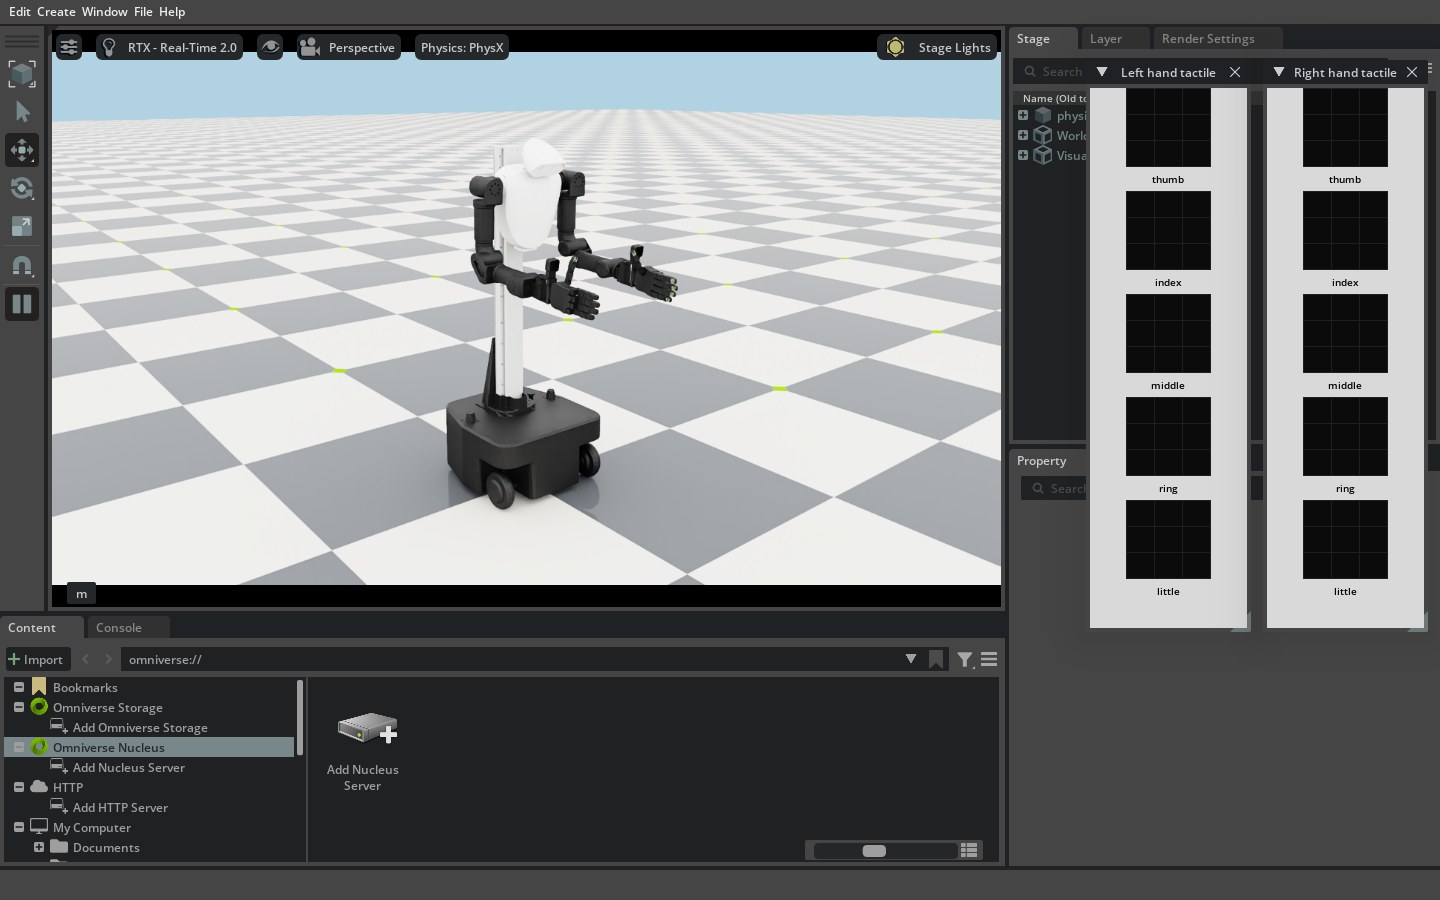
The bringup with the tactile task. Nothing touches the hands yet, so every cell is dark.
All the containers talk over Zenoh, through a Zenoh router on the PC (Zenoh Communication). If no router is running yet, start one in a terminal of the ai_worker container, as Terminal 1 below does, and keep it open.
All Commands, in Order
The whole setup runs in five terminals on the same PC. Close the demo of Section 3.3 first, and skip git clone if the repository is already there.
Terminal 1 · Zenoh router, in the ai_worker container
cd ~
git clone https://github.com/ROBOTIS-GIT/ai_worker.git
cd ~/ai_worker/docker
./container.sh start
./container.sh enter
zenohd
Terminal 2 · Isaac Sim, in the Cyclo Lab container set up in Section 3.2
cd ~/cyclo_lab
./docker/container.sh start
./docker/container.sh enter
python scripts/sim2real/bringup.py \
  --task Cyclo-Bringup-FFW-SH5-Tactile-v0 \
  --bridge ffw_sh5 \
  --viz kit
The robot stands on an empty floor. To add objects to grasp, see Section 3.5.
Terminal 3 · VR interface, in the robotis_applications container
cd ~
git clone https://github.com/ROBOTIS-GIT/robotis_applications.git
cd ~/robotis_applications/docker
./container.sh start
./container.sh enter
ros2 launch robotis_vuer vr.launch.py model:=sh5
- Find the PC's IP address on the network the Quest uses: run
hostname -Iin a terminal on the PC. - In the Quest browser, open
https://PC_IP:8012?ws=wss://PC_IP:8012, with that address in place ofPC_IP. If the browser warns about the certificate, choose Advanced and go on to the page. - Select Enter VR.
VR control stays off for now. You turn it on with a hand gesture after Terminal 4.
Terminal 4 · Motion controller, in the ai_worker container
cd ~/ai_worker/docker
./container.sh enter
ros2 launch cyclo_motion_controller_ros ai_worker_controller.launch.py \
  controller_type:=vr hand:=true
Terminal 5 · Mobile base (optional), in the ai_worker container
cd ~/ai_worker/docker
./container.sh enter
ros2 run ffw_teleop mobile_teleop
In this terminal, W and S drive forward and backward, A and D turn, and Space stops.
On the Meta Quest 3 · Turn on VR control
- VR control starts turned off: Terminal 3 prints
Status: VR=DISABLED. - Hold your hands close to the pose of the robot's hands. Make a fist with one hand and pinch the thumb and index finger of the other hand together, for example a fist with the left hand and a pinch with the right. Hold both for 3 seconds. Terminal 3 prints
[GESTURE] Toggle detected, counts down from 3, and then printsStatus: VR=ENABLED. - The arms start to follow about 3 seconds later, if your hands are close enough to the robot's wrists. SH5 follows your hands through the Quest's hand tracking, without controllers. The same gesture, held for 3 seconds, pauses VR control again.
If the Bringup Stops With JointState not found
If the bringup stops and the last line reads [ERROR] Command failed with code 1, the cause is printed above that line. If it is Message type sensor_msgs/msg/JointState not found in registry, after warnings with Permission denied: '/root/.cache/zenoh_ros2_sdk/...', the container cannot write to docker/zenoh_cache, the folder in which it keeps the ROS 2 message definitions for the VR bridge. This can happen in a clone that started a Cyclo Lab container before Cyclo Lab moved to Isaac Sim 6.2, because Docker then made that folder for the root user. In a terminal on the PC, give that folder back to your user, then start the bringup again:
sudo chown -R "$USER:$USER" ~/cyclo_lab/docker/zenoh_cache
If VR Control Does Not Turn On
If you restarted Terminal 3, reload the page in the Quest browser and select Enter VR again. A page opened before the restart is no longer connected.
VR control can also be turned on from a terminal of the robotis_applications container:
ros2 topic pub --once /vr/reactivate std_msgs/msg/Bool "{data: true}"
3.5 Use It in Your Own Scene
The sensor is an Isaac Lab sensor, so it can go into any Isaac Lab scene with an AI Worker SH5. Two settings turn it on: the robot reports the contacts of its fingertips, and each hand gets a HandTactileCfg.
from cyclo_lab.assets.robots import FFW_SH5_CFG
from cyclo_lab.sensors import HandTactileCfg
from isaaclab.scene import InteractiveSceneCfg
from isaaclab.utils import configclass

@configclass
class MySceneCfg(InteractiveSceneCfg):
    robot = FFW_SH5_CFG.replace(
        prim_path="{ENV_REGEX_NS}/Robot",
        spawn=FFW_SH5_CFG.spawn.replace(activate_contact_sensors=True),
    )
    tactile_left = HandTactileCfg(
        prim_path="{ENV_REGEX_NS}/Robot", hand="left", debug_vis=True
    )
    tactile_right = HandTactileCfg(
        prim_path="{ENV_REGEX_NS}/Robot", hand="right", debug_vis=True
    )
    # ... your table, objects and lights
Objects need nothing extra. When the simulation starts, the sensor finds every rigid body and collider in the scene, so the fingertips can feel any rigid object you add. An object added while the simulation runs is found at the next start. debug_vis=True opens the heatmap windows.
To read the values in your code:
# Shape: (environments, 5, 9)
readings = scene["tactile_left"].data.cell_readings.torch
# Environment 0, index finger, cell 5
index_center = readings[0, 1, 4]
Fingers and cells are counted from 0, with the thumb first, so the index finger is 1 and cell 5 is 4.
For VR, add your objects to the class SH5BringupSceneCfg in source/cyclo_lab/cyclo_lab/manager_based/bringup/config/ffw_sh5/env_cfg.py.
4. How It Works, Step by Step
In short: After every physics step, five steps turn the contacts on a fingertip into nine readings.
The code is in Cyclo Lab, under source/cyclo_lab/cyclo_lab/sensors/hand_tactile/.
4.1 Step 1 · Find the Contacts
PhysX already knows where things touch. For every contact point it reports three things: where the point is, which way the two surfaces push on each other, and the impulse, the push it took to keep the two bodies apart during that step.
PhysX places a few contact points where two shapes meet. In our scenes, a small ball pressing a pad gives one point per step, and the side of a can usually gives three. PhysX also reports points where two surfaces are close but do not press yet; they carry no force and add nothing to a reading.
After every physics step, the sensor reads the contact points of each fingertip. There is one contact report per fingertip, not one per cell. The cells come from where the points land, in Step 2.
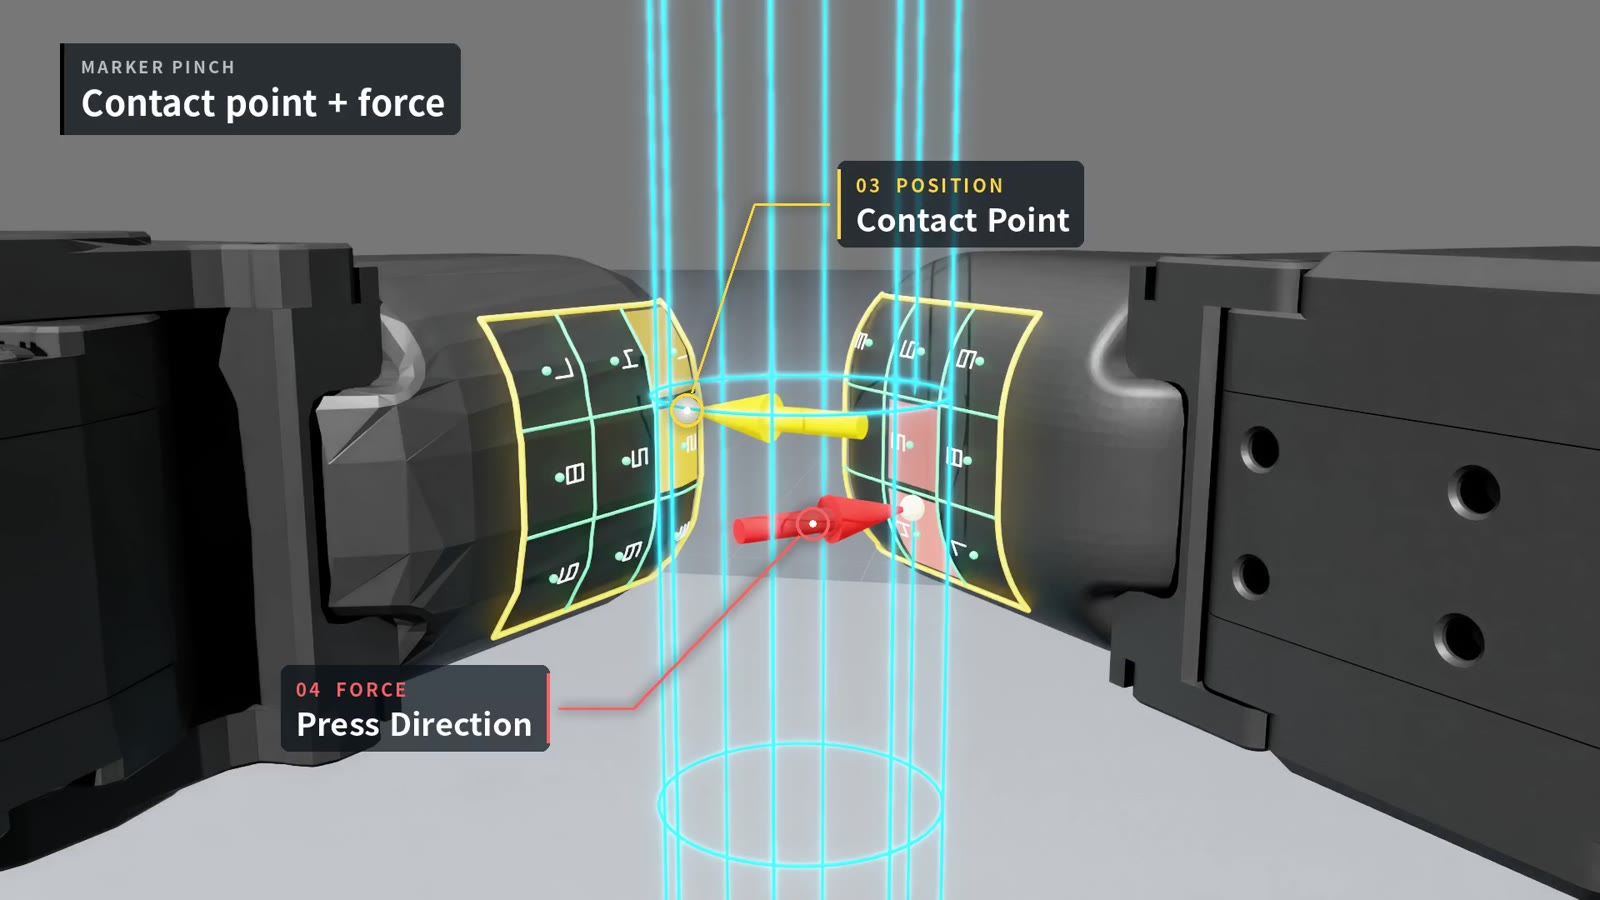
Where a pad touches the marker: the contact point.
4.2 Step 2 · Which Cell?
Each pad carries a 3 × 3 grid fixed to the fingertip, so it moves with the finger: a 15 mm square made of nine 5 mm cells, laid on the fingertip's outer surface along the pad's visible 3 × 3 layout. The cells are numbered row by row, from the row nearest the fingertip's tip (cells 1–3) to the row nearest the finger (cells 7–9). Section 6 compares where touches land with the real hand.
PhysX reports contact points from anywhere on the fingertip. The grid keeps only those on the pad and sorts them into cells, in two checks:
- Which cell, seen from the front. Looking straight at the pad, like a photo, the point lands in one of the nine cells. A point outside the 15 mm square is left out.
- On the pad's surface. The point must also lie no more than 1 mm below the pad surface, so a touch elsewhere on the fingertip does not count. This check follows the curve of the pad, so the curved cells on the sides count too.
Why allow 1 mm? PhysX works on simplified collision shapes and reports a contact a little before two surfaces meet, so a contact point can sit slightly off the visible surface. The 1 mm allows for that small gap.
From the front, a touch lands in cell 4, and one outside the 15 mm square is left out. In a cut through the pad, the 1 mm skin follows the curve, so the touch near the curved edge still counts.
One more rule is a safety net for rare cases. In our tests, the two checks above already left out touches on the side of the finger, such as a bump against a neighboring finger. A contact on the pad can still push in at a steep angle, though this was rare. The whole pad uses one direction, the pad direction: the way a straight press comes in. A push that comes in more than 45° off it is left out. The 45° limit lies halfway between a straight press (0°) and a push along the side of the finger (90°). Like the 1 mm depth, it is a setting chosen for the simulation, not a sensor specification.
Pushes at the pad's center (0°) and on its curve (24°) count. A push from the side of the finger (77°) is left out; that spot is also outside the 15 mm square.
4.3 Step 3 · How Hard?
Dividing a contact's impulse by the length of the step gives its force. We count only the part of that force that presses straight into the pad, as a pressure sensor measures pressing. Friction, the part of a push that slides along the surface, is left out: PhysX reports it separately, and the sensor does not read it.
Friction itself is not measured, but sliding still shows up: a pad that slides while it presses moves its press from cell to cell, so the lit cell moves along with it.
force of a point = |impulse · pad direction| / step time
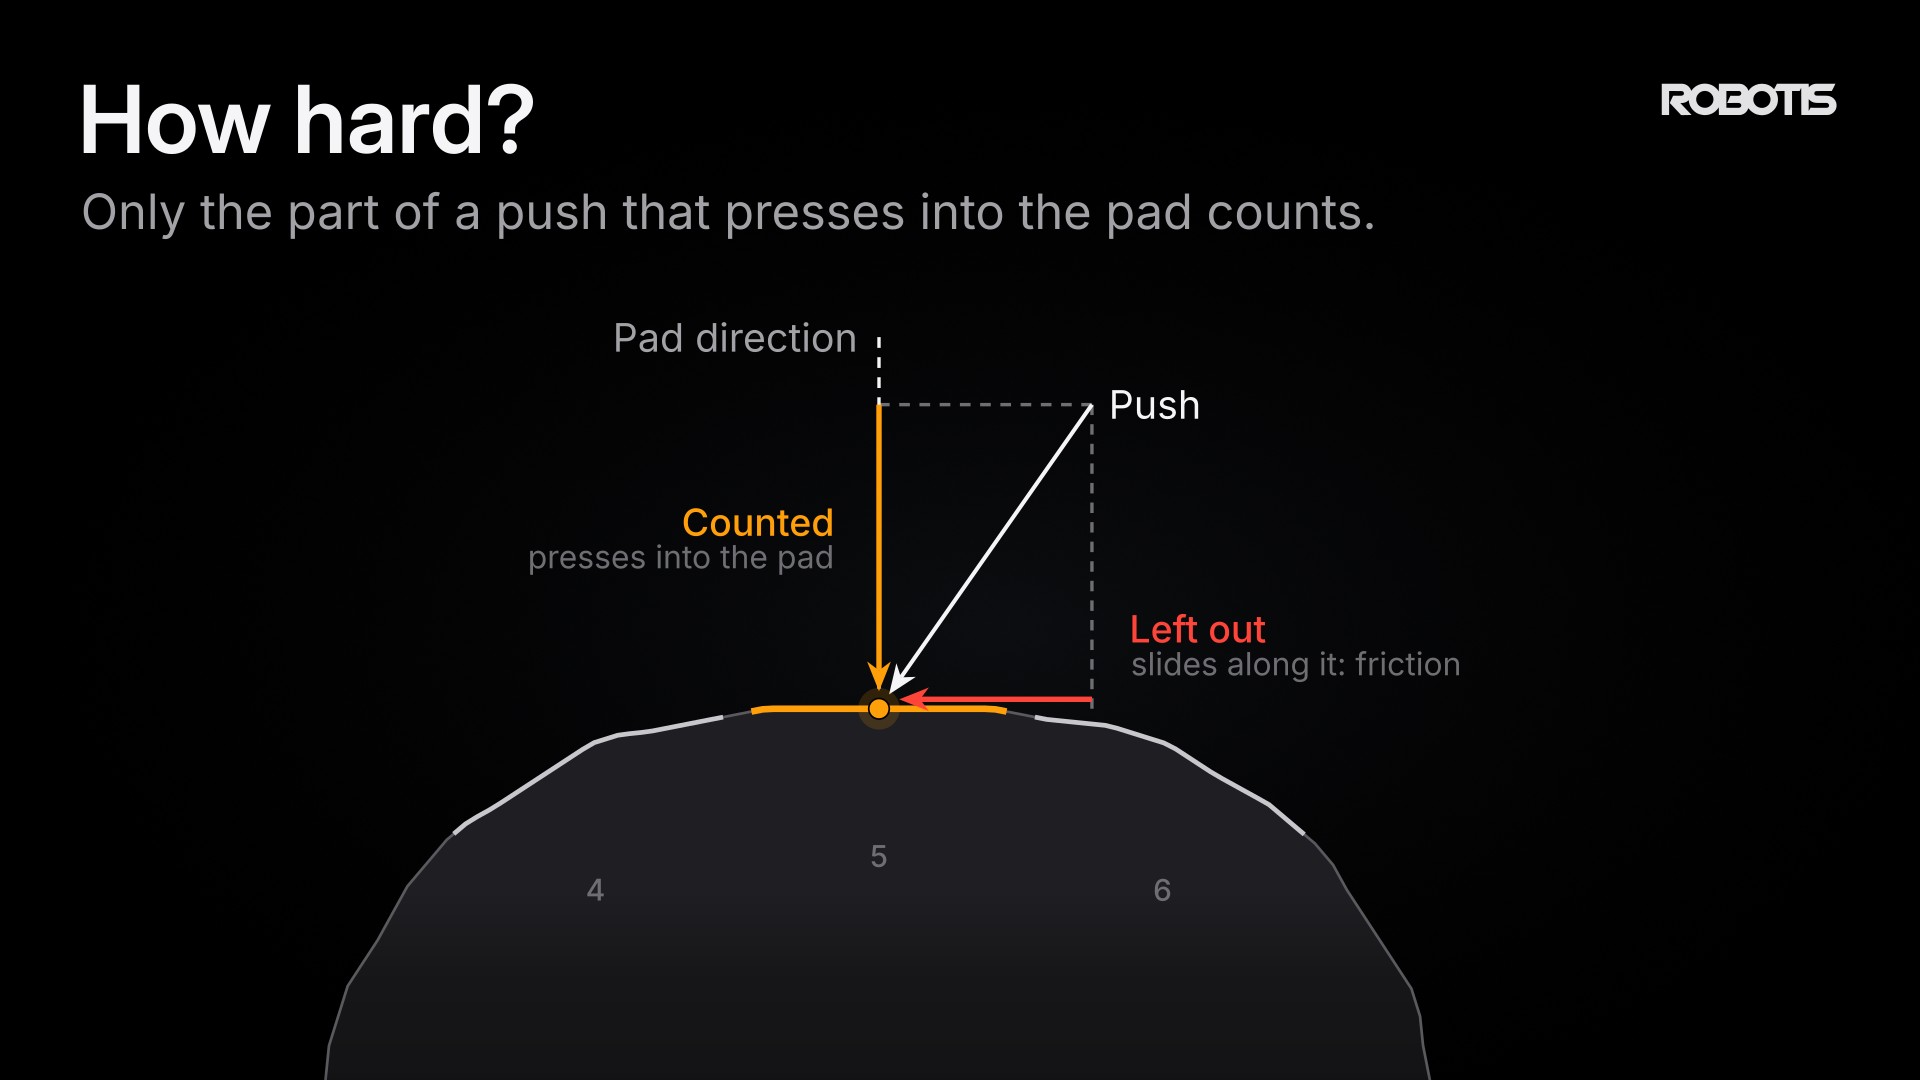
A slanted push, split in two: the part that presses into the pad counts; the part that slides along it, friction, is left out.
The dot (·) in the formula keeps only the part of the impulse that points along the pad direction. On the flat middle of the pad, the surface faces the pad direction, so a straight press counts in full. On the curve, the surface tilts away from it, and the dot keeps the force times the cosine of the tilt. The cells on the two sides of the pad (1, 3, 4, 6, 7 and 9) tilt by about 24–26°, so a press straight into their surface counts at about 90%. Cell 2, at the tip, tilts about 11°, and cells 5 and 8 are flat. This share comes from the geometry; it is not a tuned factor. Beyond 45°, the side-of-finger rule leaves the push out altogether.
The force of a point is then spread over the cells around it. PhysX reports a touch as points between rigid shapes, and each point falls in a single cell. In the can touch of Section 6, though, the real hand lit two neighboring cells where the simulated touch sat near their border. So each cell takes a share by how far the point is from the cell's center, following a Gaussian (a bell curve) with a standard deviation of 1.5 mm, and the shares add up to the point's force. A point at a cell's center keeps about 98.5% in that cell, about 0.4% goes to each cell beside it, and the diagonal cells, farther away, get almost nothing. A point 0.5 mm from a border splits about 75/25. The width is not a measurement of the real pad: it was set against one recording of the can touch in Section 6.
One touch's force shared among the cells: at a cell's center it stays in that cell, and near a border it splits between the two cells.
Each cell then adds up its shares from all the contact points. That gives one force per cell, so nine forces per fingertip, in newtons. With no contact point on the pad, every cell gets 0:
force of a cell = sum over the contact points of
                  force of the point × share of the cell
4.4 Step 4 · From Force to Reading
The real sensor does not report newtons. It reports a value from 0 to 255. Each cell's force is therefore converted with an approximate force-to-reading scale for simulation (Section 5), and capped at 255. The forces in newtons are kept as well.
4.5 Step 5 · Color It Like the Real Viewer
The heatmap colors each reading with the same rule as ROBOTIS's tactile viewer for the real hand (see Tactile Feedback Grasping). The rule brightens small readings so that light touches stay visible, and shows every reading above a ceiling, set by color_max, in full color. With the same color_max, a simulated and a real heatmap share one color scale. The sensor's heatmap uses the viewer's default, 125; the VR bringup uses 60 (Section 7).
The heatmap also smooths what it shows: a cell's color settles within about 0.1 s of a change, about as fast as the real viewer. This smoothing changes the picture only; the readings stay as computed.
Because of the spread in Step 3, a touch near the border between two cells lights both, as the real hand did in the can touch of Section 6. A touch at a cell's center lights only that cell.
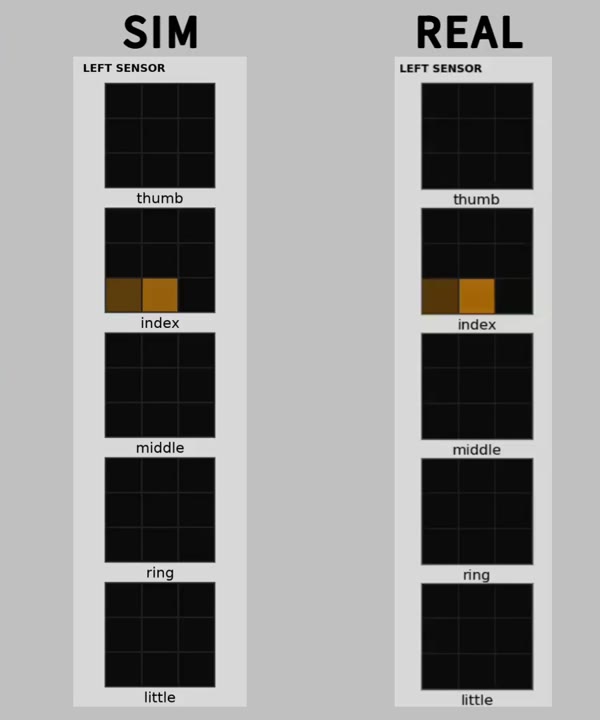
A heatmap from an earlier version of this sensor (left) and the real hand's viewer (right), during the can touch of Section 6. Both color readings with the same rule; the earlier version's brightness was tuned on this recording.
The numbers behind each step
These are the model's settings, chosen for the simulation. They are not sensor specifications. The last column names each setting in HandTactileCfg.
| Step | Setting | Value | In the code |
|---|---|---|---|
| 1 | Room for contact points in one physics step | 64 per fingertip, 320 per hand | max_contacts_per_pad |
| 2 | Pad size, cell size | 15 mm square, 5 mm cells | fixed |
| 2 | Deepest a point may lie below the pad surface | 1 mm | depth_tolerance |
| 2 | Side-of-finger rule: largest angle between a push and the pad direction | about 45° | min_normal_alignment, the cosine of that angle (0.7) |
| 3 | Spread of a point's force over the cells: standard deviation of the Gaussian | 1.5 mm | spread_sigma |
| 5 | Heatmap smoothing, picture only: how long a color takes to follow about two thirds of a change | about 35 ms | heatmap.smoothing_time_constant |
The tactile bringup task of Section 3.4 uses 3 mm and 0.3 for the two pad checks, and color_max 60 for its heatmaps (Section 7).
4.6 What Comes Out
After every physics step, each hand gives:
| Item | What it is |
|---|---|
| Layout | 5 fingers × 9 cells, from the thumb to the little finger, in the same finger order as the real hand's sensors |
| Cell numbers | 1–9, row by row from the fingertip's tip, as in Step 2 |
| Readings | One value from 0 to 255 per cell, on an approximate scale for simulation (Step 4) |
| Forces | One force in newtons per cell (Step 3), kept for analysis; the real sensor has no such value |
| No touch | Every reading and force is 0 |
In an Isaac Lab script, they are the sensor's data.cell_readings and data.cell_forces, each with one 5 × 9 block per environment.
On the real hand, the readings arrive on the ROS 2 topics /left_hand/finger_pressures and /right_hand/finger_pressures (robotis_hand). The simulated sensor does not publish these topics; its readings stay inside Isaac Lab.
5. Matching the Scale to the Real Sensor
In short: The scale from force to reading was set from a measurement of the real sensor. On the cell that was checked, a press reads close to what the real sensor read for the same force.
This scale only turns simulated forces into simulated readings. It is a rough match, so do not use it the other way, to estimate forces from the real sensor's readings.
This matters for learning: the aim is that a skill trained on simulated readings meets similar numbers on the real robot. No skill has been trained and tested this way yet. The scale was set in three steps.
| Step | What was done |
|---|---|
| 1. Measure | The real sensor was pressed with known forces, and its readings were recorded. |
| 2. Set | A force-to-reading scale for Isaac Sim was set from those recordings. |
| 3. Check | In Isaac Sim, one cell was pressed with set forces, and its readings came close to the real sensor's at those forces. |
In Cyclo Lab, this scale is the sensor's default. It is a first match, from one measurement and checked on one cell.
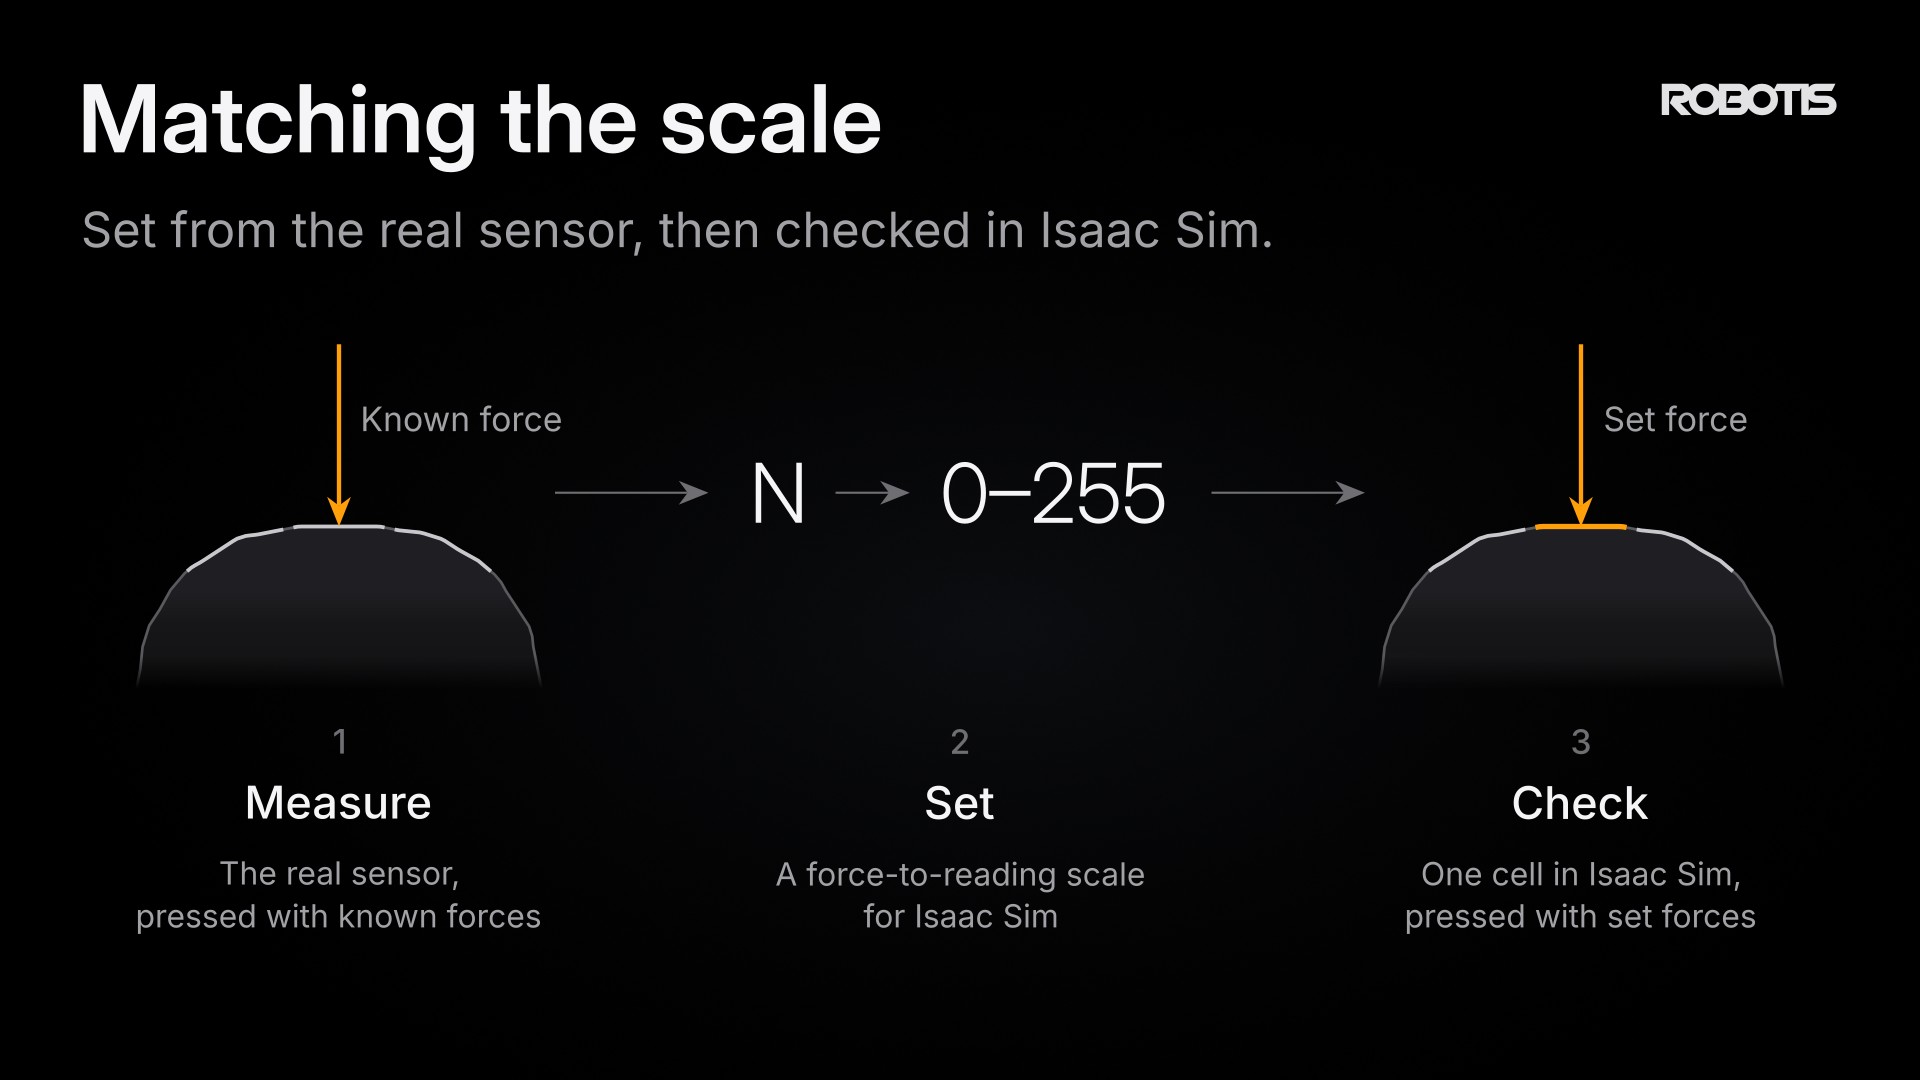
The scale is set from the real sensor, then checked in Isaac Sim.
6. Does It Light the Right Cell?
In short: In three checks, the touched cell lit up, and the simulated and the real hand lit cells in similar places.
| Check | What was done | Cells that lit up |
|---|---|---|
| Each cell | In Isaac Sim, a small ball pressed the center of the nine cells of the index pad in turn. | Only the pressed cell, nine times out of nine. |
| Same commands as the real hand | The simulated and the real left hand pressed a can with the index, middle and ring fingers in turn, with the same joint commands. | Cells 7 and 8 of each of the three pads, on the simulated and the real hand. |
| A new motion | With the settings unchanged, the simulated and the real hand pinched a 15 mm marker. | Mostly cell 4 of the thumb pad and cells 1 and 2 of the index pad, on the simulated and the real hand. |
These checks look at where a touch lands, not at how hard it presses. The can and the marker were recorded with an earlier version of the sensor, before the scale in Section 5 was set, when the spread applied to the picture only. Replayed through the current scale and spread, the recorded contacts light the same cells. The width of the spread was tuned on the can recording; the marker was not used for tuning.
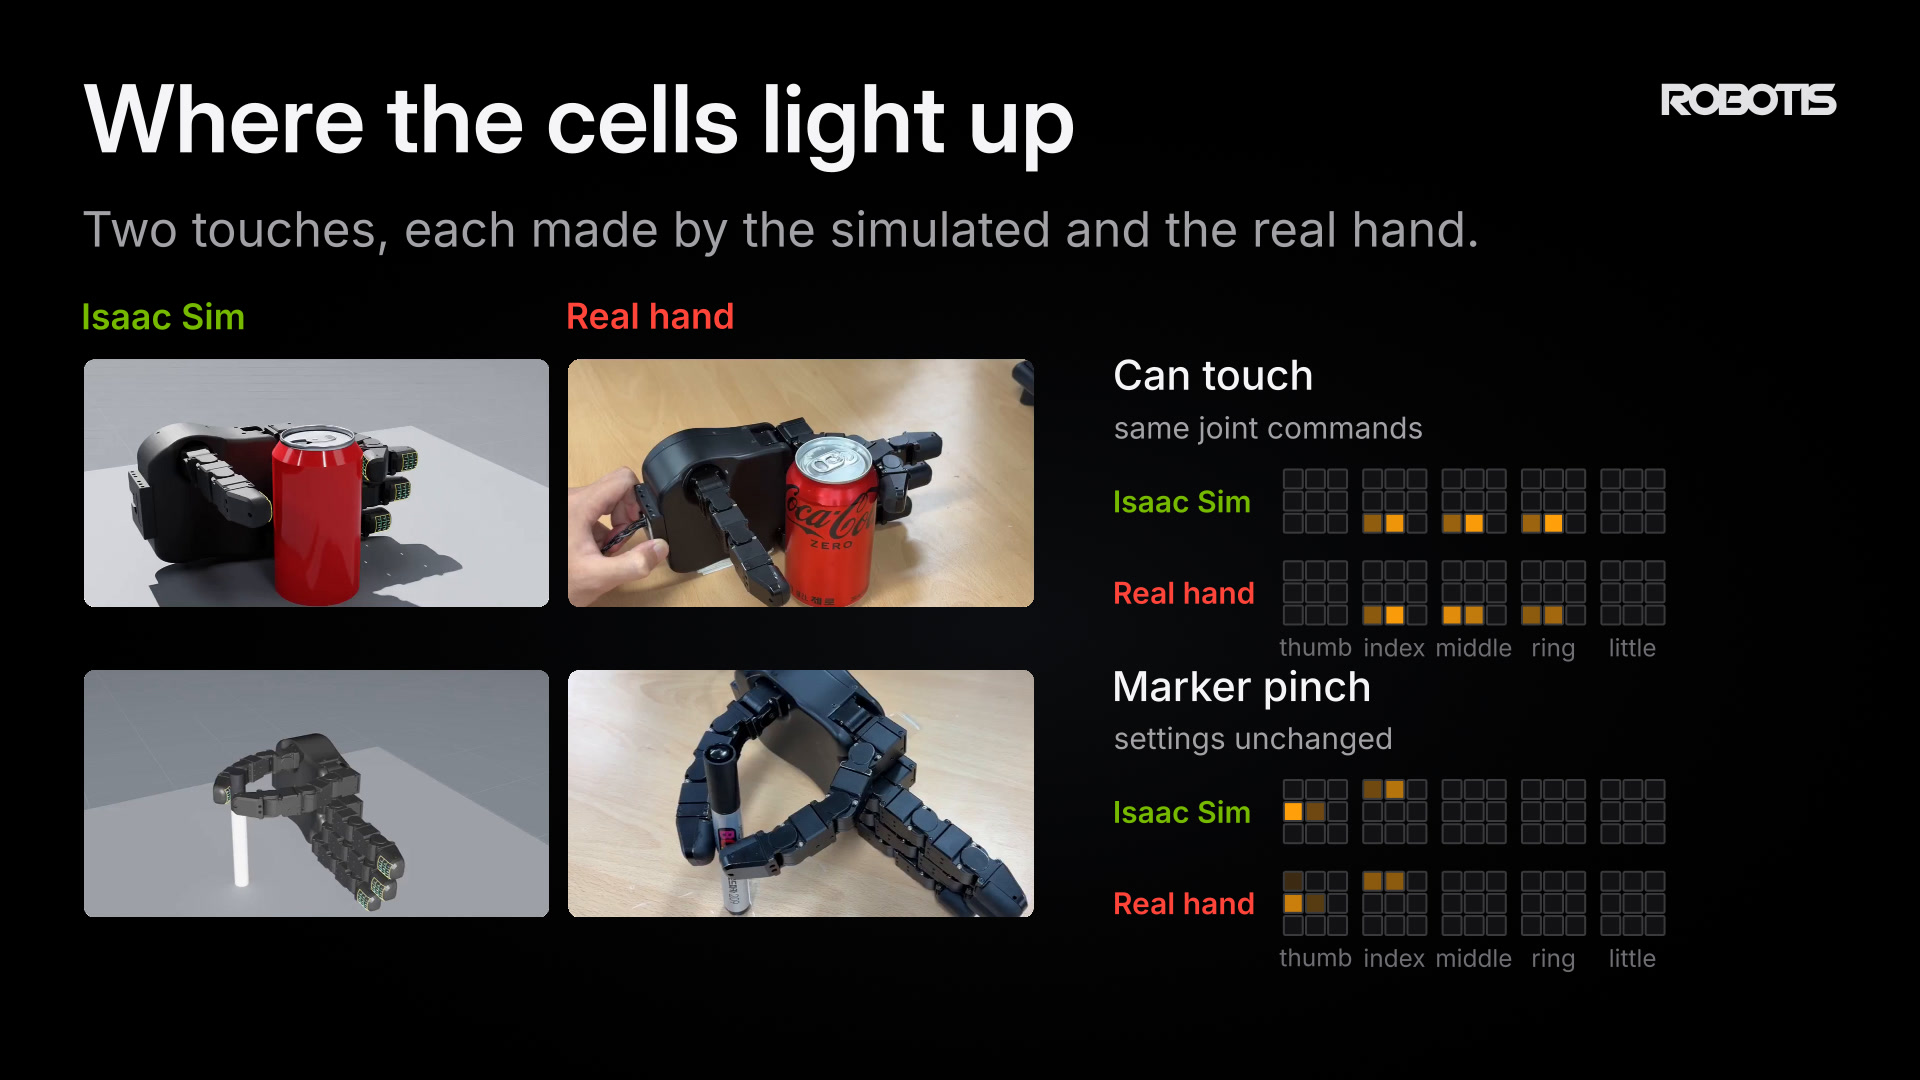
The cells that lit up on the simulated and the real hand, redrawn from both heatmap windows. Each cell shows the brightest it got during the touch.
7. On a Whole Robot: AI Worker in VR
In short: The same sensor runs on all ten fingertips of AI Worker while an operator drives it in VR.
AI Worker carries two HX5-D20 hands. With the tactile task of Section 3.4, both hands compute their fingertip readings live during VR teleoperation and show them in heatmap windows (AI Worker SH5 Isaac Sim VR Teleoperation).
Hands in VR touch objects at many angles, so the tactile bringup task checks the pads more loosely than Section 4: a contact point may lie up to 3 mm below the pad surface instead of 1 mm, and a push may come in up to about 72° off the pad direction instead of 45°. Its heatmaps also show light grasps brighter, with color_max 60 instead of the real viewer's default 125. The scale from force to reading, the spread and the heatmap's smoothing are the same.
The picture below was taken with an earlier version of the sensor. It used the same pad checks, but a different color scale and a wider spread (2.5 mm), applied to the picture only.
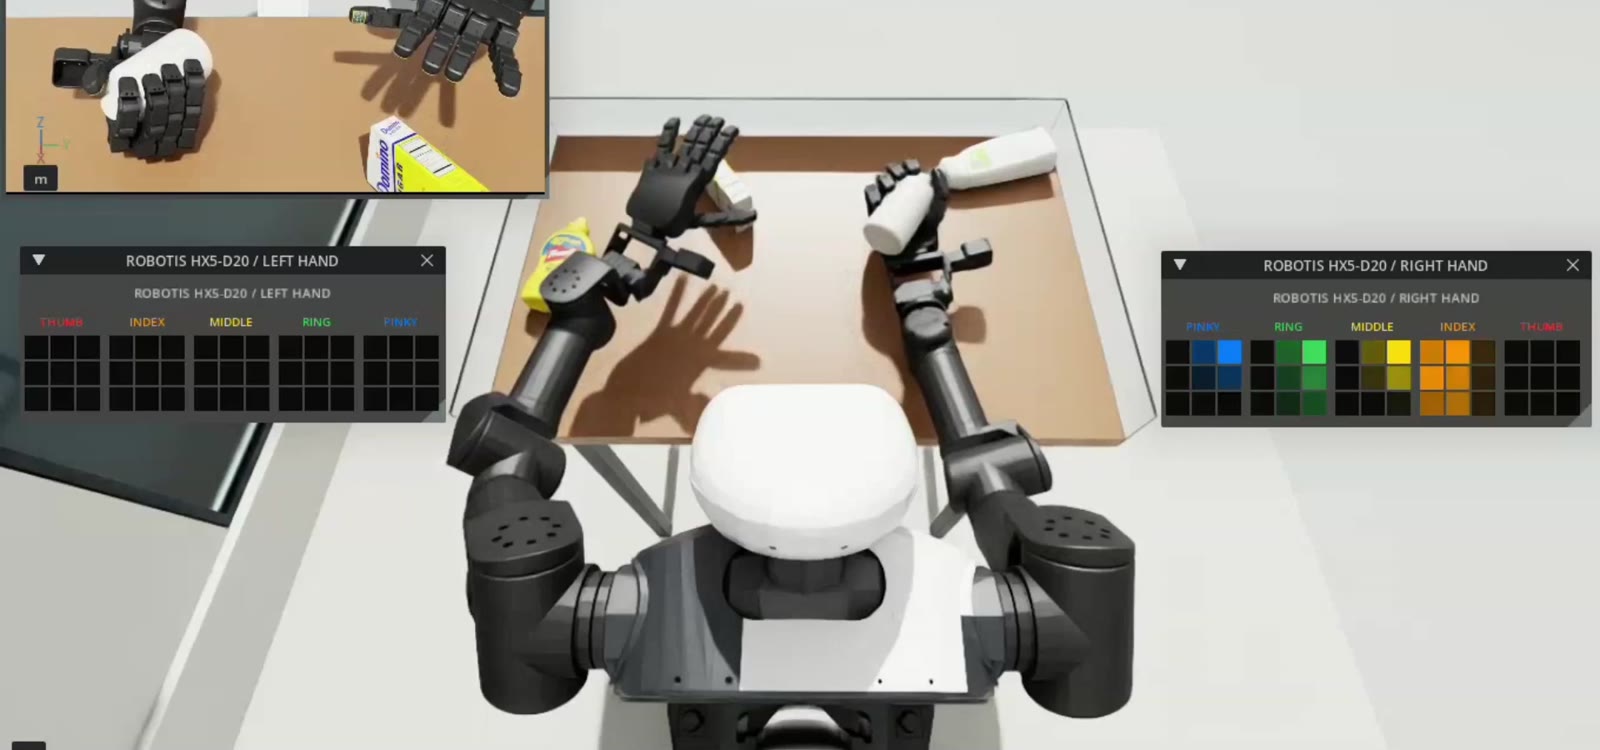
AI Worker teleoperated in VR with an earlier version of the sensor, with heatmaps for all ten fingertips.
8. Limitations
In short: Where touches land has been compared with the real hand in a few touches; how closely the readings match has been checked only in part.
| Limitation | What it means |
|---|---|
| The simulated hand's strength is not matched | Given the same joint command, the simulated fingers may press harder or softer than the real ones, because the finger motors in Isaac Sim have not been tuned to the real hand. The same command can then give different readings, even on a matched scale. |
| One direction for the whole pad | Every cell measures along the same pad direction (Section 4.3), so a press made straight into a curved side cell counts at about 90%. If each cell of the real pad measures along its own surface instead, the real side cells would read a little higher than the simulated ones. This has not been checked. |
| The spread is an estimate | Its width was set against one recording, not measured on the real pad, and it does not change with how hard a press is. PhysX still reports a touch as points, so the spread does not follow the shape of the object. |
| Cell positions are approximate | The grid follows the pad's visible layout on the fingertip's surface. Which point on the surface reaches which cell of the real pad has been checked only through the touches in Section 6. |
9. Conclusion
At the start of this story, the HX5-D20's fingertips could not sense anything in Isaac Sim. Now each fingertip reports readings in the real sensor's layout: 3 × 3 cells per pad, on an approximate scale for simulation, and colored by the real viewer's rule. In the two touches compared with the real hand, the cells that lit up were in similar places on both hands. In Cyclo Lab, one command starts a demo without any hardware, and one task name turns the sensor on during VR teleoperation. Whether a skill trained with these readings works on the real robot has not been tested yet.
A first step toward robots that learn with touch in Isaac Sim.
References
- Z.-H. Yin, B. Huang, Y. Qin, Q. Chen, X. Wang. Rotating without Seeing: Towards In-hand Dexterity through Touch. RSS, 2023.
- J. Pan, S. Coros, J. Malik, T. Lin. Beyond Binary: Sim-to-Real Dexterous Manipulation with Physics-Grounded Contact Representation. arXiv, 2026.
- S. Shang, B. Aumann, T. Brady, J. Migdal, T. Padir. Factorized Tactile Representation and Control for Sim-to-Real Manipulation. arXiv, 2026.
- HX5-D20 Hardware Specifications
- HX5-D20 Tactile Feedback Grasping
- HX5-D20: ACT with Tactile Sensors
- AI Worker SH5 Isaac Sim VR Teleoperation
- AI Worker Zenoh Communication
- Cyclo Lab