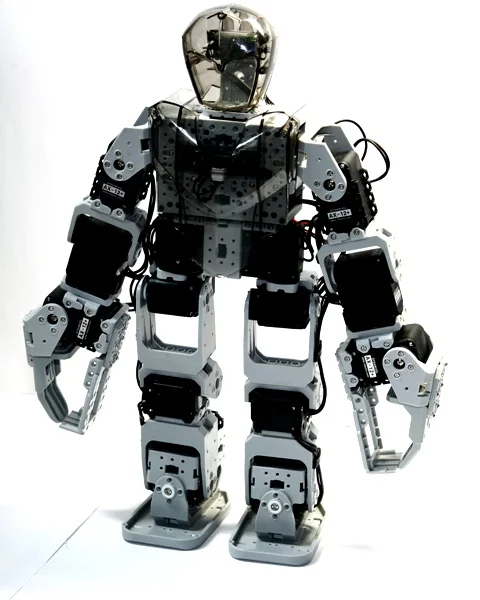
개요
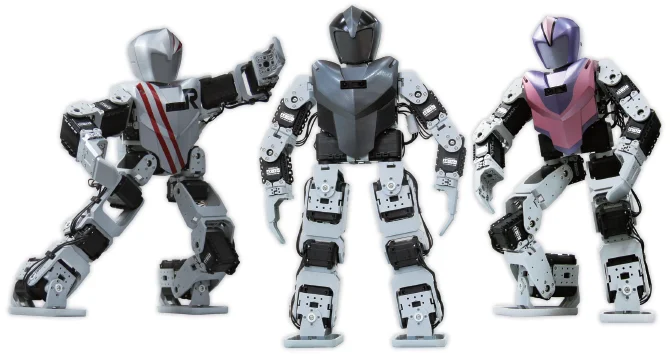
- 우수한 보행 성능의 humanoid 예제(보행 중 스스로 자세 보정)
- Gyro, Distance, IR 등 다양한 sensor 탑재
- 원격 제어 기능 지원(IR 기본, Bluetooth 선택)
- RoboPlus S/W를 이용한 C-style programming 및 motion teaching(USB interface 포함)
- 사용자 꾸미기를 위한 반투명 humanoid skin
- daisy chain topology를 사용하는 digital packet communication
- 다양한 확장 구조를 활용해 여러 형태의 로봇 제작 가능
시작하기
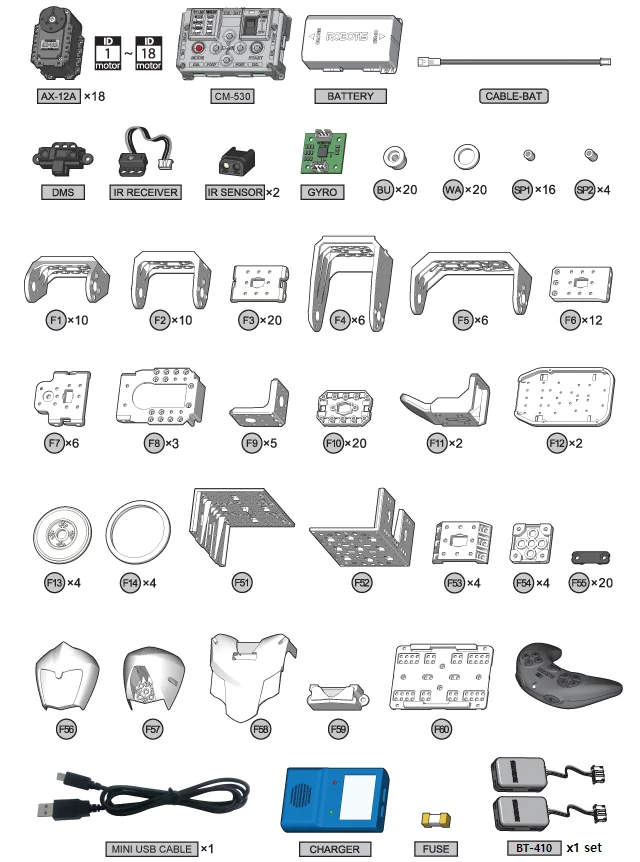
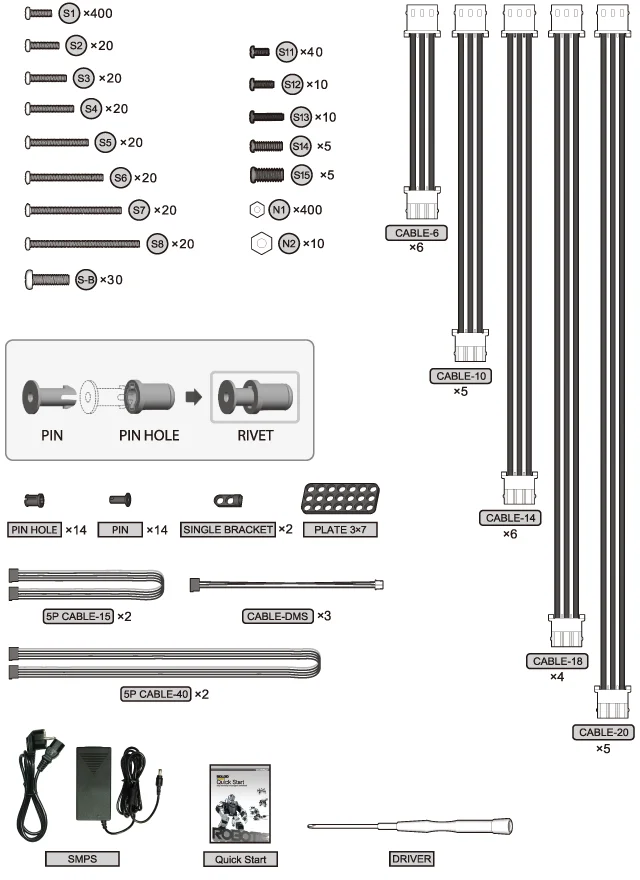
부품 목록
작동하기
프로그램 다운로드
- CM-530에는 출하 시 type A용 program이 기본으로 설치되어 있습니다.
- 다른 동작을 위한 task code와 motion file은 기본 Program 페이지에서 확인할 수 있습니다.
로봇 켜기
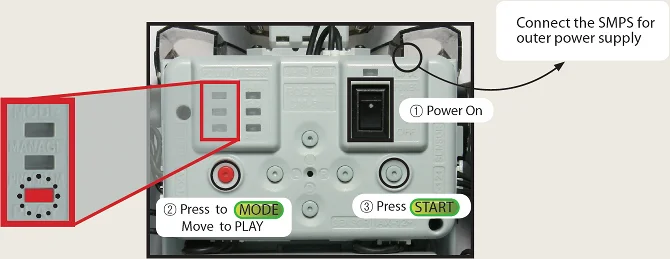
- 전원 스위치를 켜면 LED가 깜박이기 시작합니다.
- MODE 버튼을 사용해 LED를 "PLAY"로 이동합니다. MODE 버튼을 누를 때마다 LED 위치가 이동합니다.
- START 버튼을 누릅니다. "PLAY"의 LED가 깜박이는지 확인하세요.
- LED가 켜지지 않으면 전원 cable/connection을 확인하세요.
- cable에 문제가 없다면 battery를 충전하세요. 자세한 내용은 충전을 참고하세요.
전원이 켜지지 않습니다.
- battery가 올바르게 연결되어 있나요?
- battery가 충분히 충전되어 있나요?
- battery fuse가 정상인가요?
- fuse 교체 방법은 Fuse Replacement를 참고하세요.
배터리 잔량을 확인하고 싶습니다.
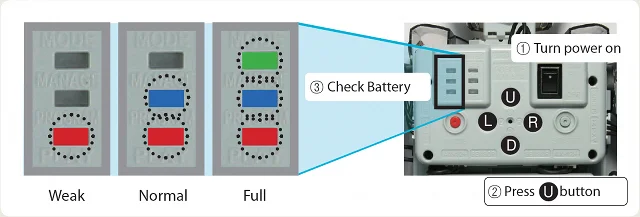
CM-530을 켠 뒤 U 버튼을 누르세요. 아래 그림처럼 LED가 켜져 battery 잔량을 표시합니다.
로봇이 움직이는 동안 계속 경고음이 납니다.
- alarm은 로봇의 battery 잔량이 부족하다는 의미입니다. 즉시 battery를 충전하세요(충전 참고).
- battery를 바로 교체하지 않으면 로봇이 예고 없이 꺼져 넘어질 수 있으며, 심각한 손상이 발생할 수 있습니다.
로봇 기본 자세 확인(로봇이 올바르게 조립되었는지 확인)
-
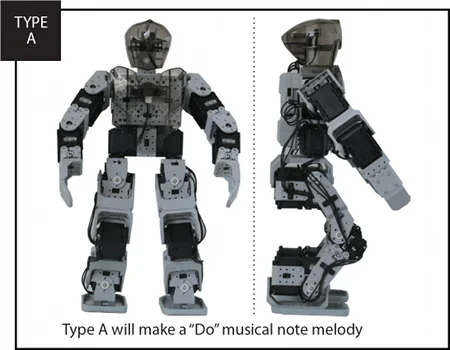
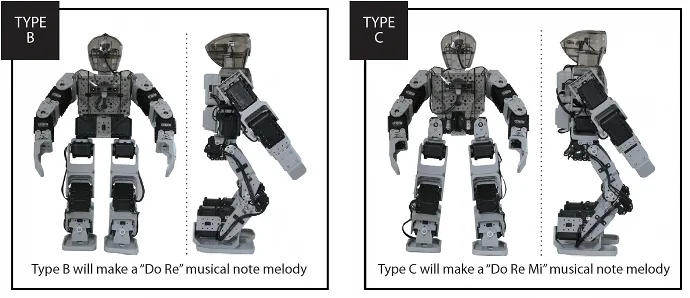
로봇은 아래 그림처럼 기본 자세를 취하고 type에 맞는 melody를 재생해야 합니다.
-
로봇이 기본 자세를 취한 상태로 1분 동안 유지하세요.
로봇이 올바르게 보행할 수 있도록 gyro sensor 기준값을 자동으로 설정하기 위한 과정입니다.
-
팔과 다리의 각도를 확인하세요. 그림과 다르다면 "Check Assembly Mode"로 돌아가세요.
-
cable이 다리 바깥쪽에 조립되어 있는지 확인하세요.
로봇이 심각하게 손상될 수 있을 정도로 잘못 조립된 경우 warning sound가 울립니다. 또한 문제가 있는 motor의 LED가 켜지고 torque가 해제되어 손상을 방지합니다.
로봇의 기본 자세와 동작이 어색합니다.
- 기본 자세가 어색한가요?
"Check Assembly Mode"로 돌아가 모든 DYNAMIXEL이 올바르게 조립되었는지 다시 확인하세요.
- Free Walk Mode에서 장애물을 감지하지 못하나요?
Absolute distance measurement sensor의 cable이 올바르게 연결되어 있는지 확인하세요.
로봇이 보행 중 쉽게 넘어지거나 불안정합니다.
- 로봇 자세를 감지하는 gyro sensor가 동작하지 않습니다.
조립서를 참고하여 gyro sensor가 올바르게 조립되었는지 확인하세요.
경고음 후 torque가 해제되고 DYNAMIXEL LED가 켜집니다.
-
motor와 frame이 올바르게 조립되지 않았거나 로봇 joint가 제대로 움직이지 못하면 손상 방지를 위해 warning sound가 울립니다.
LED가 켜진 motor를 찾고 조립서를 참고하여 올바르게 조립되었는지 확인하세요.
joint에 cable이나 다른 이물질이 끼어 있지 않은지 확인하세요. "Check Assembly Mode"를 참고하세요.
로봇 type과 melody가 일치하지 않습니다.
- ID 7 ~ 10 motor가 올바르게 조립되어 있는지 확인하고, loose connection이 없는지 확인하세요.
| Robot Type | "Do" | "Do Re" | "Do Re Mi" | Repeat "Do Re Mi" |
|---|---|---|---|---|
| TYPE A | O(올바르게 조립됨) | ID 9~10 cable 확인 | ID 7~8 cable 확인 | 일부 cable이 올바르게 연결되지 않았습니다. 조립서를 참고하여 다시 확인하세요. |
| TYPE B | - | O(올바르게 조립됨) | ID 7, 8이 연결되어야 할 위치에 ID 9, 10이 연결됨 | 일부 cable이 올바르게 연결되지 않았습니다. 조립서를 참고하여 다시 확인하세요. |
| TYPE C | - | ID 9, 10이 연결되어야 할 위치에 ID 7, 8이 연결됨 | O(올바르게 조립됨) | 일부 cable이 올바르게 연결되지 않았습니다. 조립서를 참고하여 다시 확인하세요. |
로봇 조종하기
R: Remote Control ModeD: Demo ModeL: Autonomous Walking ModeU: Check Assembly Mode

참고 : mode를 선택하기 전에 RC-100 버튼을 누르면 로봇이 remote control mode로 진입합니다.
리모컨 조종 모드
RC-100으로 로봇을 조종할 수 있습니다.
- POWER/MODE 버튼을 2초 동안 누릅니다.
- 아래 버튼을 눌러 로봇을 조종합니다.
- Walking : U / L / D / R
- Change Posture : 1 + U / L / D / R
- Demonstration Moves : 2 + U / L / D / R
- Soccer Moves : 3 + U / L / D / R
- Battle Moves : 4 + U / L / D / R

보행 동작
| Buttons | Motion |
|---|---|
| U | 앞으로 가기 |
| D | 뒤로 가기 |
| L | 왼쪽 회전 |
| R | 오른쪽 회전 |
| U + L | 전진하며 왼쪽 회전 |
| D + L | 왼쪽 옆걸음 |
| U + R | 전진하며 오른쪽 회전 |
| D + R | 오른쪽 옆걸음 |
자세 변경
| Buttons | Motion |
|---|---|
| 1 + U | 엎드려 일어나기(배를 보이고 넘어졌을 때) |
| 1 + D | 누워 일어나기(등을 보이고 넘어졌을 때) |
| 1 + L | 팔굽혀 펴기 |
| 1 + R | 물구나무 서기 |
| 2 + U | 가슴 치기 |
| 2 + D | 머리 긁기 |
| 2 + L | 환호하기 |
| 2 + R | 인사하기 |
축구 동작
| Buttons | Motion |
|---|---|
| 3 + U | 오른쪽 막기(버튼을 떼면 기본 위치로 복귀) |
| 3 + D | 왼쪽 막기(버튼을 떼면 기본 위치로 복귀) |
| 3 + L | 왼발 슛 |
| 3 + R | 오른발 슛 |
격투 동작
| Buttons | Motion |
|---|---|
| 4 + U | 공격 |
| 4 + D | 방어(버튼을 떼면 기본 위치로 복귀) |
| 4 + L | 왼쪽 공격 |
| 4 + R | 오른쪽 공격 |
CM-530 IR Channel 설정
control mode에서 CM-530에 IR receiver를 장착한 뒤 Aux 버튼을 눌러 원격 제어 channel을 설정할 수 있습니다. controller의 channel을 변경하면 RC-100의 channel도 함께 변경해야 합니다. RC-100 channel 변경 방법은 RC-100's Channel 변경 안내를 참고하세요.
| Buttons | Motion |
|---|---|
| Start + U | RC-100 channel을 1로 설정 |
| Start + D | RC-100 channel을 3으로 설정 |
| Start + L | RC-100 channel을 2로 설정 |
| Start + R | RC-100 channel을 4로 설정 |
- 일정 시간 동안 로봇이 command를 받지 못하면 앉은 자세로 standby합니다.
 |  |  |
|---|---|---|
| 조종 중 | 앉은 대기 자세 |
리모컨이 제대로 동작하지 않습니다.
- control mode로 설정하세요.
- IR receiver가 올바르게 연결되어 있는지 확인하세요.
- remote controller 전원이 켜져 있는지 확인하세요. battery를 교체한 뒤 다시 시도하세요. IR receiver를 향해 다시 시도하세요. 주변에 다른 사람이 로봇을 조종하고 있는지 확인하세요. wireless interference가 발생할 수 있습니다.
여러 대의 로봇으로 축구 또는 격투를 하고 싶습니다.
- 여러 사용자가 함께 game을 하려면 ZIG-110 set를 설치해야 합니다.
- ZIG-110 set는 Robotis shopping mall에서 구매할 수 있습니다.
- 설치 정보는 Controller와 [RC-100]을 참고하세요.
데모 모드
로봇은 사용자가 박수 친 횟수에 따라 박수를 칩니다. DMS sensor가 object를 감지하면 로봇이 사용자에게 인사합니다. 일정 시간 동안 소리나 object를 감지하지 못하면 스스로 다양한 motion을 수행합니다.
 | |  |
|---|---|---|
| 박수 횟수에 따라 박수를 침 | 다양한 동작 표시 |
자율 보행 모드
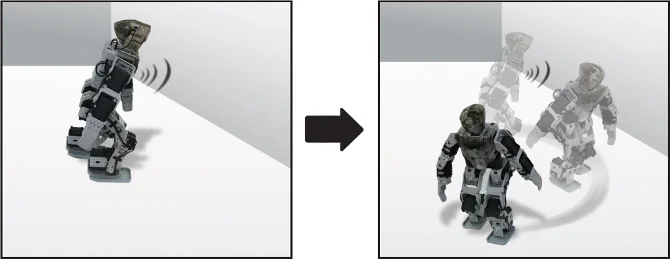
로봇은 장애물을 피하며 스스로 걸어갑니다. absolute distance sensor가 장애물을 감지하면 로봇은 정지한 뒤 장애물이 감지되지 않을 때까지 왼쪽으로 회전합니다. 보행 중 넘어지면 진행 방향에 맞춰 다시 일어납니다.
조립 확인 모드
Check Assembly Mode에서는 로봇이 올바르게 조립되었는지 확인할 수 있습니다. motor를 하나씩 분리해 standard posture와 비교하세요.
- Check Assembly Mode를 시작하면 torque가 해제됩니다.
- U 또는 D 버튼을 눌러 motor를 하나씩 확인합니다. 선택한 motor의 LED가 켜지고 기본 위치로 이동합니다. (U : ID를 1 증가, D : ID를 1 감소)
- LED가 켜진 motor의 ID를 확인하고 조립서의 ID와 비교합니다.
해당 ID가 로봇에 없으면 warning sound가 울립니다.
- 조립한 motor의 위치를 basic posture와 비교합니다.
LED는 켜져 있지만 torque가 해제되어 있다면 cable 또는 motor 조립 상태를 확인하세요.
충전
Lithium polymer battery는 www.robotis-shop-en.com에서 구매할 수 있습니다.
동작 중 로봇 alarm이 울리면 battery를 충전하세요.
충전 중에는 charger의 빨간색 LED가 켜지고, 충전이 완료되면 초록색 LED가 켜집니다.
-
battery를 꺼냅니다.

-
charger를 연결합니다.

-
충전합니다.
충전 중(빨간색 LED), 완료(초록색 LED)

-
SMPS를 통해 로봇을 외부 전원에 연결할 수 있습니다.

-
battery에는 충전용 connector와 로봇 구동용 connector가 각각 있습니다.

충전 시간 및 배터리 수명/동작
충전 시간
- 완전 방전 시 : 1~1.5시간
- battery를 완전 방전 상태로 오래 두면 수명이 크게 줄어들 수 있습니다.
- battery 충전 시간은 battery 상태에 따라 달라집니다. 충전 시간이 너무 짧거나 사용 시간이 너무 짧아지면 battery를 교체해야 할 수 있습니다.
주의
- battery를 로봇이나 charger에 계속 연결해 두지 마세요.
- battery를 장기간 사용하지 않을 경우 HALF-CHARGED 상태로 보관하세요.
- battery를 고온 또는 다습한 환경에 두지 마세요.
튜토리얼
화면 출력하기
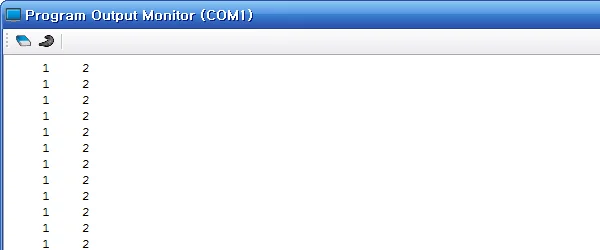
이 튜토리얼의 목표는 아래와 같이 output screen에 1과 2를 출력하는 것입니다.
Task Code 작성
-
RoboPlus Task Program을 실행합니다.
아래 그림처럼
Start > All Programs > ROBOTIS > RoboPlus > Software > RoboPlus Task로 이동해 RoboPlus Task를 실행합니다.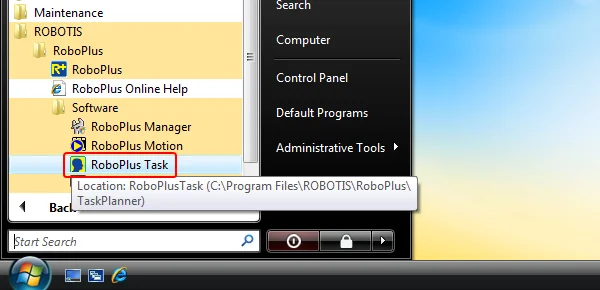
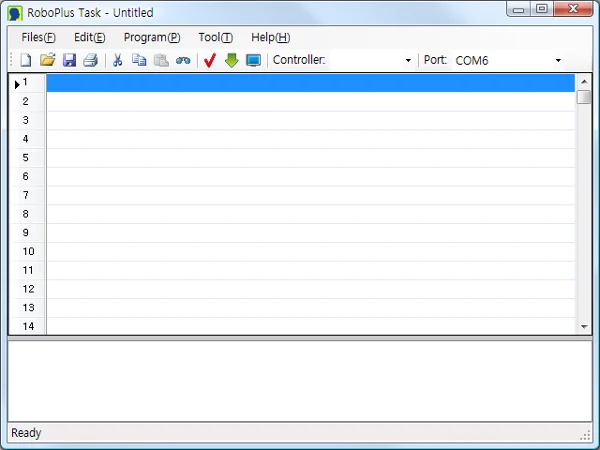
- RoboPlus Task 초기 화면
-
Controller를 선택합니다.
빈 줄을 double click하거나
Enter를 누릅니다.Select Controlwindow에서 사용할 controller를 선택한 뒤OK버튼을 누릅니다.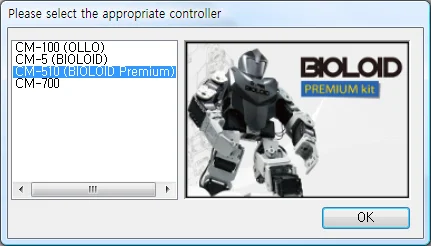
-
Start Program생성Select Instruction Typewindow에서Start Program을 선택하면 RoboPlus Task에Start Program이 자동으로 생성됩니다.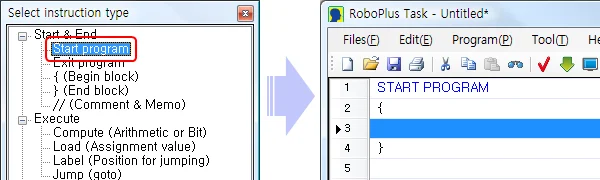
-
Endless Loopcommand 입력숫자를 화면에 계속 출력하려면
Endless Loopcommand를 사용합니다(command line 생성). Start Program의{와}사이 빈 줄을 double click하거나Enter를 눌러Select Instruction Typewindow를 엽니다. 목록에서Loop > Endless Loop(while(1))를 선택합니다.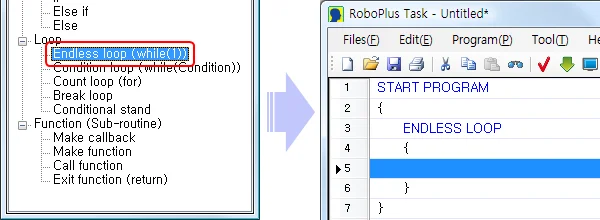
-
Loadcommand 입력화면에 숫자를 출력하는 데 필요한
Printcommand를 입력하기 위해Loadcommand를 사용합니다.Endless Loop의{와}사이 빈 줄에Execute > Load (Assignment value)를 삽입합니다.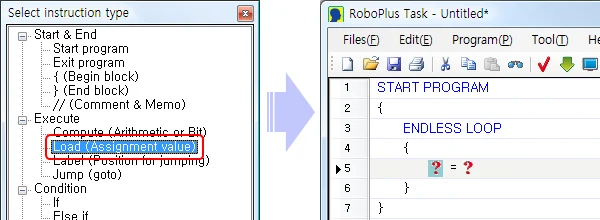
-
Print에1loadLoadparameter 중 왼쪽 parameter(?)를 선택합니다(parameter 설명). 왼쪽 parameter는 오른쪽 parameter의 입력을 받습니다. 왼쪽 parameter(?)를 double click하거나 한 번 클릭한 뒤Enterkey를 눌러Select Parameter Window를 엽니다.Controller > Print를 선택한 뒤OK를 누릅니다.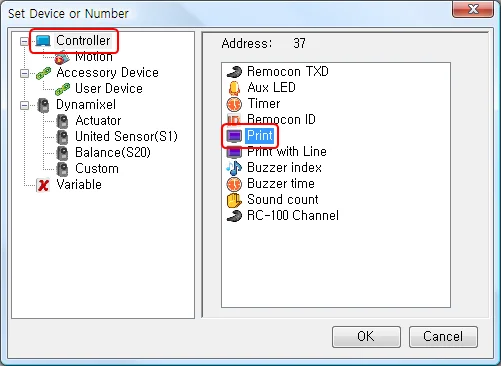
같은 방법으로 오른쪽 parameter(?)에는
Constant Numbers > Number > 1을 선택합니다.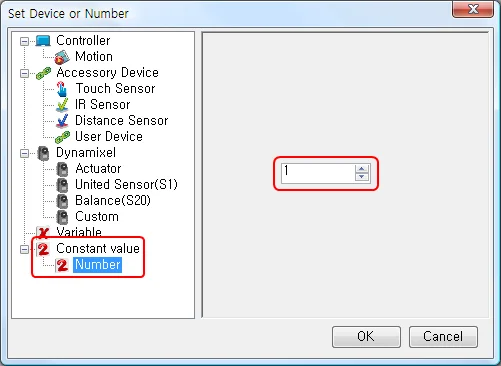
Loadcommand의 두 parameter가 모두 설정되면 아래와 같이 표시됩니다.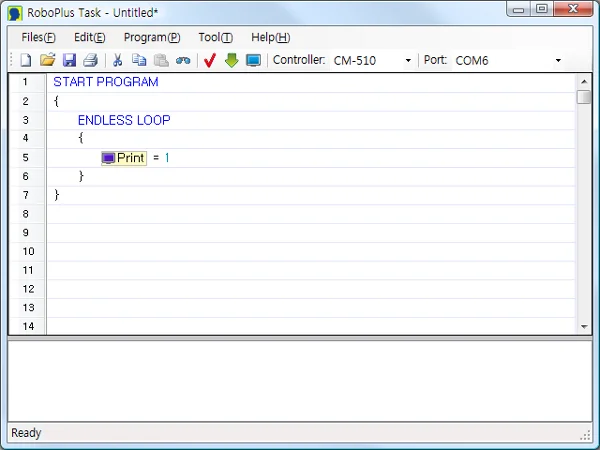
-
Print with Line에2loadPrintcommand 아래의}(endless loop section 끝)을 선택하고Spacekey를 눌러 새 줄을 추가합니다. 5, 6단계를 반복해Loadcommand를 입력하고Controller > Print with Line및2를 입력합니다. 최종 task code는 아래와 같습니다.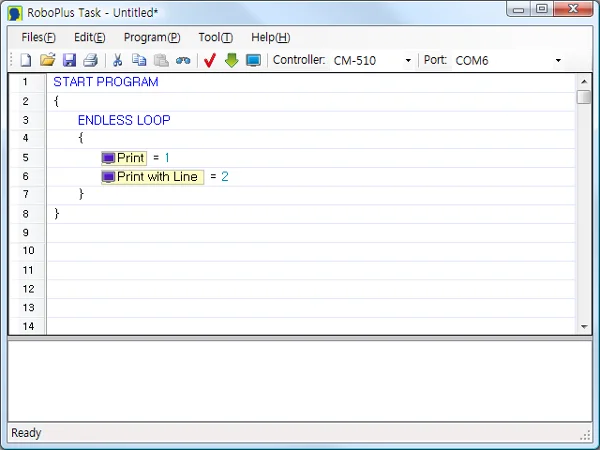
-
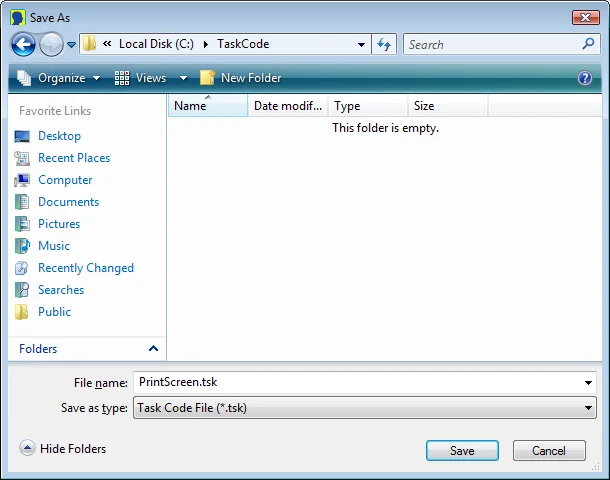
Task Code 저장
Ctrl + S 또는 Save icon을 누릅니다.
Task Code 다운로드
위에서 생성한 task code를 다운로드합니다.(Task Code 다운로드 방법)
Task Code 실행
-
Program Output Monitor 열기
program 출력을 확인하려면 program을 실행하기 전에 Program Output Monitor를 먼저 열어야 합니다. Program Output Monitor를 여는 방법은 세 가지입니다.
-
Download Program window에서 View Print of Program을 클릭합니다.
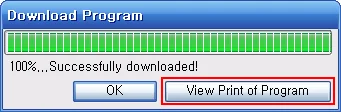
-
TOOLS에서
View Print of Program버튼을 클릭합니다. -
F5를 누르거나 Program (P) 아래의 View Print of Program (V) menu를 클릭합니다.
-
-
Program 실행
controller를 켜면 LED가 깜박이며 standby mode임을 표시합니다. MODE 버튼을 눌러 PLAY로 이동한 뒤 START를 눌러 다운로드한 task code를 실행합니다. Program Output Monitor에 "1"과 "2"가 출력되는 것을 확인할 수 있습니다.
버튼과 LED
이 튜토리얼의 목표는 U 버튼을 누르면 AUX LED가 켜지고 D 버튼을 누르면 꺼지도록 programming하는 것입니다. START 버튼을 누르면 program이 종료됩니다.
Task Code 작성
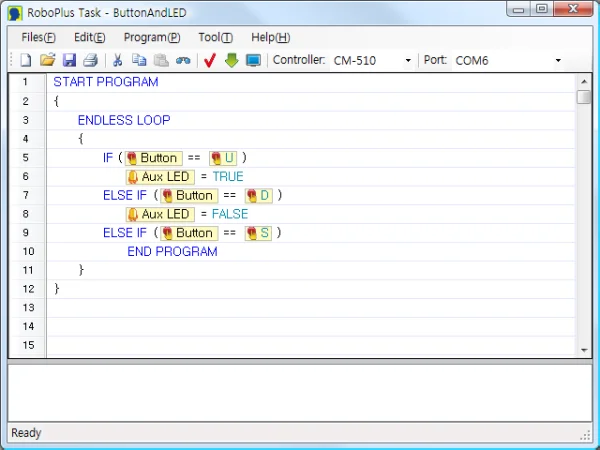
Task Code 다운로드
위에서 생성한 task code를 다운로드합니다.(Task Code 다운로드 방법)
Task Code 실행
program을 실행한 뒤 U 버튼을 누르면 AUX LED가 켜지고 D 버튼을 누르면 꺼지는지 확인합니다. 종료하려면 START 버튼을 누릅니다.
Walking Machine
이 튜토리얼의 목표는 Walking Machine 사용 방법을 익히는 것입니다.
Walking Machine은 특정 pattern으로 구성된 walking motion file과, 이 motion file의 walking motion들을 부드럽게 연결하는 역할의 task code를 합친 것입니다.
Walking Machine을 사용해 walking motion이 부드럽게 전환되는 방법을 알아봅시다.
Motion File 살펴보기
Walking Motion File
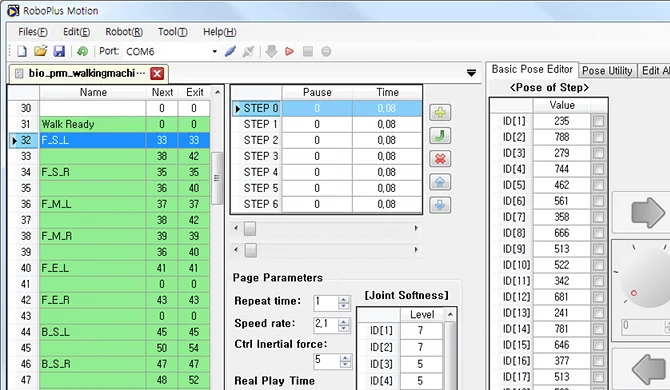
Walking Machine에 사용되는 walking motion file은 31~224 page에 있습니다. 여러 motion page가 모여 반복 실행되면서 하나의 walking pattern(forward, backward 등)을 구성합니다. 각 page는 다음 walking pattern의 motion page로 쉽게 전환되도록 만들어져 있습니다.
Walking Motion File에 작성된 walking pattern
Walking Machine에 사용되는 walking motion file에는 아래와 같은 16가지 walking pattern이 포함되어 있습니다.
| Forward | Backward | Left Turn | Right Turn |
|---|---|---|---|
 |  |  |  |
| Walk Sideways + Left | Walk Sideways + Right | Turn Left + Forward | Turn Right + Forward |
|---|---|---|---|
 |  |  |  |
| Backward + Left | Backward + Right | Avoid Left | Avoid Right |
|---|---|---|---|
 |  |  |  |
| Forward + Left Diagonally | Forward + Right Diagonally | Backward + Left Diagonally | Backward + Right Diagonally |
|---|---|---|---|
 |  |  |  |
Task Code 살펴보기
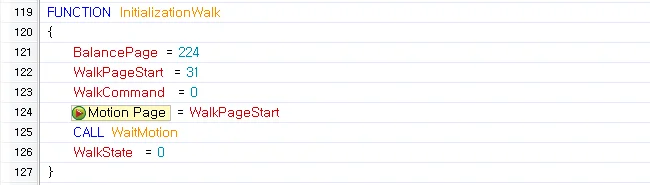
walking machine task code에는 InitializationWalk Function과 WalkExecute function이 포함되어 있습니다. 이 두 function을 사용해 remote controller로 로봇을 제어하는 sample이 들어 있습니다.
InitializationWalk Function
InitializationWalk function은 변수를 초기화하고 로봇을 기본 위치로 이동시킵니다.
WalkExecute Function
WalkExecute function은 각 walking pattern을 실행하고 walking pattern 간 전환을 부드럽게 연결합니다.
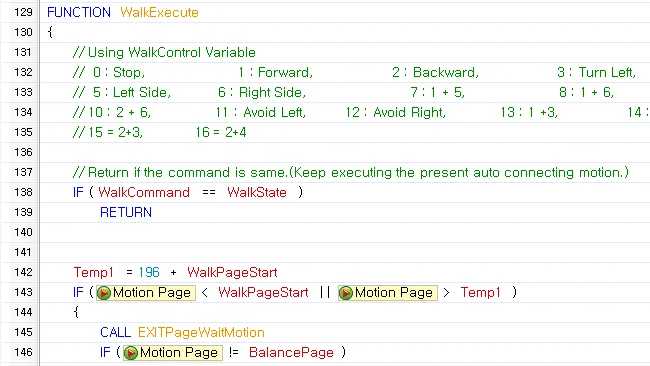
Walk Command No.
| No. | Walking Pattern | No. | Walking Pattern | No. | Walking Pattern | No. | Walking Pattern |
|---|---|---|---|---|---|---|---|
| 1 | Forward | 2 | Backward | 3 | Left Turn | 4 | Right Turn |
| 5 | Walk Sideways + Left | 6 | Walk Sideways + Right | 7 | Turn Left + Forward | 8 | Turn Right + Forward |
| 9 | Backward + Left | 10 | Backward + Right | 11 | Avoid Left | 12 | Avoid Right |
| 13 | Forward + Left Diagonally | 14 | Forward + Right Diagonally | 15 | Backward + Left Diagonally | 16 | Backward + Right Diagonally |
Start Program
walking pattern을 부드럽게 연결하기 위해 "InitializationWalk" function과 "WalkExecute" function을 사용하는 간단한 “Start Program” sample을 작성해 봅시다.
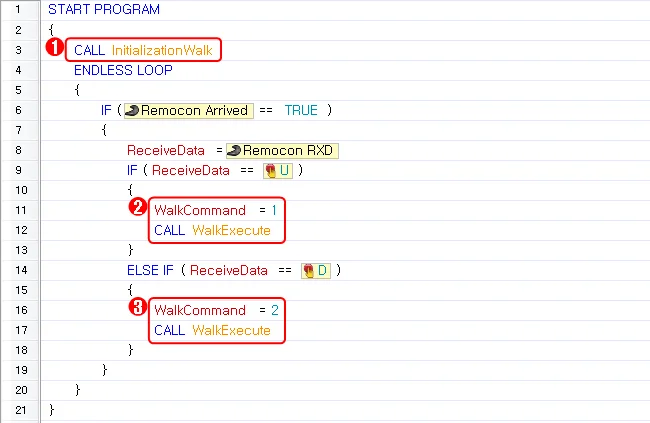
- 먼저
InitializationWalkfunction을 호출해 변수를 초기화하고 로봇을 기본 위치로 이동시킵니다. WalkCommand변수에 0~16 사이의 walking pattern을 선택해 입력한 뒤,WalkExecutefunction을 호출해 선택한 walking pattern을 실행합니다.WalkCommand변수에 다른 번호를 입력하고WalkExecutefunction을 호출하면 가능한 자연스럽게 새로운 walking pattern으로 전환됩니다.
walking machine의 task code file에는 remote control로 제어할 수 있는 16가지 walking pattern sample code가 들어 있습니다. 필요에 맞게 sample code의 Start Program function을 변경하세요.
Gyro Sensor 보정
- 선행 학습 : Walking Machine
[Walking Machine] section에서 사용한 task code에 gyro sensor 제어 code를 추가합니다. 시작하기 전에 [Walking Machine] section을 먼저 확인하세요.
이 튜토리얼의 목표는 gyro sensor를 사용해 humanoid의 자세를 보정하는 방법을 익히는 것입니다.
Gyro sensor는 angular velocity(초당 각도 변화량)를 확인하는 데 사용됩니다. 로봇이 기울어져 특정 방향의 angular velocity가 증가하면 servo motor 값을 반대 방향으로 조정해 로봇 자세를 바로잡을 수 있습니다.
다운로드 TASK Code(BIO_PRM_GyroSensorExam_EN.tsk)
준비 사항
- gyro sensor의 X-axis 값은 port #3에, Y-axis 값은 port #4에 연결되어야 합니다.
- 그 외의 경우에는 task code를 사용자의 로봇에 맞게 수정하세요.
개념
-
gyro를 사용하는 humanoid는 Callback Function을 이용해 posture adjustment value를 계산합니다. callback function은 main program routine과 독립적으로 동작하며 고정 간격으로 자동 실행되는 function입니다. 따라서 일정 간격으로 adjustment value를 계산하고 callback function에서 그 값을 사용해 자세를 보정하면 로봇이 자동으로 자세를 조정할 수 있습니다.
-
joint offset은 gyro sensor에서 얻은 adjustment value에 더해져 humanoid 자세 보정에 사용됩니다. 자세한 내용은 Joint Offset을 참고하세요. 이는 특정 actuator의 joint position value에 offset을 주는 parameter입니다. 따라서 joint offset이 설정된 actuator는 motion file에 지정된 position value + joint offset value를 사용해 motion을 실행합니다.
Task Code 살펴보기
InitializationGyroCall Function

- Joint Offset 적용을 위한
BalancePage실행
joint offset을 적용하려면 motion이 실행되어야 합니다. motion이 재생되지 않는 상태에서는 gyro sensor에서 값이 입력되어도 joint offset이 적용되지 않습니다. BalancePage는 motion이 실행되지 않을 때 joint offset을 적용하기 위해 사용됩니다.

InitializationGyroFunction
InitializeGyro function은 gyro sensor 값을 0.128초 간격으로 10회 읽고 평균값을 gyro sensor standard value로 저장합니다. standard value는 약 250입니다. gyro sensor 값이 230보다 작거나 270보다 크면 gyro sensor가 없는 것으로 판단하고 adjustment를 사용하지 않습니다. 이는 gyro sensor가 없거나 initialization 중 로봇이 움직인 경우입니다.
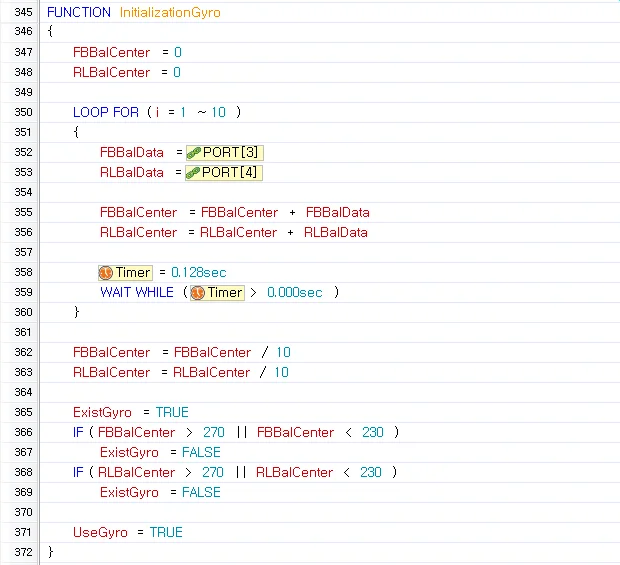
Callback Function에서 adjustment value 계산
callback function은 일정 간격으로 현재 gyro sensor 값을 읽고 standard value와 비교해 adjustment value를 계산합니다. UseGyro 변수가 false이면 로봇은 자세 보정을 수행하지 않습니다. 따라서 gyro adjustment를 사용하지 않을 구간에서는 UseGyro 변수를 false로 설정하세요.
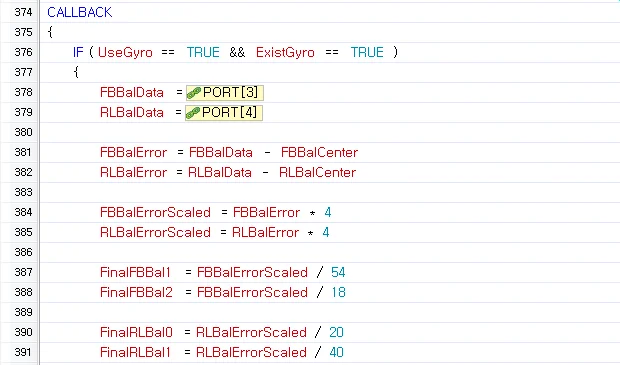
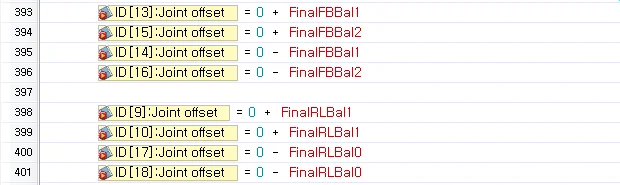
계산된 adjustment value를 joint offset에 적용해 로봇 자세를 보정합니다. 앞/뒤 기울어짐을 보정하려면 무릎과 발목 joint인 actuator 1316을 사용해야 합니다. 좌/우 기울어짐을 보정하려면 발목과 허리 joint인 actuator 910 및 17~18을 사용해야 합니다.
보정 테스트
- task code를 로봇에 다운로드합니다(Task Code 다운로드 방법).
- gyro를 initialize하려면 task code 실행 후 로봇을 평평한 바닥에 최소 1.5초 이상 세워 두어야 합니다. gyro sensor가 연결되어 있지 않거나 gyro initialization 중 움직임이 있으면 gyro adjustment를 수행하지 않습니다.
- 똑바로 서 있는 상태에서 강한 외부 힘으로 자세가 변했을 때 로봇이 스스로 보정하려고 하는지 확인하세요.
- 경사면에서 gyro를 사용할 때와 사용하지 않을 때 로봇 동작을 비교하세요.
Custom Motions(Create)
선행 학습 : [Walking Machine]
"Walking Machine" section에서 사용한 motion file에 motion을 추가합니다. 시작하기 전에 "Walking Machine" section을 먼저 확인하세요.
이 튜토리얼의 목표는 RoboPlus Motion을 사용해 새 motion을 추가하는 것입니다.
RoboPlus Motion program을 사용해 아래 4가지 motion을 추가하는 방법을 알아봅시다.
| Motion Page No | Movement Description | Motion Page No | Movement Description |
|---|---|---|---|
| 14 | 오른쪽 공 막기 | 27 | 엎드려 일어나기 |
| 16 | 왼쪽 공 막기 | 28 | 누워 일어나기 |
다운로드 Motion File(BIO_PRM_UserMotionExam_EN.mtn)
오른쪽 공 막기 motion 만들기
- RoboPlus Motion을 실행한 뒤 controller에 연결합니다(Connect Robot 참고).

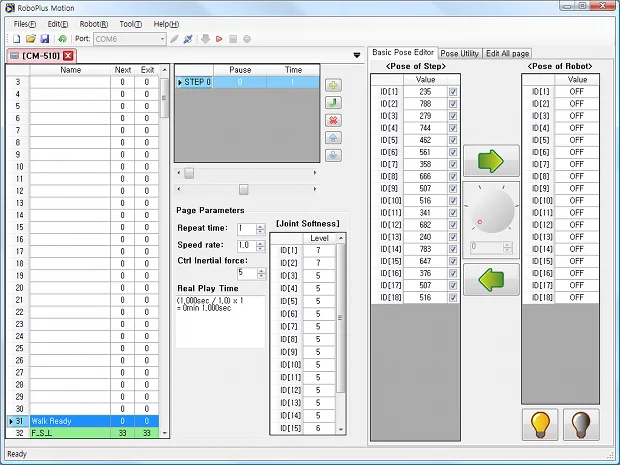
- page 14에 “Block Ball” motion을 추가하려면 name과 step을 입력합니다.

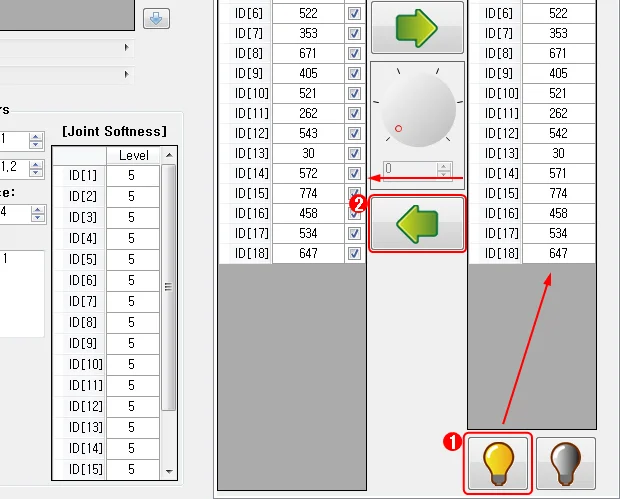
- 모든 motor를 끈 뒤 로봇의 pose를 설정합니다. 아래는 "Block ball on the right" pose입니다.
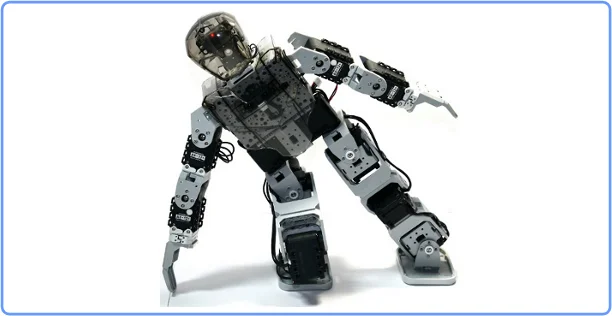
- 위와 같이 로봇 pose를 설정합니다. "torque on" 버튼을 누르면 로봇의 현재 actuator 값이 자동으로 저장됩니다. 왼쪽 화살표 버튼을 누르면 현재 입력된 actuator 값을 Step의 Pose column으로 읽어올 수 있습니다.
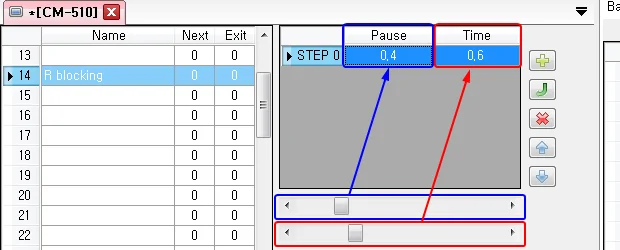
- pause와 play duration을 조정할 수 있습니다. 자세한 내용은 STEP STOP/PLAY를 참고하세요.
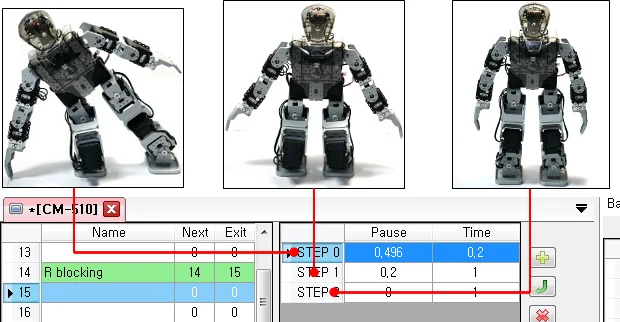
- NEXT page를 자기 자신(14)으로 지정하면 로봇이 infinite loop에 진입해 pose를 유지합니다. infinite loop에서 빠져나올 때 부드럽게 전환되도록 EXIT page도 지정하세요.

- Exit page로 지정한 page 15에 standard position으로 돌아가는 motion을 만듭니다. page 15에 아래 3개의 step과 pose를 추가하세요.
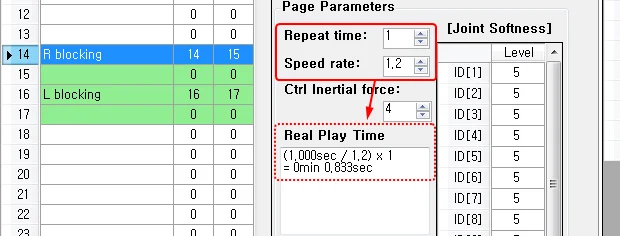
각 page의 반복 횟수, 전체 speed 등을 추가로 설정할 수 있습니다.
왼쪽 공 막기 motion 만들기
STEP 1을 반복해 page 16과 17에 왼쪽 공 막기 motion을 만듭니다.
로봇이 누워 있거나 엎드려 있을 때 일어나는 motion 만들기
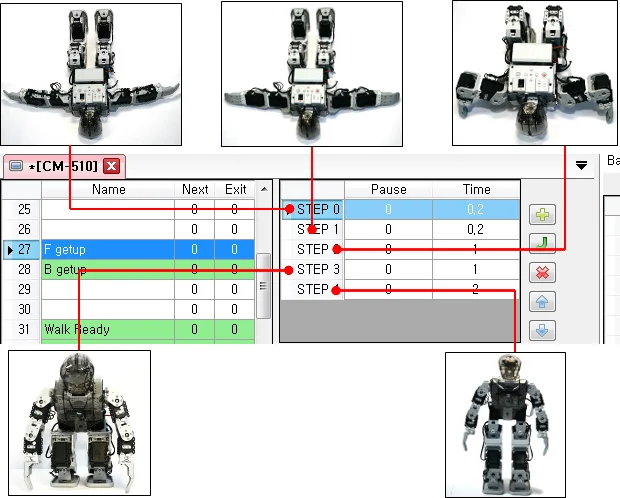
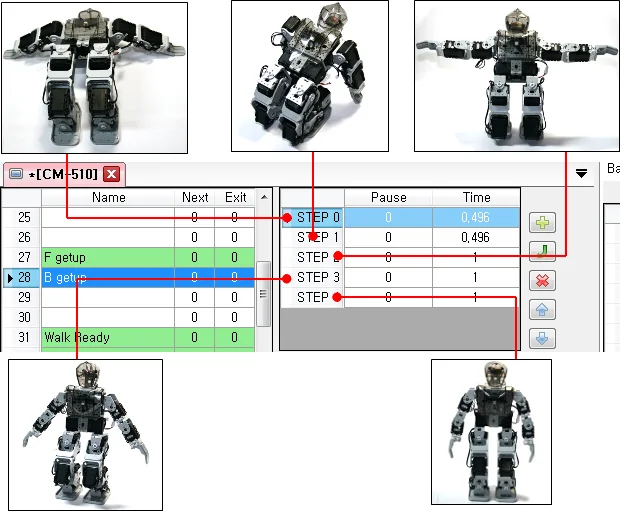
motion page 27과 28에 아래 step을 추가해 "Get up while lying on stomach" 및 "Get up while lying on back" motion을 만듭니다.
-
엎드려 일어나기
-
누워 일어나기
저장
Save(S) command를 사용해 작업 내용을 로봇에 저장하거나 Save As(A)로 PC에 .mtn file로 저장합니다.

Custom Motions(Task Code)
선행 학습 : Adjustment using the Gyro Sensor, Custom Motions: Create
Adjustment using the Gyro Sensor section에서 사용한 task code에 user-defined motion을 실행하는 code를 추가합니다. motion file은 Custom Motions: Create section의 결과물입니다. 시작하기 전에 두 section을 먼저 확인하세요.
user-defined motion을 실행하는 task code 작성
"User-defined Motions 1 : Create Motion"에서 추가한 motion을 RC-100으로 실행하는 방법을 알아봅시다.
Task Code 살펴보기
"Adjusting using the Gyro Sensor"에서 작성한 task code에 user-defined motion을 실행하는 code가 추가되어 있습니다.
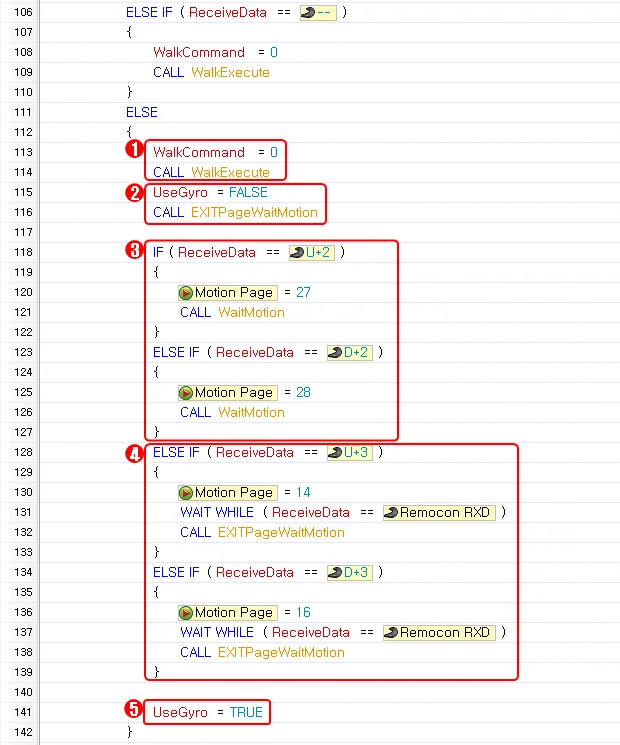
WalkCommand를 0으로 설정해 로봇을 정지시킵니다.- 사용자가 추가한 motion이 자세 유지를 위한 gyro sensor를 필요로 하지 않는다면, offset으로 인한 motion 변형을 방지하기 위해 gyro sensor adjustment를 꺼야 합니다.
UseGyro변수를 FALSE로 설정하세요. 그런 다음EXITPageWaitMotionfunction을 호출하고 로봇이 완전히 멈출 때까지 기다립니다. - motion page 27과 28에 추가한
Getting Upmotion은 한 번만 재생할 수 있습니다. 따라서 motion을 실행하고, 다른 motion을 실행하기 전에 motion이 끝날 때까지 기다립니다. - motion page 14와 16에 추가한
Block Ballmotion은 endlessly repeating motion입니다. 따라서 motion을 끝내려면 EXIT page가 필요합니다. 버튼을 계속 누르고 있지 않으면WAIT WHILEcommand를 사용해EXITPageWaitMotionfunction이 EXIT를 실행하여 motion을 끝내도록 합니다. (자세한 내용은 Motion Page를 참고하세요.) - user motion이 끝나면
UseGyro변수를 다시 TRUE로 설정해 gyro adjustment를 복원합니다.
Gripper Control
선행 학습 : Custom Motions: Create, Custom Motions: Task Code
시작하기 전에 두 section을 먼저 확인하세요.
이 튜토리얼의 목표는 motion과 관계없이 gripper를 제어하는 방법을 익히는 것입니다.
로봇에 gripper를 추가하면 motion과 관계없이 로봇 arm을 고정해야 할 때가 있습니다.
이 경우 arm을 고정하기 위해 motion을 수정할 필요는 없습니다. 대신 특정 actuator가 motion data에 의해 제어되지 않도록 하면서 task code로 gripper를 제어하는 방법을 알아봅시다.
배경 지식
gripper와 motion을 별도로 제어하기 위한 priority 설정입니다.
-
일반 Control Priority
일반적으로 motion data가 가장 높은 priority를 가지고, task code가 그 다음 priority를 가집니다. 따라서 일반적인 상황에서는 motion이 실행되면 task code로 특정 DYNAMIXEL만 제어할 수 없습니다.
-
Control Priority 변경
motion이 실행되는 동안 task code로 motor(gripper를 포함한 arm 전체)를 제어하는 방법은 두 가지입니다.
- motion data에서 actuator ID의 “Using Now/Not Using” checkbox를 해제합니다.
- actuator의 “Joint Offset” parameter를 1024로 설정합니다.
첫 번째 방법은 전체 page에서 actuator를 비활성화합니다. 해당 actuator가 필요한 motion이 있더라도 motion data로 제어할 방법이 없습니다. 따라서 필요에 따라 특정 actuator에 대한 motion data 적용을 활성화/비활성화할 수 있는 두 번째 방법이 더 적합할 수 있습니다.
조립
[Gripper Assembly]를 참고하세요.
Task Code 작성
- Gripper Control 초기화
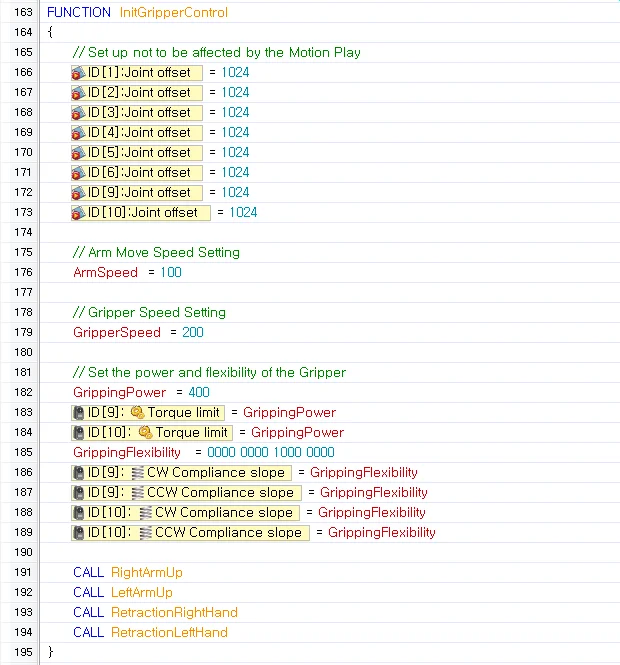
양쪽 arm actuator의 joint offset을 1024로 설정해 motion data에 의해 제어되지 않도록 합니다. arm과 gripper의 movement speed, gripper grasping power와 flexibility 같은 data를 초기화한 뒤 arm을 default position에 놓습니다.
- Callback Function 수정(Gyro Adjustment)
gyro adjustment value를 적용하기 위해 callback function에서 joint offset을 사용하는 경우, gripper에 사용되는 joint에는 joint offset을 설정하지 않아야 합니다. 이는 STEP 1에서 1024로 설정한 값이 변경되는 것을 방지하기 위함입니다.

- Gripper/Arm Control Function
gripper와 arm을 제어하려면 아래 function을 복사합니다. 이 function은 motion 상태와 관계없이 gripper와 arm의 움직임을 제어할 수 있습니다.
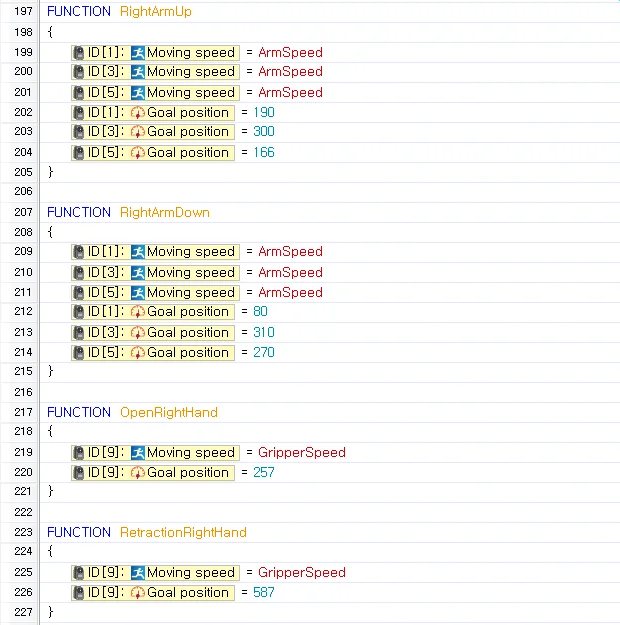
왼쪽 arm과 gripper도 위와 같은 방식으로 function을 작성합니다.
- remote controller로 arm과 gripper 제어
remote controller를 사용해 gripper와 arm을 제어하는 code를 추가합니다. [Custom Motions: Task Code]를 확인하면 아래 code를 이해하는 데 도움이 됩니다.
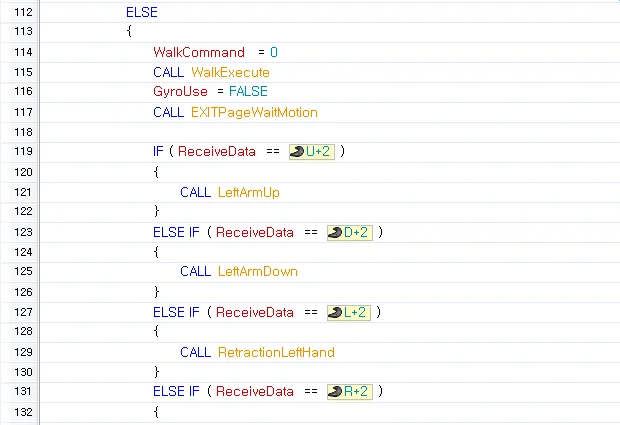
다운로드 및 결과 확인
- STEP 2에서 작성한 task code를 다운로드합니다(How to Download of task code).
- remote controller로 로봇 motion을 제어하는 동안 gripper와 arm이 고정되는지 확인합니다.
- remote controller로 gripper를 제어합니다.
다운로드
기본 Program
| Robot Type | File Type | Download |
|---|---|---|
| 조립서 | PDF File | 다운로드 |
| A Type | Task Code | 다운로드 |
| A Type | Motion File | 다운로드 |
| B Type | Task Code | 다운로드 |
| B Type | Motion File | 다운로드 |
| C Type | Task Code | 다운로드 |
| C Type | Motion File | 다운로드 |
Humanoid Fight
| Robot Type | File Type | Download |
|---|---|---|
| A Type | Humanoid Fight Task Code | 다운로드 |
| A Type | Humanoid Fight Motion File | 다운로드 |
Walking
| Buttons | Motion | Buttons | Motion |
|---|---|---|---|
| U | 앞으로 이동 | D | 뒤로 이동 |
| L | 왼쪽 회전 | R | 오른쪽 회전 |
| U + L | 전진하며 왼쪽 회전 | U + R | 전진하며 오른쪽 회전 |
| L + 5 | 왼쪽 이동 | L + 5 + 6 | 빠른 왼쪽 이동 |
| L + U + 5 | 전진하며 왼쪽 이동 | L + D + 5 | 후진하며 왼쪽 이동 |
| R + 5 | 오른쪽 이동 | R + 5 + 6 | 빠른 오른쪽 이동 |
| R + U + 5 | 전진하며 오른쪽 이동 | R + D + 5 | 후진하며 오른쪽 이동 |
Attack
| Buttons | Motion | Buttons | Motion |
|---|---|---|---|
| 1 + L | 왼쪽 대각선 공격 | 6 + 2 | 강한 왼쪽 공격 |
| 1 + R | 오른쪽 대각선 공격 | 6 + 4 | 강한 오른쪽 공격 |
| 2 + U | 전방 공격 | 6 + 1 | 강한 전방 공격 |
| 2 + L | 왼쪽 공격 | 4 + U(4 + L) | 잡기 1 |
| 2 + R | 오른쪽 공격 | 4 + D(4 + R) | 잡기 2 |
| 3 | 양쪽 공격 | - | - |
ETC
| Buttons | Motion | Buttons | Motion |
|---|---|---|---|
| 5+6+D+3 | Torque Off | 5+6+U+1 | Torque On |
| 1 + U | 엎드려 일어나기 | 1 + D | 누워 일어나기 |
Humanoid Soccer
| Robot Type | File Type | Download |
|---|---|---|
| A Type | Humanoid Soccer Task Code | 다운로드 |
| A Type | Humanoid Soccer Motion File | 다운로드 |
Walking
| Buttons | Motion | Buttons | Motion |
|---|---|---|---|
| U | 앞으로 이동 | D | 뒤로 이동 |
| L | 왼쪽 회전 | R | 오른쪽 회전 |
| U + L | 전진하며 왼쪽 회전 | U + R | 전진하며 오른쪽 회전 |
| L + 5 | 왼쪽 이동 | L + 5 + 6 | 빠른 왼쪽 이동 |
| L + U + 5 | 전진하며 왼쪽 이동 | L + D + 5 | 후진하며 왼쪽 이동 |
| R + 5 | 오른쪽 이동 | R + 5 + 6 | 빠른 오른쪽 이동 |
| R + U + 5 | 전진하며 오른쪽 이동 | R + D + 5 | 후진하며 오른쪽 이동 |
Offense
| Buttons | Motion | Buttons | Motion |
|---|---|---|---|
| 2 + U | 왼발 앞으로 차기 | 4 + U | 오른발 앞으로 차기 |
| 2 + 6 + U | 강한 왼발 앞으로 차기 | 4 + 6 + U | 강한 오른발 앞으로 차기 |
| 2 + D | 뒤로 차기 | 4 + D | 뒤로 차기 |
| 2 + L | 왼쪽 차기 | 4 + L | 왼쪽 차기 |
| 2 + R | 오른쪽 차기 | 4 + R | 오른쪽 차기 |
Defense
| Buttons | Motion | Buttons | Motion |
|---|---|---|---|
| 3 | 막기 준비 | 3 + L | 왼쪽 막기 |
| 3 + U | 전방 막기 | 3 + R | 오른쪽 막기 |
ETC
| Buttons | Motion | Buttons | Motion |
|---|---|---|---|
| 5+6+D+3 | Torque Off | 5+6+U+1 | Torque On |
| 1 + U | 엎드려 일어나기 | 1 + D | 누워 일어나기 |
| 1 + L | 가슴 치기 | 1 + R | 환호하기 |
예제
초급
| Examples | Description |
|---|---|
1. Crossing Gate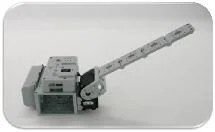 | 다운로드 조립서 다운로드 Task Code 다운로드 동영상 사용 장치 CM-530(x1), AX-12+(x1)DYNAMIXEL 설정 AX-12+ ID[1]: Joint ModeRoboPlus 문법 Function, Call, Load, Endless Loop, If, Wait While알고리즘 Control DYNAMIXEL's position using the buttons on the CM-530동작 방법- Press the U button on the CM-530 to open the bar.- Press the D button on the CM-530 to lower the bar. |
2. Universal Gauge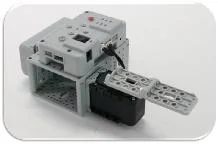 | 다운로드 조립서 다운로드 Task Code 다운로드 동영상 사용 장치 CM-530(x1), AX-12+(x1)DYNAMIXEL 설정: AX-12+ ID[1]: Joint ModeRoboPlus 문법 Function, Call, Return, Load, Calculate, Endless Loop, If, Else if알고리즘 Control DYNAMIXEL's speed using the buttons on the CM-530동작 방법- Press the U button on the CM-530 to increase the gauge's speed.- Press the D button on the CM-530 to decrease the gauge's speed. |
3. Crocodile Mouth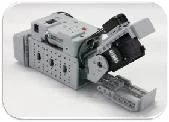 | 다운로드 조립서 다운로드 Task Code 다운로드 동영상 사용 장치 CM-530(x1), AX-12+(x1), IR Sensor(x1)DYNAMIXEL 설정: AX-12+ ID[1]: Joint ModeRoboPlus 문법 Function, Call, Load, Endless Loop, If, Else If, Wait While알고리즘 Control DYNAMIXEL position and Buzzer with the value from the IR Sensor and Timer동작 방법- The mouth opens when the front sensor detects something, and close when nothing is detected. - It will open its mouth when it detects something. - A melody will activate if nothing is detected for 10 seconds. |
4. Pan Tilt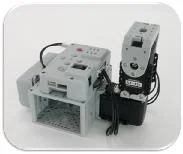 | 다운로드 조립서 다운로드 Task Code 다운로드 동영상 사용 장치 CM-530(x1), AX-12+(x2)DYNAMIXEL 설정: AX-12+ ID[1, 2]: Joint ModeRoboPlus 문법 Function, Call, Load, Calculate,Endless Loop,If, Else If, Wait While알고리즘 Control the Pan Tilt using the buttons on the CM-530동작 방법- Press the U button on the CM-530 to move the tilt actuator (Up, Down) up.- Press the D button on the CM-530 to move the tilt actuator (Up, Down) down.- Press the R button on the CM-530 to turn the pan actuator (Sideways) right.- Press the L button on the CM-530 to turn the pan actuator (Sideways) left. |
5. Parking Gate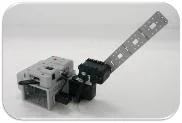 | 다운로드 조립서 다운로드 Task Code 다운로드 동영상 사용 장치 CM-530(x1), AX-12+(x2), IR Sensor(x1)DYNAMIXEL 설정: AX-12+ ID[1, 2]: Joint ModeRoboPlus 문법 Function, Call, Load, Endless Loop, If, Else If, Wait While, Break Loop알고리즘 Control DYNAMIXEL's position using the IR Sensor and DYNAMIXEL's load value.동작 방법- When an object is detected, the parking gate opens perpendicularly. - When an object is detected and the bar is pushed, the parking gate opens horizontally. - When an object is not detected, the parking gate closes. |
6. Smart Car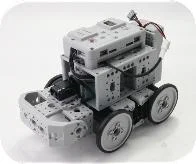 | 다운로드 조립서 다운로드 Task Code 다운로드 동영상 사용 장치 CM-530(x1), AX-12+(x4), IR sensor(x2)DYNAMIXEL 설정: AX-12+ ID[1 ~ 4]: Wheel ModeRoboPlus 문법 Function, Call, Load, Calculate, Jump, Lable, Endless Loop, If, Else If, Wait While알고리즘 Use the CM-530's buttons to set the mode and use the buttons and sensor value to control the rotation direction.동작 방법- Press the U button together with the START button on the CM-530 to change to CONTROL mode.- Press the D button together with the START button on the CM-530 to change to FREE mode.- When you press the L button in CONTROL mode, it moves forward. The R button moves backward, U button moves rights, and the D button moves left. A melody will play each time it moves.- When front sensor detects an object in FREE mode, it will turn right. When the lower sensor detects something, it will avoid the edge and turn right. |
7. Clapping Crab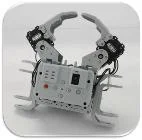 | 다운로드 조립서 다운로드 Task Code 다운로드 동영상 사용 장치 CM-530(x1), AX-12+(x2)DYNAMIXEL 설정: AX-12+ ID[1, 2]: Joint ModeRoboPlus 문법 Load, Calculate, Endless Loop, If, Wait While알고리즘 Control DYNAMIXEL position using the number of times the MIC detects a sound.동작 방법- The robot will standby with its arm open. - The robot the number of time it detects a sound. |
8. Attacking Duck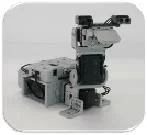 | 다운로드 조립서 다운로드 Task Code 다운로드 동영상 사용 장치 CM-530(x1), AX-12+(x3), IR Sensor(x2)DYNAMIXEL 설정: AX-12+ ID[1, 2, 3]: Joint ModeRoboPlus 문법 Function, Call, Load, Endless Loop, If, Loop While, Wait While알고리즘 Use the sensor detecting to control DYNAMIXEL's동작 방법- The robot moves sideways continuously and watches for objects. - The robot follows the direction in which an object is detected then attacks when both sensors detect an object. |
9. Distance Level Meter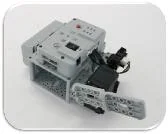 | 다운로드 조립서 다운로드 Task Code 다운로드 동영상 사용 장치 CM-530(x1), AX-12+(x1), DMS Sensor(x1)DYNAMIXEL 설정: AX-12+ ID[1]: Joint ModeRoboPlus 문법 Function, Call, Load, Calculate, Endless Loop알고리즘 Control DYNAMIXEL position using the distance detected by the sensor.동작 방법 The bar moves depending on the distance detected by the sensor. |
10. Line Tracer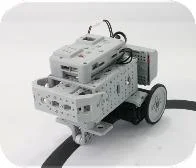 | 다운로드 조립서 다운로드 Task Code 다운로드 동영상 사용 장치 CM-530(x1), AX-12+(x2), IR Sensor(x2)DYNAMIXEL 설정: AX-12+ ID[1, 2]: Wheel ModeRoboPlus 문법 Function, Call, Load, Calculate, Endless Loop, If, Else If, Else, Wait While알고리즘 Control the line tracer using the sensor's detection value.동작 방법 The robot traces the black line. |
11. Walking Droid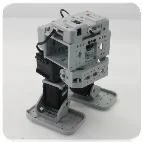 | 다운로드 조립서 다운로드 Task Code 다운로드 Motion File 다운로드 동영상 사용 장치 CM-530(x1), AX-12+(x4), IR Sensor(x1)DYNAMIXEL 설정: AX-12+ ID[1 ~ 4]: Joint ModeRoboPlus 문법 Function, Call, Load, Endless Loop, If, Loop While, Wait While알고리즘 Control various motions using the IR Sensor's value.동작 방법- Place an object in the robot's path and start your robot. - Checks whether the robot avoids obstacles while walking. |
중급
| Examples | Description |
|---|---|
1. Probing Robot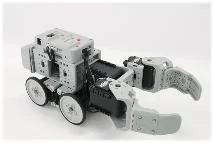 | 다운로드 조립서 다운로드 Task Code 다운로드 동영상 사용 장치 CM-530(1), AX-12+(7),IR Sensor(1), DMS Sensor(1)DYNAMIXEL 설정 AX-12+ ID[1RoboPlus 문법 Function, Call, Return, Load, Calculate, Endless Loop, If, Else, Wait While, Break Loop알고리즘 Object sensing and processing depending on IR Sensor's and DMS Sensor's value동작 방법- Place objects of various sizes in the robot's path, then turn the robot on. - If the obstacle is too big, it will avoid it. - If the obstacle is not too big, it will move it then proceed going its way. |
2. Excavator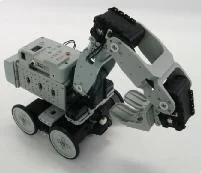 | 다운로드 조립서 다운로드 Task Code 다운로드 Motion File 다운로드 동영상 사용 장치 CM-530(1), AX-12+(8), IR Sensor(1), DMS Sensor(1)DYNAMIXEL 설정 AX-12+ ID[1RoboPlus 문법 Function, Call, Load, Calculate, Endless Loop, If, Else, Wait While알고리즘 DYNAMIXEL Position control depending on IR Sensor's and DMS Sensor's value.동작 방법- Place an object in the robot's path, then turn the robot on. - When an object is detected in front of it, it will begin excavating. - If an object is detected while carrying an object, the robot will turn in that direction and put the object it was carrying down. |
3. Robot Flower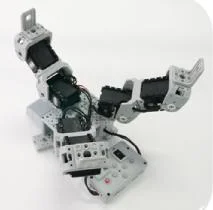 | 다운로드 조립서 다운로드 Task Code 다운로드 Motion File 다운로드 동영상 사용 장치 CM-530(1)(Sound Detection), AX-12+(6)DYNAMIXEL 설정 AX-12+ ID[1~6] : Joint ModeRoboPlus 문법 Function, Call, Load,Endless Loop, If, Else, Wait While알고리즘 Motion control depending on the number of time sound is detected.동작 방법- When the power is turned on, the flower blooms and moves as though it is dancing. - If one clap is detected, the petals will pucker up slowly. - If several claps are detected, the petals will pucker up quickly. |
4. Fawn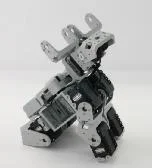 | 다운로드 조립서 다운로드 Task Code 다운로드 Motion File 다운로드 동영상 사용 장치 CM-530(1)(Sound Detection), AX-12+(7), IR Sensor(1)DYNAMIXEL 설정 AX-12+ ID[1~7] : Joint ModeRoboPlus 문법 Function, Call, Load, Endless Loop, If, Else If, Else, Wait While알고리즘 Object sensing using IR Sensor's value.동작 방법- When no change is detected, the fawn sits down and looks around. - If an object is detected in front of the face, the fawn will follow the object. |
5. Turtle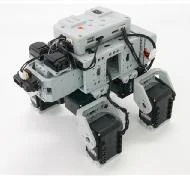 | 다운로드 조립서 다운로드 Task Code 다운로드 Motion File 다운로드 동영상 사용 장치 CM-530(1), AX-12+(8), IR Sensor(2), DMS Sensor(1)DYNAMIXEL 설정 AX-12+ ID[1~8] : Joint ModeRoboPlus 문법 Function, Call, Load, Endless Loop, If, Else If, Else, Wait While알고리즘 Avoids obstacles depending on the IR Sensor and DMS Sensor value.동작 방법- Place an obstacle in the robots path and turn the robot on. - The turtle avoids obstacles in front of it. |
6. GerWalk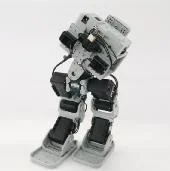 | 다운로드 조립서 다운로드 Task Code 다운로드 Motion File 다운로드 동영상 사용 장치 CM-530(1), AX-12+(7), IR Sensor(2), DMS Sensor(1)DYNAMIXEL 설정 AX-12+ ID[1~7] : Joint ModeRoboPlus 문법 Function, Call, Load, Endless Loop, If, Else If, Else, Loop While알고리즘 Control the Bird's walking pattern using the IR Sensor and DMS Sensor value.동작 방법- Place an obstacle in the robots path and turn the gerwalk robot on. - The robot avoids obstacles in front of it and on the sides. |
7. Battle Droid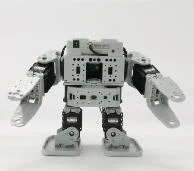 | 다운로드 조립서 다운로드 Task Code 다운로드 Motion File 다운로드 동영상 사용 장치 CM-530(1), AX-12+(8), IR Sensor(1)DYNAMIXEL 설정 AX-12+ ID[1~8] : Joint ModeRoboPlus 문법 Variables, Function, Call, Load, Calculate, Endless Loop, If, Else If, Else, Wait While알고리즘 DYNAMIXEL control using the IR Sensor's value동작 방법- Place an obstacle in the robots path and turn the battle droid robot on. - When the robot detects an object while walking, it will attack with both arms. - When battle droid falls down, it will know which side it has fallen up and get up on its own. |
8. Quadruped Robot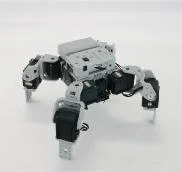 | 다운로드 조립서 다운로드 Task Code 다운로드 Motion File 다운로드 동영상 사용 장치 CM-530(1), AX-12+(8), IR Sensor(1), DMS Sensor(1)DYNAMIXEL 설정 AX-12+ ID[1~8] : Joint ModeRoboPlus 문법 Function, Call, Load, Endless Loop, If, Wait While알고리즘 Control the walking using the IR Sensor and DMS Sensor value동작 방법- Place an obstacle in the robots path and turn the quadruped robot on. - The robot avoids obstacles in front of it. |
9. Biped Walking Robot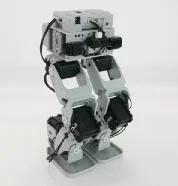 | 다운로드 조립서 다운로드 Task Code 다운로드 Motion File 다운로드 동영상 사용 장치 CM-530(1), AX-12+(8), IR Sensor(1), DMS Sensor(1)DYNAMIXEL 설정 AX-12+ ID[11~18] : Joint ModeRoboPlus 문법 Function, Call, Load, Endless Loop, If, Else If, Else, Wait While, Loop While알고리즘 Control the walking using the IR Sensor and DMS Sensor value동작 방법- Place an obstacle in the robots path and turn the robot on. - The robot avoids obstacles in front of it and on the sides. |
10. Robot Arm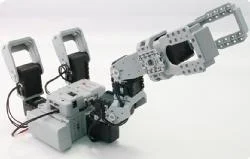 | 다운로드 조립서 다운로드 Task Code 다운로드 동영상 사용 장치 CM-530(1), AX-12+(8)DYNAMIXEL 설정 AX-12+ ID[1~8] : Joint ModeRoboPlus 문법 Function, Call, Load, Calculate, Endless Loop, If, Else, Loop While알고리즘 DYNAMIXEL Communication for Position Value동작 방법 Check whether the responding motor reacts to the control motor's movement. |
고급
| Examples | Description |
|---|---|
1. Dinosaur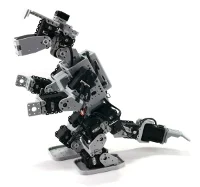 | 다운로드 조립서 다운로드 Task Code 다운로드 Motion File 다운로드 동영상 사용 장치 CM-530(1), AX-12+(15), IR Sensor(1)DYNAMIXEL 설정 AX-12+ ID[1~15] : Joint ModeRoboPlus 문법 Function, Call, Load, Lable, Jump, If, Else If, Else, Wait While알고리즘 Object detection and motion control using IR Sensor value.동작 방법- Place an obstacle in the robots path and turn the dinosaur robot on. - The dinosaur robot attacks. - When the obstacle disappears, it continues walking. - When nothing is detected for a while, it will sleep. |
2. Puppy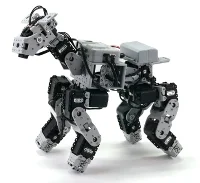 | 다운로드 조립서 다운로드 Task Code 다운로드 Motion File 다운로드 동영상 사용 장치 CM-530(1)(Sound Detection, Timer), AX-12+(17), IR Sensor(1)DYNAMIXEL 설정 AX-12+ ID[1~17] : Joint ModeRoboPlus 문법 Function, Call, Load, Lable, Jump, If, Else If, Wait While알고리즘 Motion control depending on the sound detection of the IR Sensor and Timer.동작 방법- Place an obstacle in the robots path and turn the puppy robot on. - When a sound is detected, it will walk avoiding obstacles. - If you touch its mouth, it will do cute things. - It will do different things depending on the number of claps. - When nothing is detected for a while, it will sleep. |
3. King Spider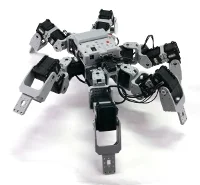 | 다운로드 조립서 다운로드 Task Code 다운로드 Motion File 다운로드 동영상 사용 장치 CM-530(1)(Timer), AX-12+(18), IR Sensor(2)DYNAMIXEL 설정 AX-12+ ID[1~18] : Joint ModeRoboPlus 문법 Function, Call, Load, Lable, Jump, If, Wait While알고리즘 Application motion control depending on the sound detection of the IR Sensor and Timer.동작 방법- When it detects an object while walking, it will avoid it. - It will attack when something is detected near the front. - When an object is detected above it, it will crumple up its body. - When nothing is detected for a while, it will sleep. |
4. Scorpion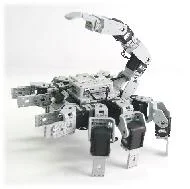 | 다운로드 조립서 다운로드 Task Code 다운로드 Motion File 다운로드 동영상 사용 장치 CM-530(1)(Sound detection), AX-12+(18), DMS Sensor(1)DYNAMIXEL 설정 AX-12+ ID[1~18] : Joint ModeRoboPlus 문법 Function, Call, Load, Lable, Jump, If, Else If, Loop For, Wait While알고리즘 Application motion control depending on the number of sounds detected and DMS Sensor value.동작 방법- The robot sleeps when you first turn it on. - The robot will awake when you clap. - If you clap twice when the robot is awake, it will run away. - The closer your hand gets to the sensor, the tail will rise to threaten you. - If you get too close, it will attack. |
5. Lizard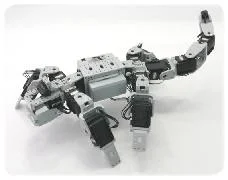 | 다운로드 조립서 다운로드 Task Code 다운로드 Motion File 다운로드 동영상 사용 장치 CM-530(1), AX-12+(14), IR Sensor(1),DMS Sensor(1)DYNAMIXEL 설정 AX-12+ ID[1~14] : Joint ModeRoboPlus 문법 Function, Call, Load, Calculate, Endless Loop, If, Else If, Else, Wait While알고리즘 Obstacle avoidance motion control using the IR Sensor and DMS Sensor value.동작 방법- It will being crawling once turned on, and will stop when it detects an object then avoid it. - When the tail is caught, it will try to escape. |
참고자료
Fuse 교체
CM-510/CM-530의 fuse는 circuit을 손상시킬 수 있는 과부하를 방지합니다.
CM-510/CM-530이 battery로는 켜지지 않고 SMPS를 연결했을 때만 켜진다면 fuse를 교체하세요.
※ fuse 크기는 아래와 같습니다. 125V/5A~10A fuse를 사용하세요.

※ fuse 교체 방법
-
CM-510/CM-530 뒷면에서 fuse를 찾습니다.

-
pincette를 사용해 fuse를 새 fuse로 교체합니다.

DYNAMIXEL 관리
robot actuator로 사용되는 DYNAMIXEL은 다양한 기능을 가지고 있습니다. 이 section에서는 DYNAMIXEL 설정을 변경하는 방법을 설명합니다.
ID 변경
-
controller가 연결된 port를 선택합니다.
-
“Connect”를 클릭합니다.

-
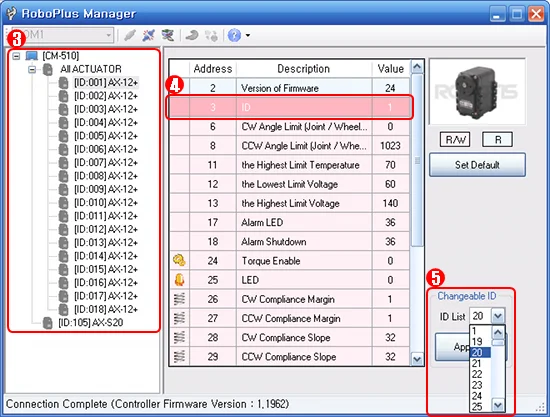
왼쪽에 연결된 DYNAMIXEL 목록이 표시됩니다. ID를 변경할 DYNAMIXEL을 클릭합니다.
-
Control Table에서 ID row를 클릭합니다.
-
ID List combo box를 클릭해 선택 가능한 ID 목록을 확인합니다. ID를 선택한 뒤 Apply를 클릭합니다.
- RoboPlus Motion과 RoboPlus Task에서 사용하려면 ID가 아래 범위 안에 있어야 합니다.
- DYNAMIXEL ID는 0~25 사이여야 합니다.
- AX-S1의 ID는 100~109 사이로 설정해야 합니다.
Movement Mode 변경
DYNAMIXEL은 두 가지 mode로 동작할 수 있습니다.
- Wheel Mode : 일반 motor처럼 360도 회전합니다.
- Joint Mode : 일반 servo motor처럼 설정된 각도로 움직입니다.
mode는 RoboPlus Manager를 사용해 변경할 수 있습니다. 한 번 설정한 mode는 전원을 꺼도 유지됩니다.
-
controller가 연결된 port를 선택합니다.
-
“Connect”를 클릭합니다.
-
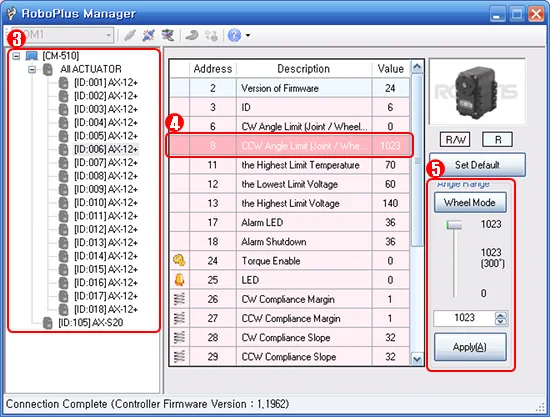
왼쪽에 연결된 DYNAMIXEL 목록이 표시됩니다. mode를 변경할 DYNAMIXEL을 클릭한 뒤 Control Table에서 CW/CCW Angle Limit line을 클릭합니다.
-
Wheel Mode로 설정하려면 CW/CCW Angle Limit 값을 “0”으로 변경합니다. 또는 "Wheel Mode" button을 클릭해도 됩니다.
-
다시 Joint Mode로 설정하려면 CW/CCW Angle Limit 값을 "0"이 아닌 값으로 설정합니다. Joint Mode의 초기값은 CW Angle Limit "0", CCW Angle Limit "1023"입니다.
문제 해결
RoboPlus Manager에서 원하는 DYNAMIXEL을 찾을 수 없다면 아래를 시도하세요.
- DYNAMIXEL 1개만 연결하고 중복 ID가 있는지 확인합니다. DYNAMIXEL 1개만 연결했는데도 왼쪽에 DYNAMIXEL이 보인다면 ID가 중복되었을 가능성이 높습니다. 즉시 ID를 변경하세요.
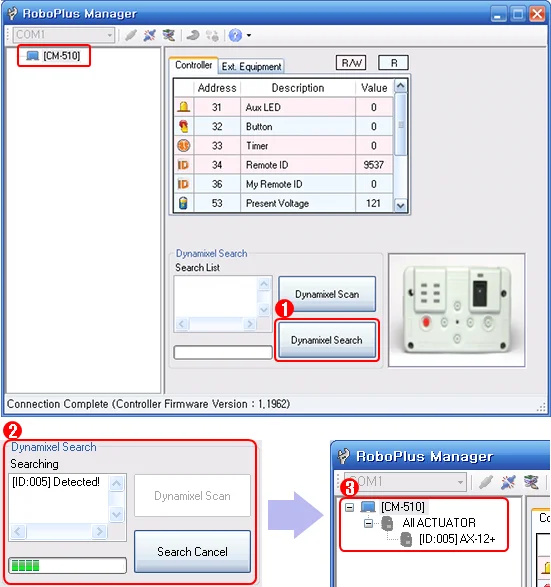
- 아래 이미지처럼 어떤 DYNAMIXEL도 찾을 수 없다면 "DYNAMIXEL Search"를 클릭하세요. communication speed가 1Mbps로 설정되어 있지 않으면 "DYNAMIXEL Search" 기능이 controller의 communication speed를 자동으로 1Mbps로 reset해 인식할 수 있게 합니다.
문제가 계속되면 DYNAMIXEL 수리가 필요할 수 있습니다. 구매처의 service department에 문의하세요.
ZIGBee 무선 제어
ZIGBee

[ZIG-100/110]은 wireless communication에 ZIGBee를 사용합니다. ZIGBee는 Bluetooth처럼 Personal Area Network(PAN)에서 널리 사용되는 communication technology입니다. ZIGBee는 IR보다 communication quality가 좋아 여러 사용자가 interference 없이 로봇을 제어할 수 있습니다.
주의 : 모든 제품에 zigbee module이 포함되는 것은 아니며, 별도로 구매해야 할 수 있습니다.
Controller & ZIGBee
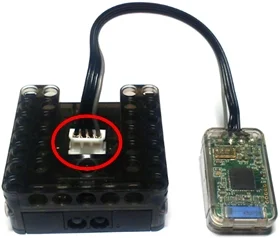
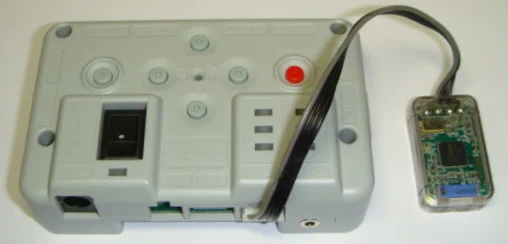
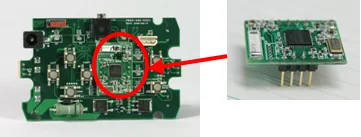
OLLO와 Bioloid는 모두 IR communication method를 사용하는 RC-100을 사용합니다. Zigbee communication method로 upgrade하려면 ZIG-110 set를 별도로 구매해야 합니다. ZIG-110 set에는 [RC-100]에 장착하는 Zig-100 module 1개와 Controller에 장착하는 Zig-110 module 1개가 포함됩니다.
참고 : 하나의 Zigbee set에 포함된 module들은 서로 communication하도록 미리 설정되어 있습니다. 따라서 한 set의 module은 다른 set의 module과 동작하지 않을 수 있습니다. 서로 섞이지 않도록 주의하세요.
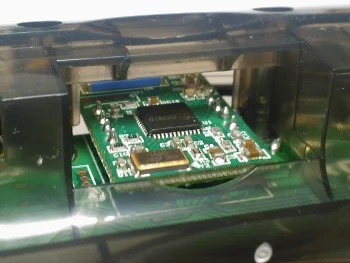
| ZIG-100 installed in RC-100 | ZIG-110 installed in CM-100 |
|---|---|
 |  |
| ZIG-110 installed in CM-510 | ZIG-100 installed in CM-5 |
|---|---|
 |  |
여러 대의 로봇 제어
이 방법은 dance나 demonstration에 사용되는 여러 로봇에 동시에 command를 보내는 방법입니다. zigbee module의 broadcast mode를 사용해 로봇에 command를 한 번에 전송합니다.
Bioloid(Entry/고급)
-
Zig2Serial과 여러 로봇의 communication
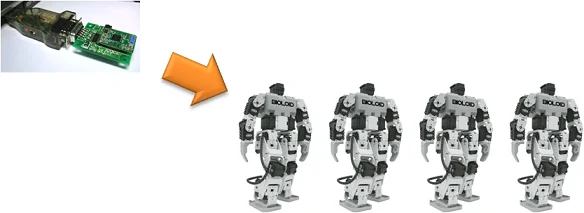
-
RC-100과 여러 로봇의 communication
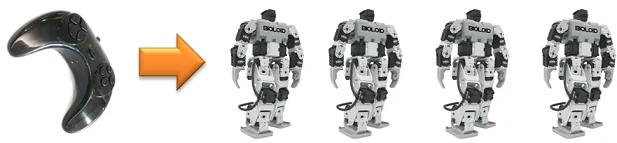
- CM-5를 사용하려면 controller와 ZIG-100 module을 함께 연결합니다.
- RoboPlus Manager를 사용해 상대 로봇의 ZIG-100 module wireless ID를 65535로 설정합니다.
- communication을 위해 broadcast channel을 별도로 설정할 필요는 없습니다.
- RC-100으로 직접 command를 보내거나 Zig2Serial을 사용해 PC에서 command를 보냅니다.
| Device | Channel Default Value | channel 변경 가능 여부 |
|---|---|---|
| CM-5 | 1 | 변경 불가 |
| Zig2Serial | 1 | 변경 가능 |
| RC-100 | 1 | 변경 가능 |
CM-5에 장착된 ZIG-100의 channel은 변경할 수 없습니다. 따라서 broadcast communication을 위해 모든 사용자는 channel을 #1로 설정해야 합니다. communication하려면 모든 device의 channel이 서로 맞아야 합니다.
Bioloid Premium Kit
-
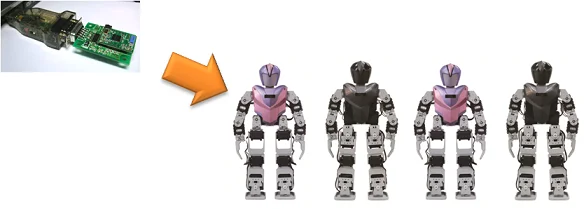
Zig2Serial과 여러 로봇의 communication
-
RC-100과 여러 로봇의 communication
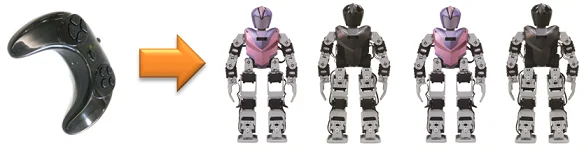
- CM-510을 사용할 때는 ZIG-100 module을 controller와 연결합니다.
- RoboPlus Manager를 사용해 상대방의 wireless ID를 65535로 변경합니다.
- controller에 연결된 ZIG-110의 channel은 #4로 설정되어 있으므로 Zig2Serial과 RC-100의 channel도 #4로 설정해야 합니다.
- [RC-100 channel 변경 방법][How to change the RC-100 channel]
- [Zig2Serial channel 변경 방법][How to change the Zig2Serial channel]
| Device | Channel Default Value | channel 변경 가능 여부 |
|---|---|---|
| CM-510 CM530 | 4 | 변경 불가 |
| Zig2Serial | 1 | 변경 가능 |
| RC-100 | 1 | 변경 가능 |
controller에 연결된 zigbee의 channel은 변경할 수 없습니다. 따라서 broadcast communication을 위해 모든 사용자는 channel을 #4로 설정해야 합니다. communication하려면 모든 device의 channel이 서로 맞아야 합니다.
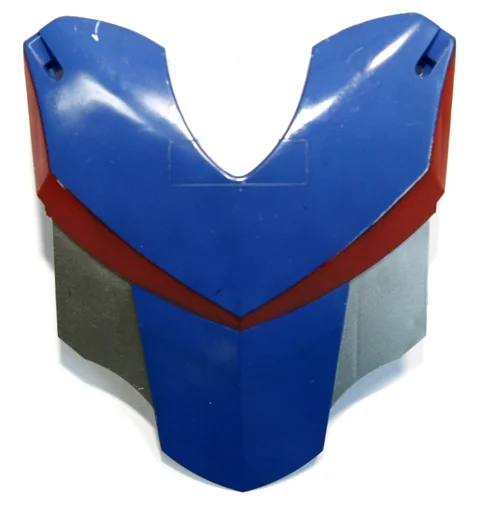
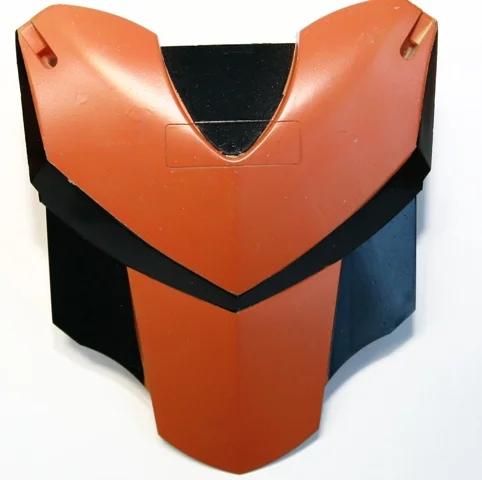
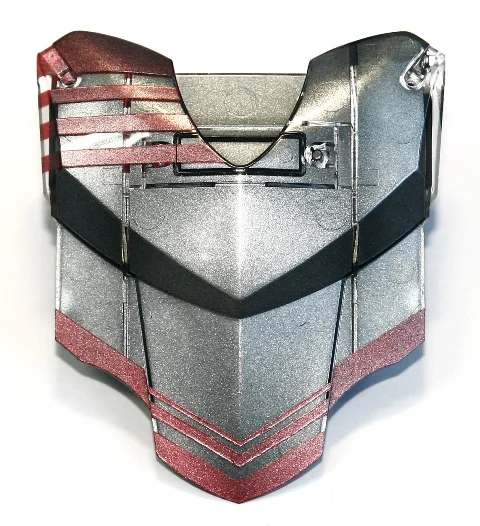
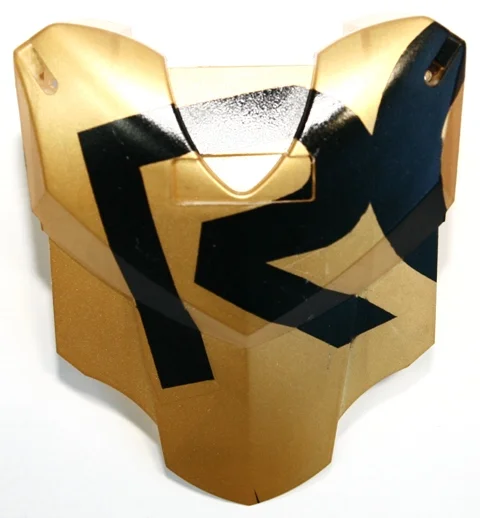
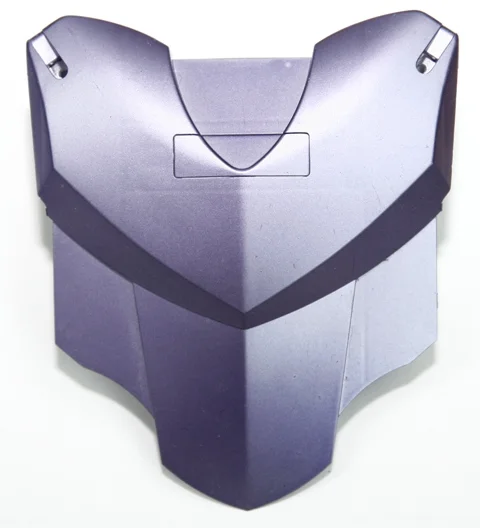
로봇 꾸미기
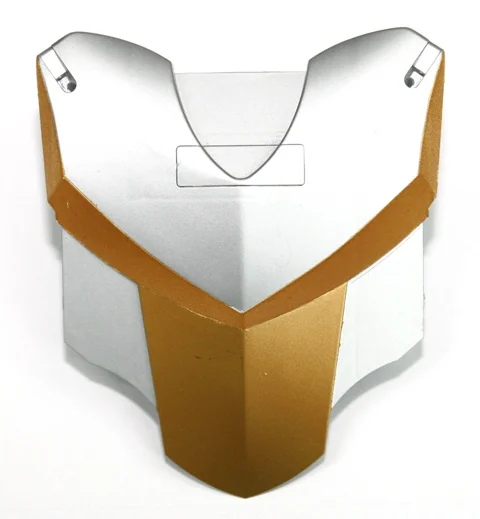
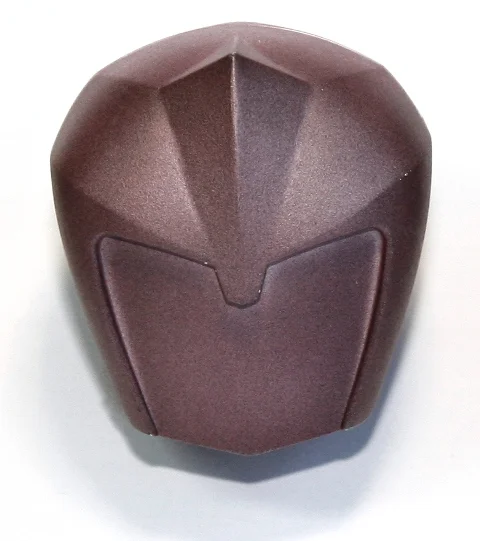
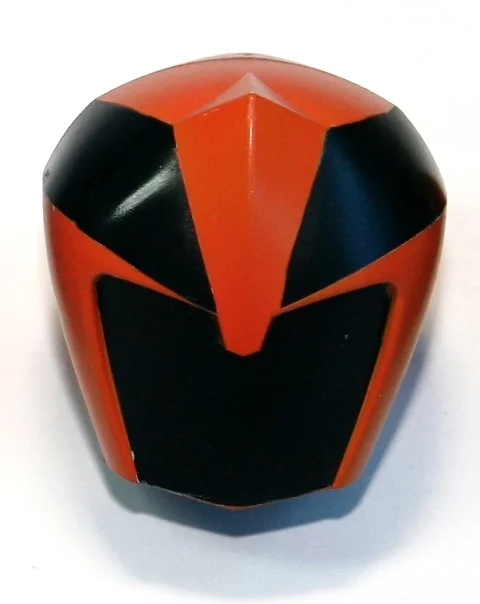
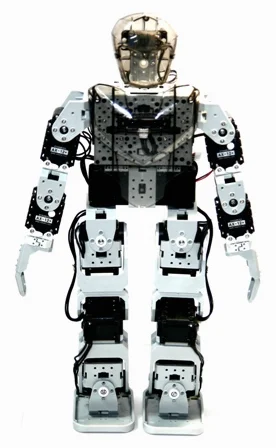
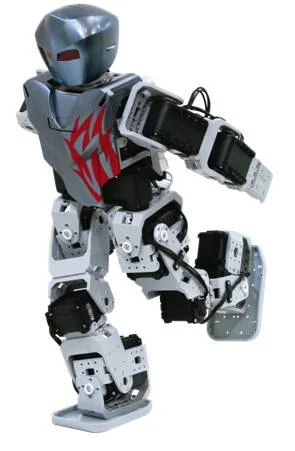
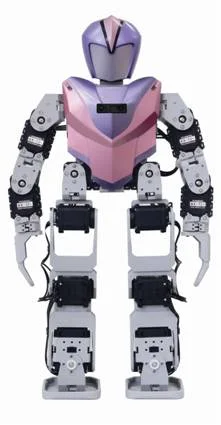
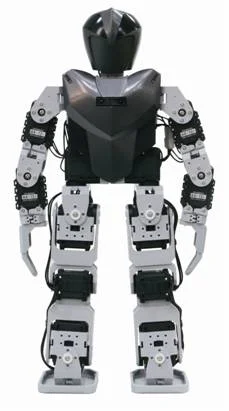
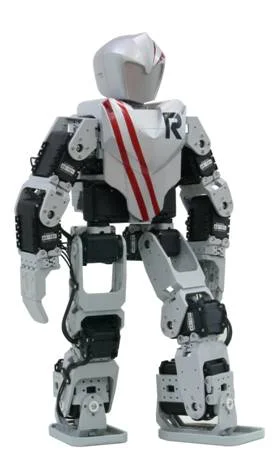
Premium Kit에만 제공되는 반투명 skin을 사용해 나만의 humanoid를 꾸밀 수 있습니다.
반투명 skin 꾸미기
chest skin을 꾸민 sample입니다.
 |  |
|---|---|
 |  |
 |  |
head skin을 꾸민 sample입니다.
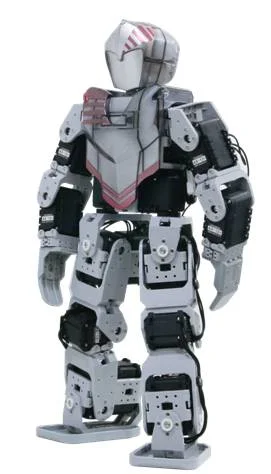
customized skin을 장착한 로봇 sample입니다.
 |  |  |
|---|---|---|
 |  |  |
Sensor 추가
Bioloid Premium Kit에서는 CM-530에 [IR Sensor]와 [Touch Sensor]를 추가로 연결할 수 있습니다. 각 sensor에 대한 자세한 정보는 sensor 이름을 클릭해 확인하세요.
IR Sensor

- IR Sensor 활용
- IR sensor는 로봇 앞의 object를 감지할 수 있습니다.
- 보행하거나 이동할 때 측면의 object를 감지하는 용도로도 사용할 수 있습니다.
Touch Sensor

- Touch Sensor 활용
- touch sensor는 로봇이 touch되었는지 감지할 수 있게 합니다.
- 예를 들어 sensor를 사용해 특정 touch에 로봇이 반응하도록 만들 수 있습니다.
사용자 Sensor 제작
CM-510/CM-530의 ADC port와 OUT port를 사용해 간단한 control function을 가진 사용자 sensor를 만들 수 있습니다.
주의 : 잘못 설계된 circuit을 연결하면 controller가 손상될 수 있습니다. 사전에 circuit에 대한 충분한 지식을 습득하세요.
PIN 정보

-
아래는 CM-510 external port의 pin diagram입니다.
- OUT : 5V Output
- VCC (5V)
- ADC : 사용자가 만든 analog signal을 읽을 수 있습니다.
- GND
- NC : 사용하지 않음
-
아래는 CM-530 external port의 pin diagram입니다.
- OUT1 : 3.3V Output(최대 허용 전류 0.3A)
- VCC (5V)
- ADC : 사용자가 만든 analog signal을 읽을 수 있습니다.
- GND
- OUT2 : 3.3V Output(최대 허용 전류 0.3A)
참고 : 다른 sensor를 사용할 때는 5P Cable을 사용하세요. 5P cable은 ROBOTIS에서 구매할 수 있습니다.
사용자 Device 제어
External Output Control
아래는 OUT port(Pin 1)를 사용해 LED를 켜고 끄는 LED circuit 예시입니다. controller 종류 또는 LED 종류에 따라 resistance 값을 조정해야 합니다.

RoboPlus Task를 사용해 OUT port로 high signal을 보낼 수 있습니다.
- LOAD, CALCULATE 같은 writable parameter에서 user device를 선택한 뒤 device가 연결된 port를 선택합니다.
- 그런 다음 constant를 사용해 readable parameter에 high signal을 설정합니다.
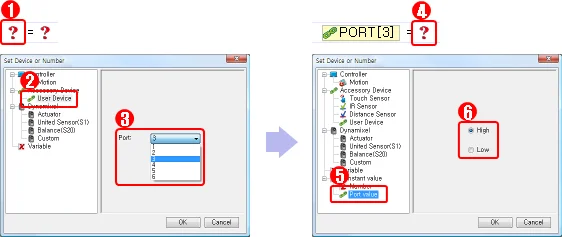

위 code가 실행되면 PORT 3에 연결된 device의 OUT port로 high signal이 전송되고 LED가 켜집니다.
ADC Value 읽기
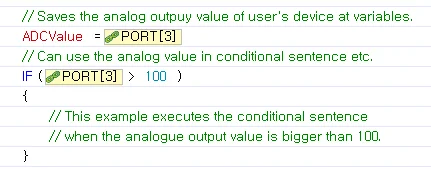
IR sensor, distance sensor 등 로봇에 사용되는 대부분의 sensor는 analog output을 지원합니다. CM-510/CM-530은 external port를 사용해 sensor의 analog output signal을 읽을 수 있습니다. 이러한 sensor는 사용자가 직접 설계하거나 시중에서 구매할 수 있습니다.
- 아래는 tilt sensor 이미지입니다. sensor가 기울어지면 기울어진 값을 analog signal로 출력합니다.

- tilt sensor의 왼쪽 pin은 5V VCC, 가운데는 analog signal output pin, 오른쪽 pin은 GND입니다. 이 sensor는 각 pin을 CM-530/CM-510 external port의 대응 pin에 연결해 사용할 수 있습니다. 직접 시험하려면 CM-530/CM-510 external port pin 정보를 참고하세요.

- 아래 예시처럼 sensor의 analog output을 로봇 움직임에 활용할 수 있습니다.
Gripper Assembly
- 사용자는 필요에 맞게 humanoid robot에 gripper를 추가할 수 있습니다.
- gripper는 물건을 잡거나 던질 때 유용합니다.
재료
Bioloid Premium Kit로 humanoid Type B 또는 Type C를 조립하면 AX-12+ 2개가 남습니다. 이 spare part를 사용해 humanoid용 gripper를 만들 수 있습니다. 아래는 gripper 제작에 필요한 parts입니다.
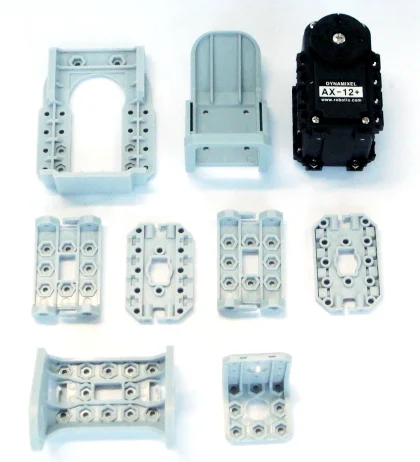
gripper 만들기
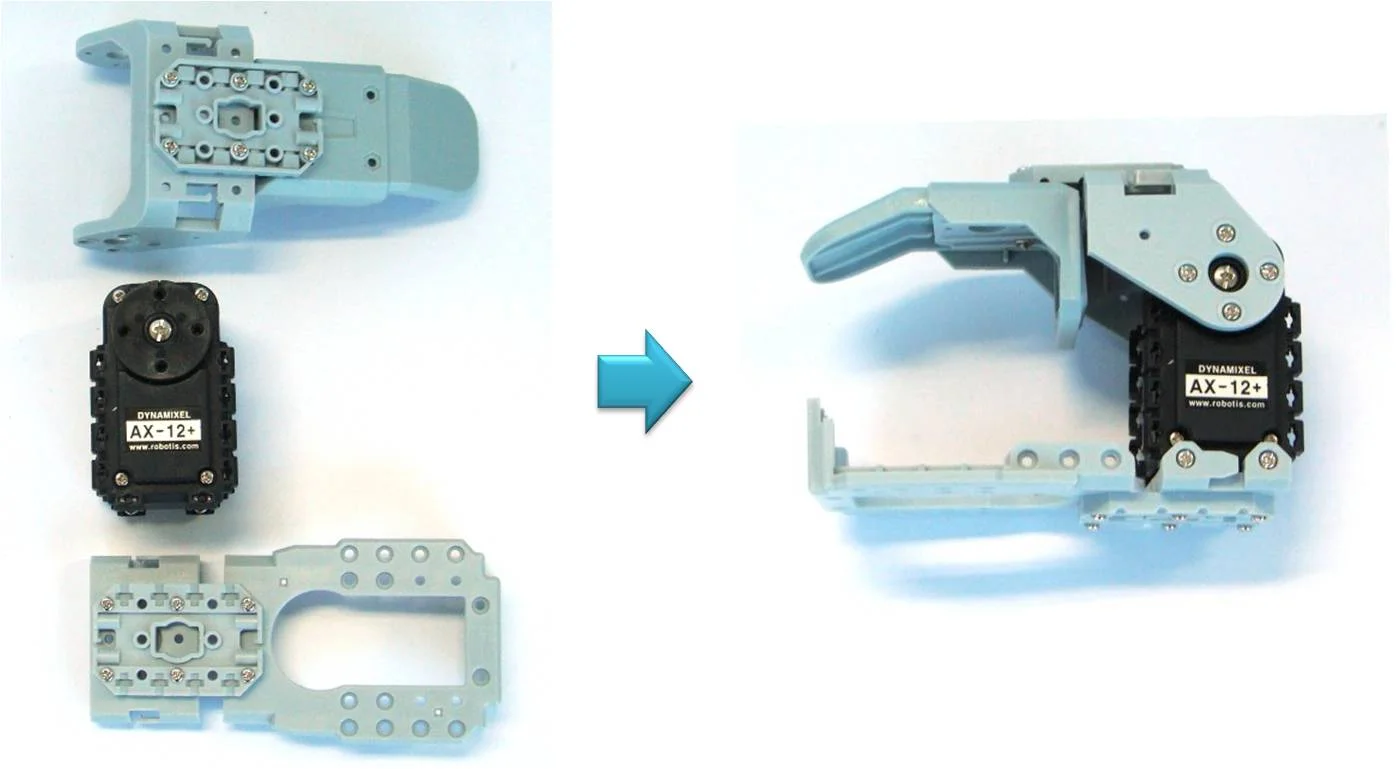
위 이미지는 frame과 AX-12+를 사용해 gripper를 만드는 방법을 보여줍니다. 양손에 gripper를 장착하려면 두 개를 만드세요.
Gripper 장착
gripper가 장착된 로봇을 만들면 로봇으로 할 수 있는 일을 확장할 수 있습니다. gripper robot 제어에 대한 자세한 내용은 gripper control을 참고하세요. 아래는 gripper가 장착된 Type B humanoid 이미지입니다. 오른쪽 gripper에는 AX-12+ #9, 왼쪽에는 AX-12+ #10이 사용되었습니다.