- 2025 ~
- ~ 2023
Recovery
OP3 Manual Installation
Overview
This chapter explains how to manually install and configure the main software of the ROBOTIS-OP3.
User Installation
OS Installation
OS Installation
- Linux Mint 22 Xfce
Reference : How to Install Linux Mint
PC Setup
- WiFi Hotspot
- Right-click on the Network icon in the system tray at the bottom right corner of your screen and select
Edit Connections.... - In the
Network Connectionswindow, click Add(+) button. - In the
Choose a Connection Typewindow, selectWi-Fifrom the Hardware group. - Click
Create...button. - Modify the
Connection nametoOP3-Hotspotin the new window. - Change the SSID to
ROBOTIS-OP3-Sharein the Wi-Fi tab. - Select
HotspotMode and clickSavebutton. - Close the
Network Connectionswindow. - Click the Network icon from the bottom right corner of the system tray and select
Connect to Hidden Wi-Fi Network.... - Select
OP3-Hotspotfor theConnectionin theHidden Wi-Fi networkand click theConnectbutton.
-
Other Settings
- Increase real-time scheduling priority (rtprio) for current user's group
$ sudo bash -c 'echo "@robotis - rtprio 99" > /etc/security/limits.d/robotis-rtprio.conf'
- Add user to appropriate groups
$ sudo usermod -aG dialout,video,audio robotis
- Configure USB latency timer to 1ms at startup
- create a udev rules file
$ sudo nano /etc/udev/rules.d/50-latency-timer.rules
- add the following rule to the file
ACTION=="add", SUBSYSTEM=="usb-serial", DRIVER=="ftdi_sio", ATTR{latency_timer}="1"
- reload udev rules
$ sudo udevadmin control --reload-rules$ sudo udevadmin trigger
- create a udev rules file
- Increase real-time scheduling priority (rtprio) for current user's group
-
Server Settings
-
openssh Installation
$ sudo apt install openssh-server -
Desktop sharing
- Vino Installation and configuration
$ sudo apt install vino$ gsettings set org.gnome.Vino require-encryption false$ gsettings set org.gnome.Vino prompt-enabled false$ gsettings set org.gnome.Vino authentication-methods "['vnc']"$ gsettings set org.gnome.Vino vnc-password $(echo -n '111111'|base64)
Start→Session and Startup→Application Autostart→AddbuttonName: Desktop SharingDescription: vnc serverCommand: /usr/lib/vino/vino-server --sm-disableTrigger: on login
OKbutton- logout & login
- Vino Installation and configuration
-
Samba
- Installation
$ sudo apt install -y samba samba-common
- Create a samba user
$ sudo smbpasswd -a robotis[sudo] password for robotis: 111111New SMB password: 111111Retype new SMB password: 111111
- Append the following to the
/etc/samba/smb.conffile[root directory]comment = Root Directorypath = /browseable = yesread only = nowritable = yescreate mask = 0755directory mask = 0755valid users = @robotis - Restart service
$ sudo service smbd restart
- Installation
-
Apache(for web_setting_tool)
- Install web server(APACHE2)
$ sudo apt install apache2
- Check the default page from a web browser
- Install web server(APACHE2)
-
ROS Installation & Environment Setup
-
ROS Installation
Reference : ROS Installation
-
ROS Environment Setup
Reference : ROS Environment and Network Settings
DDS Middleware and Network tuning
-
Change DDS Middleware
- Install CycloneDDS
$ sudo apt install ros-jazzy-rmw-cyclonedds-cpp
- Append the following to your
~/.bashrcfile:export ROS2_WS='robotis_ws'source /opt/ros/jazzy/setup.bashsource ~/$ROS2_WS/install/local_setup.bashexport ROS_DOMAIN_ID=1export RMW_IMPLEMENTATION=rmw_cyclonedds_cppexport CYCLONEDDS_URI=file:///home/robotis/.ros/cyclonedds.xml
- Install CycloneDDS
-
Tuning for large messages
DDS implementations are not designed to handle large messages (such as images). Therefore, it is necessary to tune them and the network parameters to prevent data loss and system overloading.- Increase the minimum socket receive buffer and maximum size of messages for CycloneDDS
Create the CycloneDDS configuration file:$ nano ~/.ros/cyclonedds.xml<?xml version="1.0" encoding="UTF-8" ?><CycloneDDS xmlns="https://cdds.io/config" xmlns:xsi="http://www.w3.org/2001/XMLSchema-instance" xsi:schemaLocation="https://cdds.io/config https://raw.githubusercontent.com/eclipse-cyclonedds/cyclonedds/master/etc/cyclonedds.xsd"><Domain id="any"><General><Interfaces><NetworkInterface name="lo" /></Interfaces><AllowMulticast>false</AllowMulticast><MaxMessageSize>65500B</MaxMessageSize></General><Internal><SocketReceiveBufferSize min="10MB"/><Watermarks><WhcHigh>500kB</WhcHigh></Watermarks></Internal><Discovery><ParticipantIndex>auto</ParticipantIndex><MaxAutoParticipantIndex>100</MaxAutoParticipantIndex><Peers><Peer Address="127.0.0.1"/></Peers></Discovery></Domain></CycloneDDS> - Create a network configuration file:
$ sudo nano /etc/sysctl.d/10-cyclone-max.conf# IP fragmentation settingsnet.ipv4.ipfrag_time=3 # in seconds, default is 30 snet.ipv4.ipfrag_high_thresh=33554432 # 32 MiB, default is 4 MiB# Increase the maximum receive buffer size for network packetsnet.core.rmem_max=134217728 # 128 MiB, default is 208 KiB
- Save the file and reboot. Validate the sysctl settings, after a reboot:
$ sysctl net.core.rmem_max net.ipv4.ipfrag_time net.ipv4.ipfrag_high_threshnet.core.rmem_max = 134217728net.ipv4.ipfrag_time = 3net.ipv4.ipfrag_high_thresh = 33554432
- Increase the minimum socket receive buffer and maximum size of messages for CycloneDDS
Installing ROBOTIS ROS Packages
-
ROBOTIS ROS Packages
- DYNAMIXEL SDK : SDK for DYNAMIXEL
- ROBOTIS-Math : basic calculation related to transformation and trajectory functions
- ROBOTIS-OP3 : ROS packages running on the ROBOTIS-OP3
- ROBOTIS-OP3-Common
- ROBOTIS-OP3-Demo : ROBOTIS-OP3 demonstration package.
- ROBOTIS-OP3-ETC : : This package contains a modified version of the usb_cam driver and face_detection used for the ROBOTIS-OP3
- ROBOTIS-OP3-msgs : This package contains the ROS messages that are used for the ROBOTIS-OP3
- ROBOTIS-OP3-Tools : This package contains useful tools for the ROBOTIS-OP3
- ROBOTIS-Utility : This package contains the audio player for the ROBOTIS-OP3
-
How to install ROBOTIS ROS packages
- Download sources from Github.
$ mkdir -p ~/robotis_ws/src$ cd ~/robotis_ws/src$ git clone https://github.com/ROBOTIS-GIT/DynamixelSDK.git --branch=jazzy$ git clone https://github.com/ROBOTIS-GIT/ROBOTIS-Math.git --branch=jazzy-devl$ git clone https://github.com/ROBOTIS-GIT/ROBOTIS-OP3.git --branch=jazzy-devl$ git clone https://github.com/ROBOTIS-GIT/ROBOTIS-OP3-Common.git --branch=jazzy-devl$ git clone https://github.com/ROBOTIS-GIT/ROBOTIS-OP3-Demo.git --branch=jazzy-devl$ git clone https://github.com/ROBOTIS-GIT/ROBOTIS-OP3-ETC.git --branch=jazzy-devl$ git clone https://github.com/ROBOTIS-GIT/ROBOTIS-OP3-msgs.git --branch=jazzy-devl$ git clone https://github.com/ROBOTIS-GIT/ROBOTIS-OP3-Tools.git --branch=jazzy-devl$ git clone https://github.com/ROBOTIS-GIT/ROBOTIS-Utility.git --branch=jazzy-devl
- Download sources from Github.
Installing additional applications for ROBOTIS ROS Package
- update package list
$ sudo apt update
- install python3-rosdep
$ sudo apt install python3-rosdep
- initialize rosdep and update the rosdep database
$ sudo rosdep init$ rosdep udpate
- use rosdep to install dependencies
$ cd ~/robotis_ws$ rosdep install --from-paths src --ignore-src -r -y --os=ubuntu:noble
--from-paths src: specifies the source directory where your ROS packages are located.--ignore-src: ignores packages within the source directory itself.-r: resolves dependencies recursively.-y: automatically answers "yes" to all prompts.
- install additional packages
- for ROBOTIS-Utility : madplay, mpg321
$ sudo apt install -y madplay mpg321
- ETC.
$ sudo apt install -y ros-jazzy-xacro ros-jazzy-imu-tools python3-pydantic
- for ROBOTIS-Utility : madplay, mpg321
Build downloaded ROBOTIS ROS packages.
$ cd ~/robotis_ws
$ colcon build --symlink-install && source ~/.bashrc
ETC Setting
-
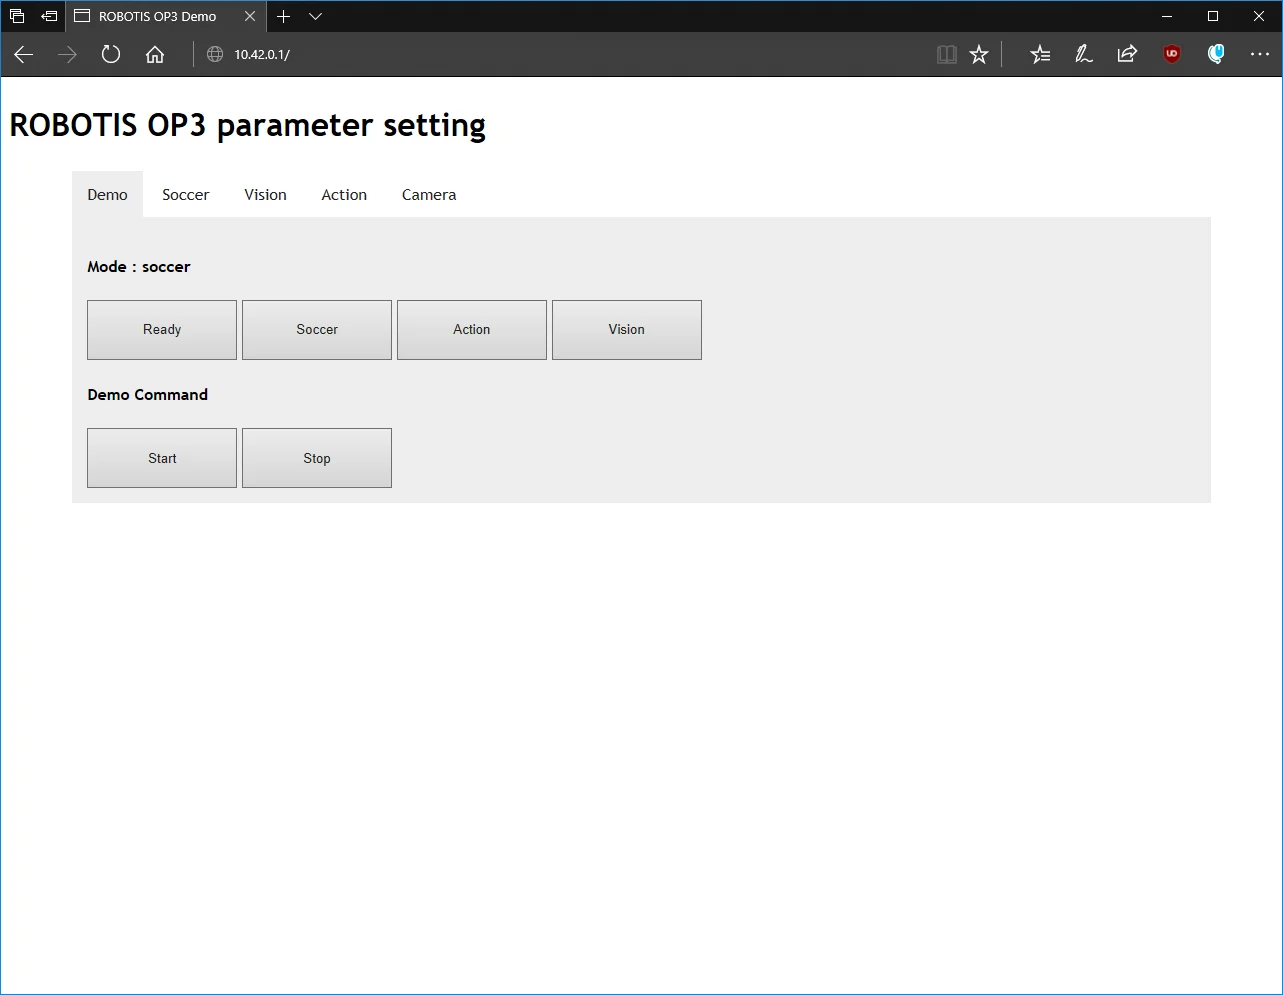
Configure web_setting_tool
- Copy files from ROBOTIS-OP3-Tools folder to the web server folder : github
$ cd ~/robotis_ws/src/ROBOTIS-OP3-Tools/op3_web_setting_tool$ sudo cp -r ./html /var/www
- Check the default page from a web browser
- How to Use the Web Setting Tool
- Copy files from ROBOTIS-OP3-Tools folder to the web server folder : github
-
Configure Shutdown Sound
- Create
/etc/init.d/shutdown-sndfile.
Create the above file with a text editor.$ sudo xed /etc/init.d/shutdown-snd - Append the following information to the file and save.
#! /bin/sh/usr/bin/madplay "/usr/share/sounds/byebye.mp3"
- Add execution permission to the file.
$ sudo chmod +x /etc/init.d/shutdown-snd
- Copy shutdown mp3 to
/usr/share/sounds/folder.$ sudo cp ~/robotis_ws/src/ROBOTIS-OP3-Demo/op3_demo/data/mp3/Bye\ bye.mp3 /usr/share/sounds/byebye.mp3 - Create a service for the shutdown sound.
-
Create the
/etc/systemd/system/shutdown_sound.servicefile$ sudo xed /etc/systemd/system/shutdown_sound.service -
Append the below information to the file and save.
[Unit]Description=shutdown soundAfter=network.target[Service]Type=oneshotExecStart=/bin/trueExecStop=/etc/init.d/shutdown-sndRemainAfterExit=yes[Install]WantedBy=multi-user.target -
Register the Service and execute
$ systemctl daemon-reload$ systemctl enable /etc/systemd/system/shutdown_sound.service --now
-
- Create
-
Configure Power Button for shutdown
- Go to Start Button >
Settings>Power Manager. - Go to
General>Buttons>When power button is pressedand change the option toShutdown.
- Go to Start Button >
-
Running the demo at the startup
Reference: Running the demo at the startup
Recovery of ROBOTIS-OP3
Overview
This chapter explains how to recover the ROBOTIS-OP3 software using the recovery USB image.
CloneZilla recovery
Clonezilla can be used to recover the ROBOTIS-OP3 software from the image file in the provided backup USB.
How to creat a recovery USB media
- Format a USB drive (8GB or more space is required)
- Go to sourceforge.net and download a recovery image file.
NOTE: The required image file may differ depending on the generation of the installed SBC. Be sure to check the following table and download the appropriate image file for your NUC PC.
| Recovery Image List | Description |
|---|---|
| clonezilla-live-ROBOTIS-OP3_Recovery_250GB_250226.zip | OP3 Rev.3 only (SSD 250GB) |
| clonezilla-live-ROBOTIS-OP3_Recovery_181019(NUC_7th).zip | OP3 Rev.2 only (NUC7) |
| clonezilla-live-ROBOTIS-OP3_Recovery_180402.zip | Latest version for NUC 6 only |
| clonezilla-live-ROBOTIS-OP3_Recovery_171013.zip | Older image for NUC 6 only |
- Extract the zipped folder to the root folder of the USB drive. The folder structure is as follows.
.├── .disk├── [BOOT]├── boot│ └── grub├── EFI│ └── boot├── home│ └── partimag│ └── ROBOTIS-OP3_Recovery_250GB_25xxxx├── live├── syslinux└── utils├── linux├── mbr├── win32└── win64
How to recover ROBOTIS-OP3
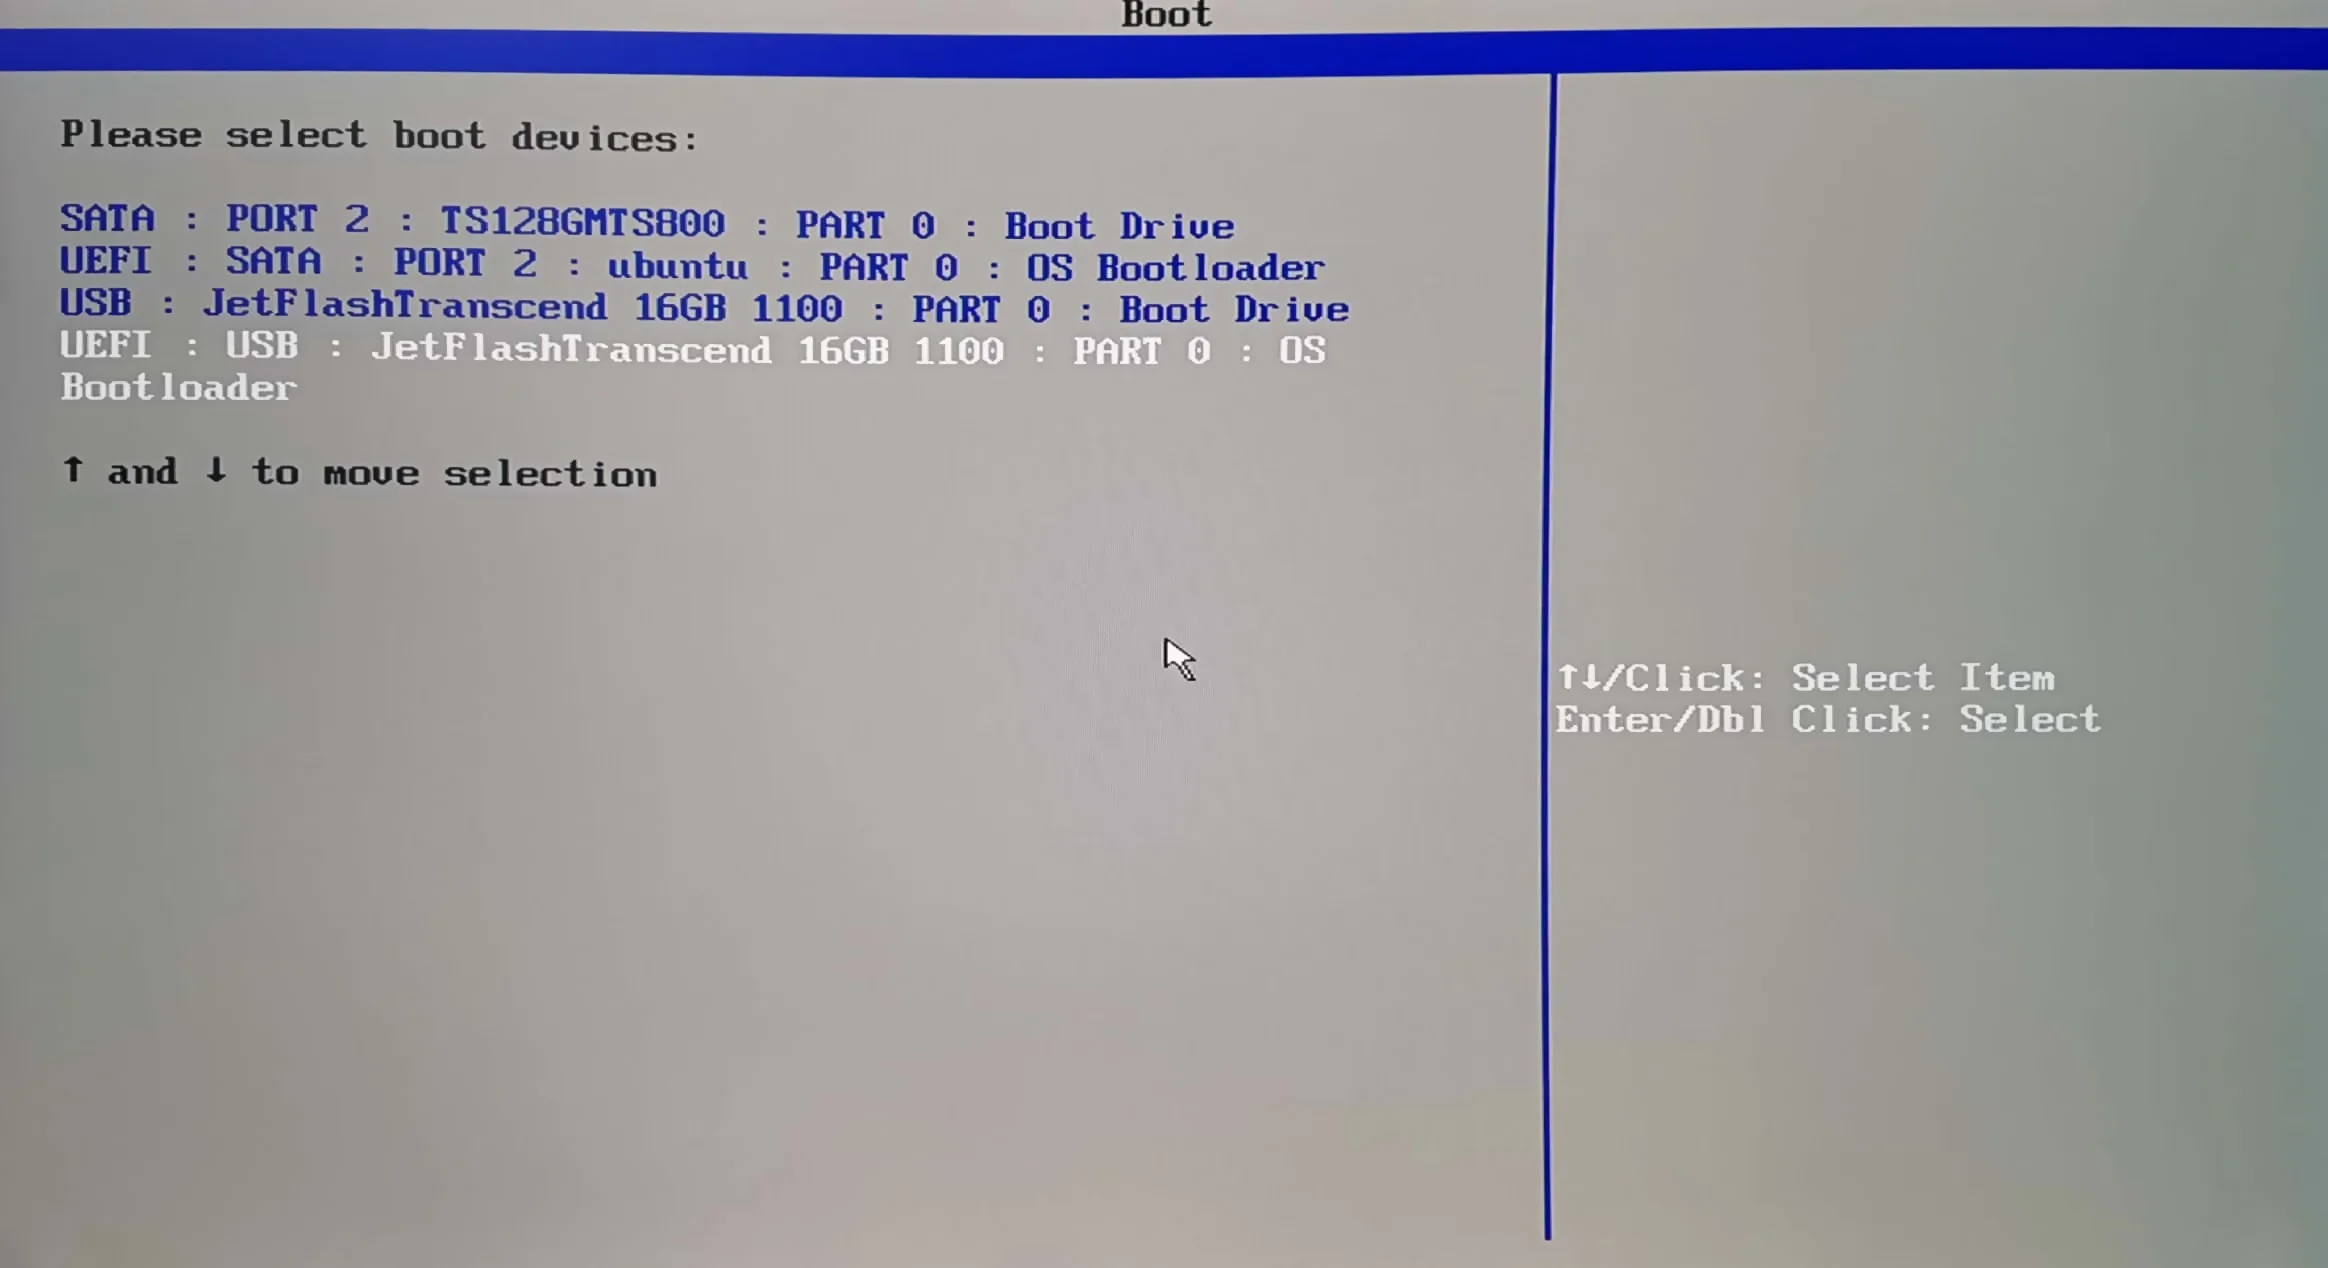
- Go to boot manager : Press F10

- Select the boot device : Recovery USB media
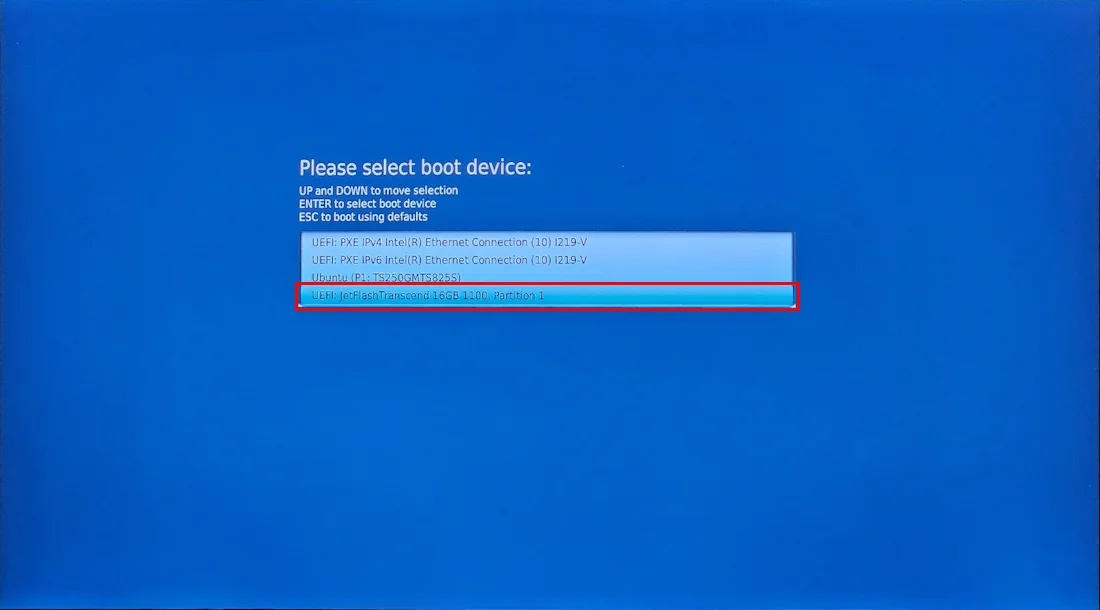
- Select the image :
Clonezilla live (VGA 800x600)

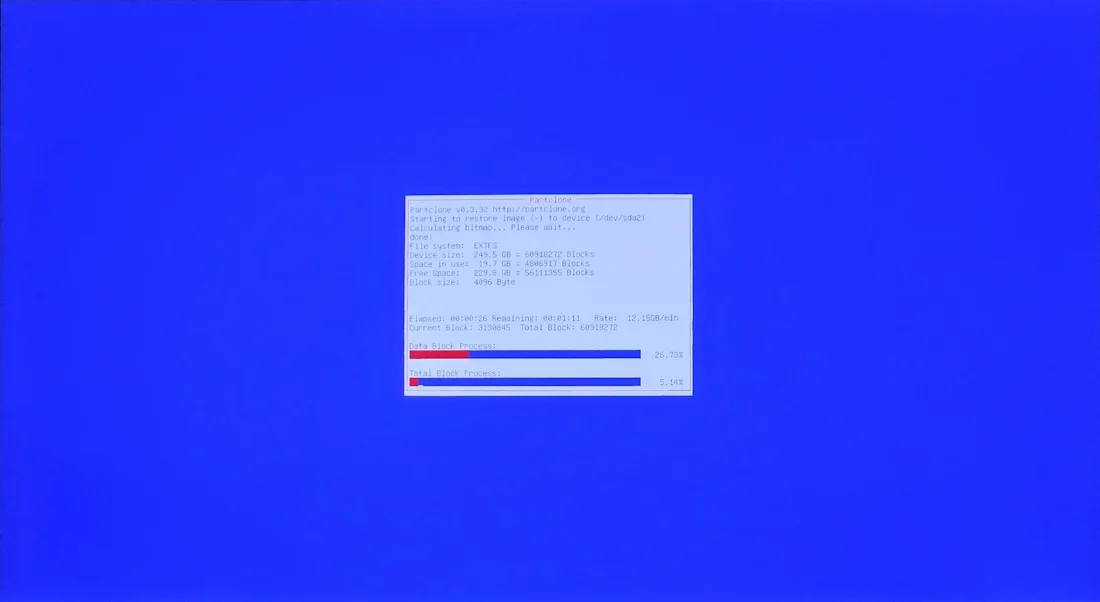
- Recovery will automatically start, and the PC will turn off when it's done.
Recovery
OP3 Manual Installation
Overview
This chapter explains how to install software and configure ROBOTIS OP3.
User Installation
OS Installation
OS Installation
- Linux Mint 18.1 Xfce
Reference : How to Install Linux Mint
PC Setting
- WiFi Hotspot
- Click the Network icon from the bottom right corner of the system tray and select "Edit Connections...".
- In the Network Connections window, click Add button.
- In the Choose a Connection Type window, select Wi-Fi from the Hardware group.
- Click Create... button.
- Modify the Connection name to "OP3-Hotspot" in the new window.
- Change the SSID to "ROBOTIS-OP3-share" in the Wi-Fi tab.
- Select Hotspot Mode and click Save button.
- Close the Network Connections window.
- Click the Network icon from the bottom right corner of the system tray and select "Connect to Hidden Wi-Fi Network...".
- Select OP3-Hotspot for the Connection in the Hidden Wi-Fi network and click Connect button.
-
Other Settings
- Increase real-time scheduling priority (rtprio) for current user group
$ sudo bash -c 'echo "@robotis - rtprio 99" > /etc/security/limits.d/robotis-rtprio.conf'
- Add user to appropriate groups
$ sudo usermod -aG dialout robotis
- Increase real-time scheduling priority (rtprio) for current user group
-
Server Settings
- openssh Installation
$ sudo apt install openssh-server-
Desktop sharing
- Open a terminal window.
- Install dconf-editor with
$ sudo apt install dconf-editorcommand. - Run the editor with
$ dconf-editorcommand. - Go to org > gnome > desktop > remote-access and uncheck require-encryption
- Execute
$ vino-preferences - In the Sharing section of the Desktop Sharing Preferences windows, apply followings
- Check on the Allow other users to view your desktop option.
- Check on the Allow other users to control your desktop option.
- In the Security section, apply followings
- Uncheck the You must confirm each access to this machine option.
- Check on the Require the user to enter this password option and enter
111111.
- Click Close button
- Reboot the system.
-
Samba
- Installation
$ sudo apt install samba samba-common python-glade2 system-config-samba
- Configuration
$ sudo touch /etc/libuser.conf$ sudo system-config-samba
- Go to Preferences > Samba Users...
- Click
Add Userbutton - Select the Unix Username (ex : robotis)
- Enter the Windows Username (ex : robotis)
- Enter the Password (ex : 111111)
- Click
- Click
Add Sharebutton- In the Basic tab
- Enter
/in the Directory. - Check on the Writable / Visible option.
- Enter
- In the Access tab
- Select Only allow access to specific users
- Select samba user
- In the Basic tab
- Go to Preferences > Samba Users...
- Installation
-
Apache(for web_setting_tool)
- Install web server(APACHE2)
$ sudo apt install apache2
- Check the default page from a web browser
- Install web server(APACHE2)
ROS Installation & Environment Setup
-
ROS Installation
Reference : ROS Installation
-
ROS Environment Setup
Reference : ROS Environment and Network Settings
Installing additional applications for ROBOTIS ROS Package
Prerequisites for ROBOTIS ROS package
- ROBOTIS-OP3 : libncurses5-dev, v4l-utils
$ sudo apt install libncurses5-dev v4l-utils
- ROBOTIS-Utility : madplay, mpg321
$ sudo apt install madplay mpg321
- ETC : g++, git
$ sudo apt install g++ git
Installing ROS packages for ROBOTIS-OP3
-
face_detection
ROS Package used for vision demo$ cd ~/catkin_ws/src$ git clone https://github.com/ROBOTIS-GIT/face_detection.git$ cd ~/catkin_ws$ catkin_make -
robot_upstart
ROS Package that automatically executes basic demo of ROBOTIS-OP3- Installation
$ sudo apt install ros-kinetic-robot-upstart
- Setting for automatic startup
- Installation
-
usb_cam
ROS Package for USB Camera$ cd ~/catkin_ws/src$ git clone https://github.com/bosch-ros-pkg/usb_cam.git$ cd ~/catkin_ws$ catkin_make$ sudo apt install v4l-utils -
qt_ros
$ sudo apt install ros-kinetic-qt-ros -
humanoid_navigation
Package for footstep planner.-
Install prerequisite packages
$ sudo apt-get install ros-kinetic-map-server$ sudo apt-get install ros-kinetic-humanoid-nav-msgs$ sudo apt-get install ros-kinetic-nav-msgs$ sudo apt-get install ros-kinetic-octomap$ sudo apt-get install ros-kinetic-octomap-msgs$ sudo apt-get install ros-kinetic-octomap-ros$ sudo apt-get install ros-kinetic-octomap-server -
Install library from sources
-
sbpl
Reference : https://github.com/sbpl/sbpl
-
-
Install humanoid_navigation
$ cd ~/catkin_ws/src$ git clone https://github.com/ROBOTIS-GIT/humanoid_navigation.git$ cd ~/catkin_ws -
rosbridge_server, web_video_server
Packages for web_setting_tool$ sudo apt install ros-kinetic-rosbridge-server ros-kinetic-web-video-server
-
Installing ROBOTIS ROS Packages
-
ROBOTIS ROS Packages
- DYNAMIXEL SDK : SDK for DYNAMIXEL
- ROBOTIS-Math : basic calculation related to transformation and trajectory functions
- ROBOTIS-OP3 : ROS packages running in the ROBOTIS-OP3
- ROBOTIS-OP3-Demo : ROBOTIS-OP3 uses this package when running a demonstration
- ROBOTIS-OP3-msgs : This package contains ROS messages that are used for ROBOTIS-OP3
- ROBOTIS-OP3-Tools : This package contains useful tools for ROBOTIS-OP3
- ROBOTIS-OP3-Common
- ROBOTIS-Utility
-
How to install ROBOTIS ROS packages
-
Download sources from Github.
$ cd ~/catkin_ws/src$ git clone https://github.com/ROBOTIS-GIT/DynamixelSDK.git$ git clone https://github.com/ROBOTIS-GIT/ROBOTIS-Math.git$ git clone https://github.com/ROBOTIS-GIT/ROBOTIS-OP3.git$ git clone https://github.com/ROBOTIS-GIT/ROBOTIS-OP3-Demo.git$ git clone https://github.com/ROBOTIS-GIT/ROBOTIS-OP3-msgs.git$ git clone https://github.com/ROBOTIS-GIT/ROBOTIS-OP3-Tools.git$ git clone https://github.com/ROBOTIS-GIT/ROBOTIS-OP3-Common.git$ git clone https://github.com/ROBOTIS-GIT/ROBOTIS-Utility.git -
Build downloaded sources.
$ cd ~/catkin_ws$ catkin_make
-
ETC Setting
-
Configure web_setting_tool
- Copy files from ROBOTIS-OP3-Tools folder to the web server folder : github
$ cd ~/catkin_ws/src/ROBOTIS-OP3-Tools/op3_web_setting_tool$ sudo cp -r ./html /var/www
- Check the default page from a web browser
- How to use Web Setting Tool
- Copy files from ROBOTIS-OP3-Tools folder to the web server folder : github
-
Configure Shutdown Sound
- Create
/etc/init.d/shutdown-sndfile.
Create the above file with a text editor.$ sudo xed /etc/init.d/shutdown-snd - Append below information to the file and save.
#! /bin/sh/usr/bin/madplay "/usr/share/sounds/byebye.mp3"
- Add execution permission to the file.
$ sudo chmod +x /etc/init.d/shutdown-snd
- Copy shutdown mp3 to
/usr/share/sounds/folder. - Create a service for the shutdown sound.
-
Create
/etc/systemd/system/shutdown_sound.servicefile
Create the above file with a text editor.$ sudo xed /etc/systemd/system/shutdown_sound.service -
Append below information to the file and save.
[Unit]Description=shutdown soundAfter=network.target[Service]Type=oneshotExecStart=/bin/trueExecStop=/etc/init.d/shutdown-sndRemainAfterExit=yes[Install]WantedBy=multi-user.target -
Register the Service and execute
$ systemctl daemon-reload$ systemctl enable /etc/systemd/system/shutdown_sound.service --now
-
- Create
-
Configure Power Button for shutdown
- Go to Start Button > Settings > Power Manager.
- Go to General > Buttons > When power button is pressed and change the option to "Shutdown".
Recovery of ROBOTIS-OP3
Overview
This chapter explains how to recover ROBOTIS-OP3 softwares using recovery USB image.
CloneZilla recovery
Clonezilla is used to recover ROBOTIS-OP3 with the image file in the provided USB.
How to creat a recovery USB media
- Format a USB drive (Required 4GB space or above)
- Go to sourceforge.net and download an recovery image file.
NOTE: The required image file may differ depending on a generation of the provided SBC. Be sure to see the following table and download an appropriate image file with your NUC PC.
| Recovery Image List | Description |
|---|---|
| clonezilla-live-ROBOTIS-OP3_Recovery_181019(NUC_7th).zip | NUC 7 only |
| clonezilla-live-ROBOTIS-OP3_Recovery_180402.zip | Latest version for NUC 6 only |
| clonezilla-live-ROBOTIS-OP3_Recovery_171013.zip | Older image for NUC 6 only |
- Extract the zipped foler to the root folder of the USB drive. The folder structure is as follows.
.├── boot│ └── grub├── EFI│ ├── boot│ └── images├── home│ └── partimag│ └── ROBOTIS-OP3_transcend├── live├── syslinux└── utils
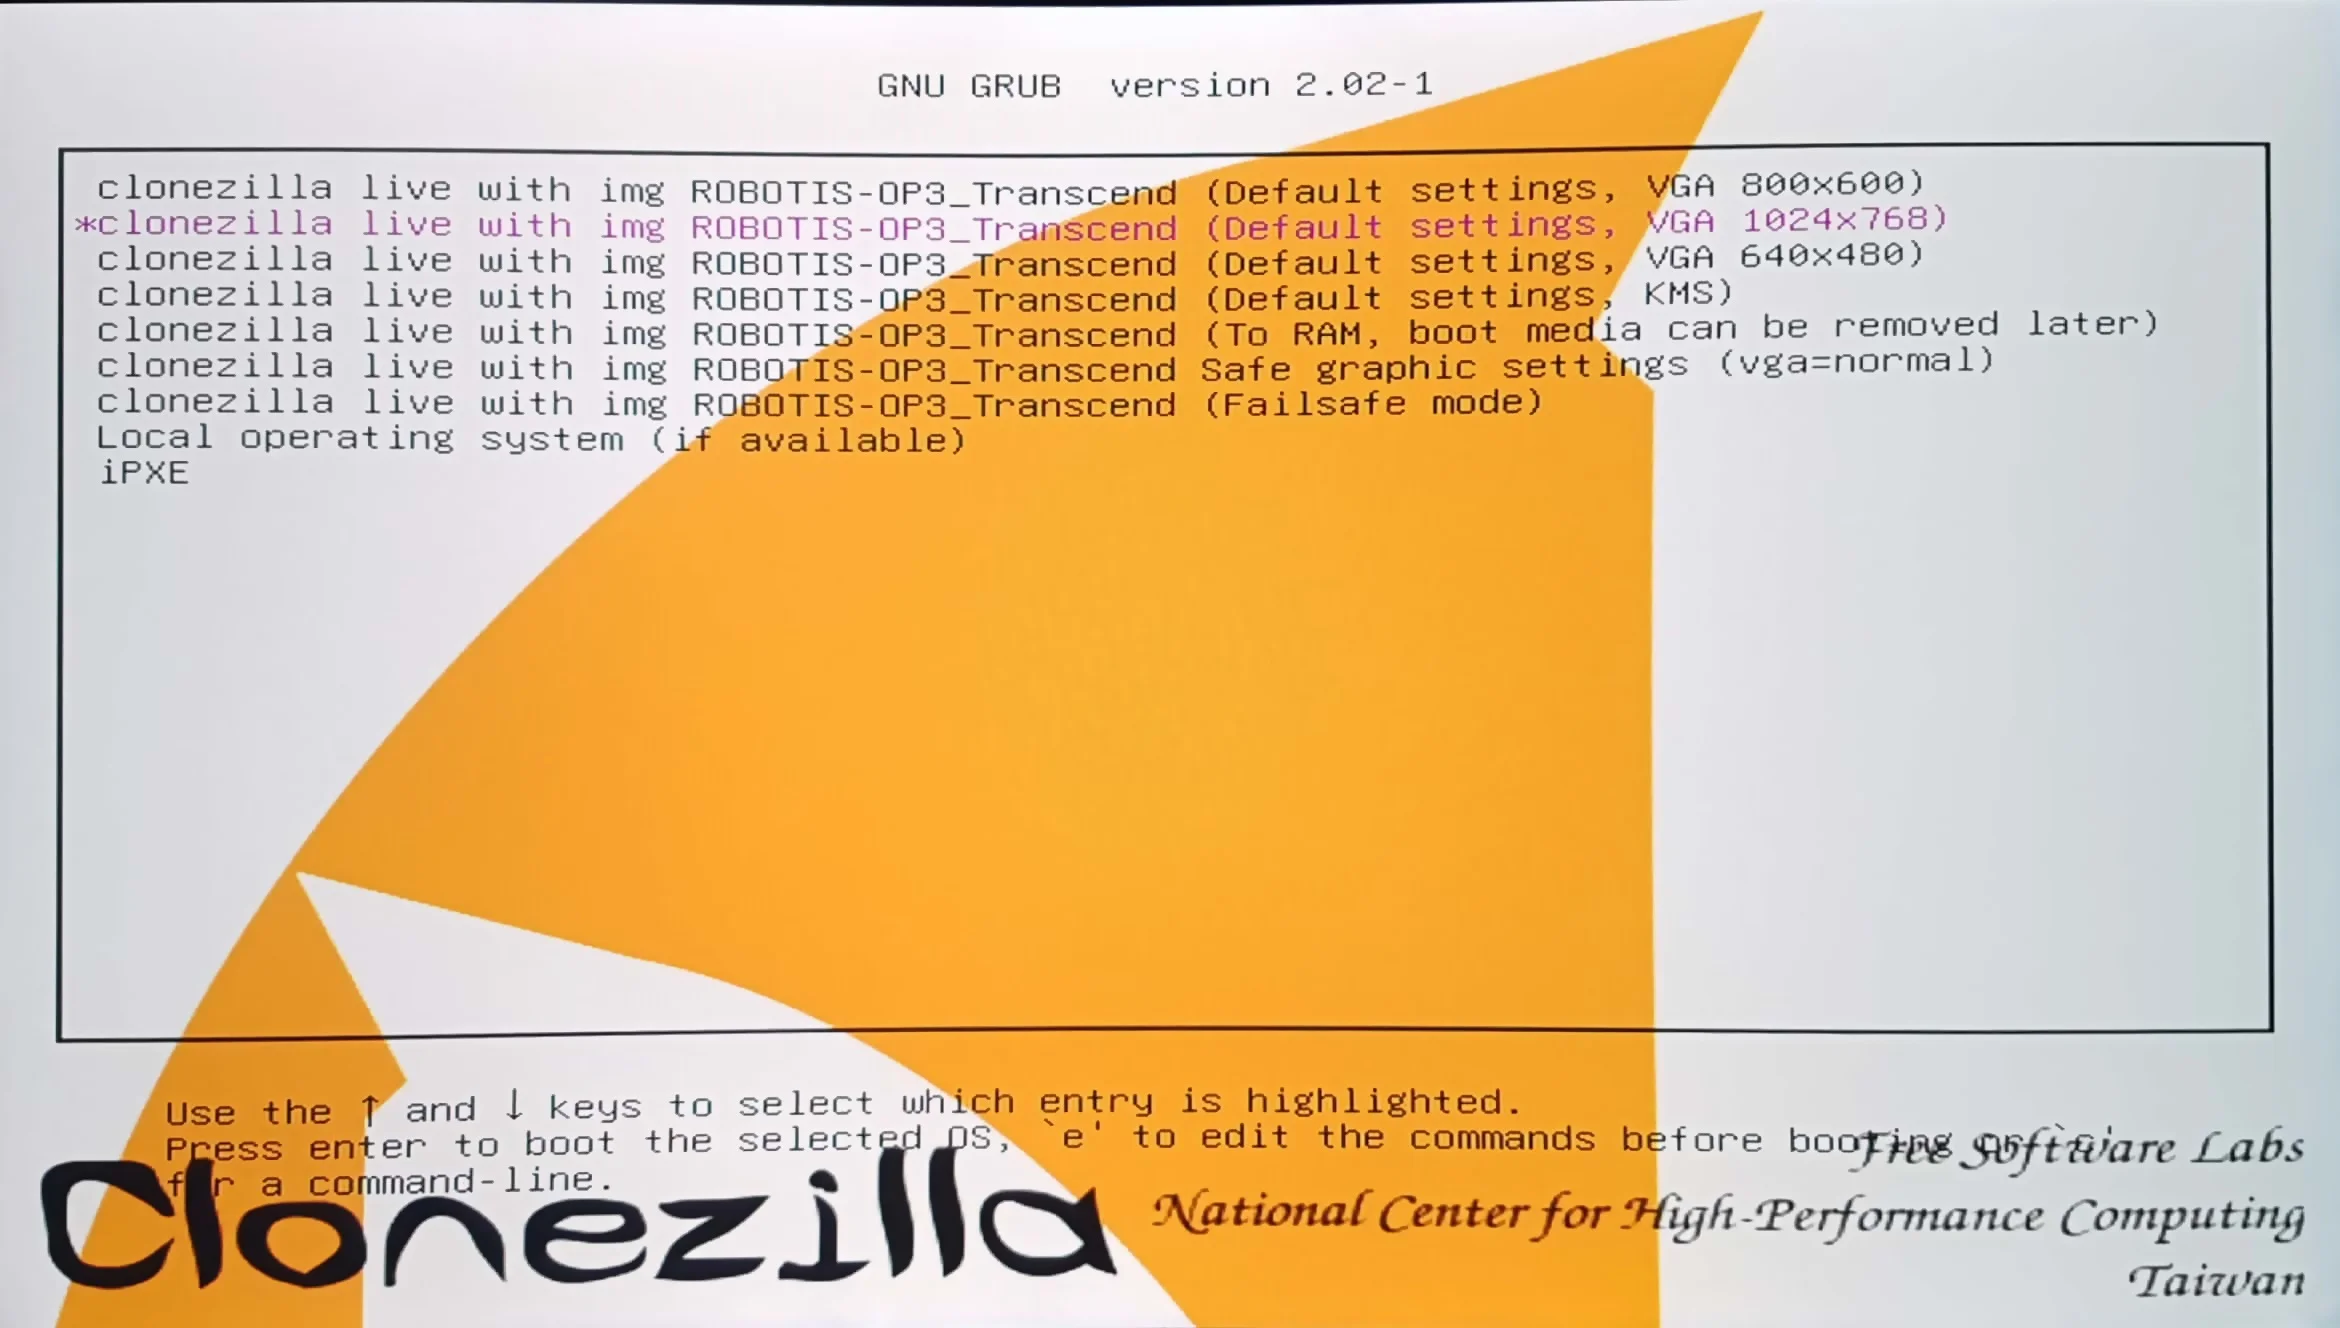
How to recover ROBOTIS-OP3
- Go to boot manager : Press F10

- Select the boot device : Recovery USB media
- Select the image : clonezilla live with img ROBOTIS-OP3_Transcend (Default settings, VGA 1024x768)
- Confirm to continue : enter
y
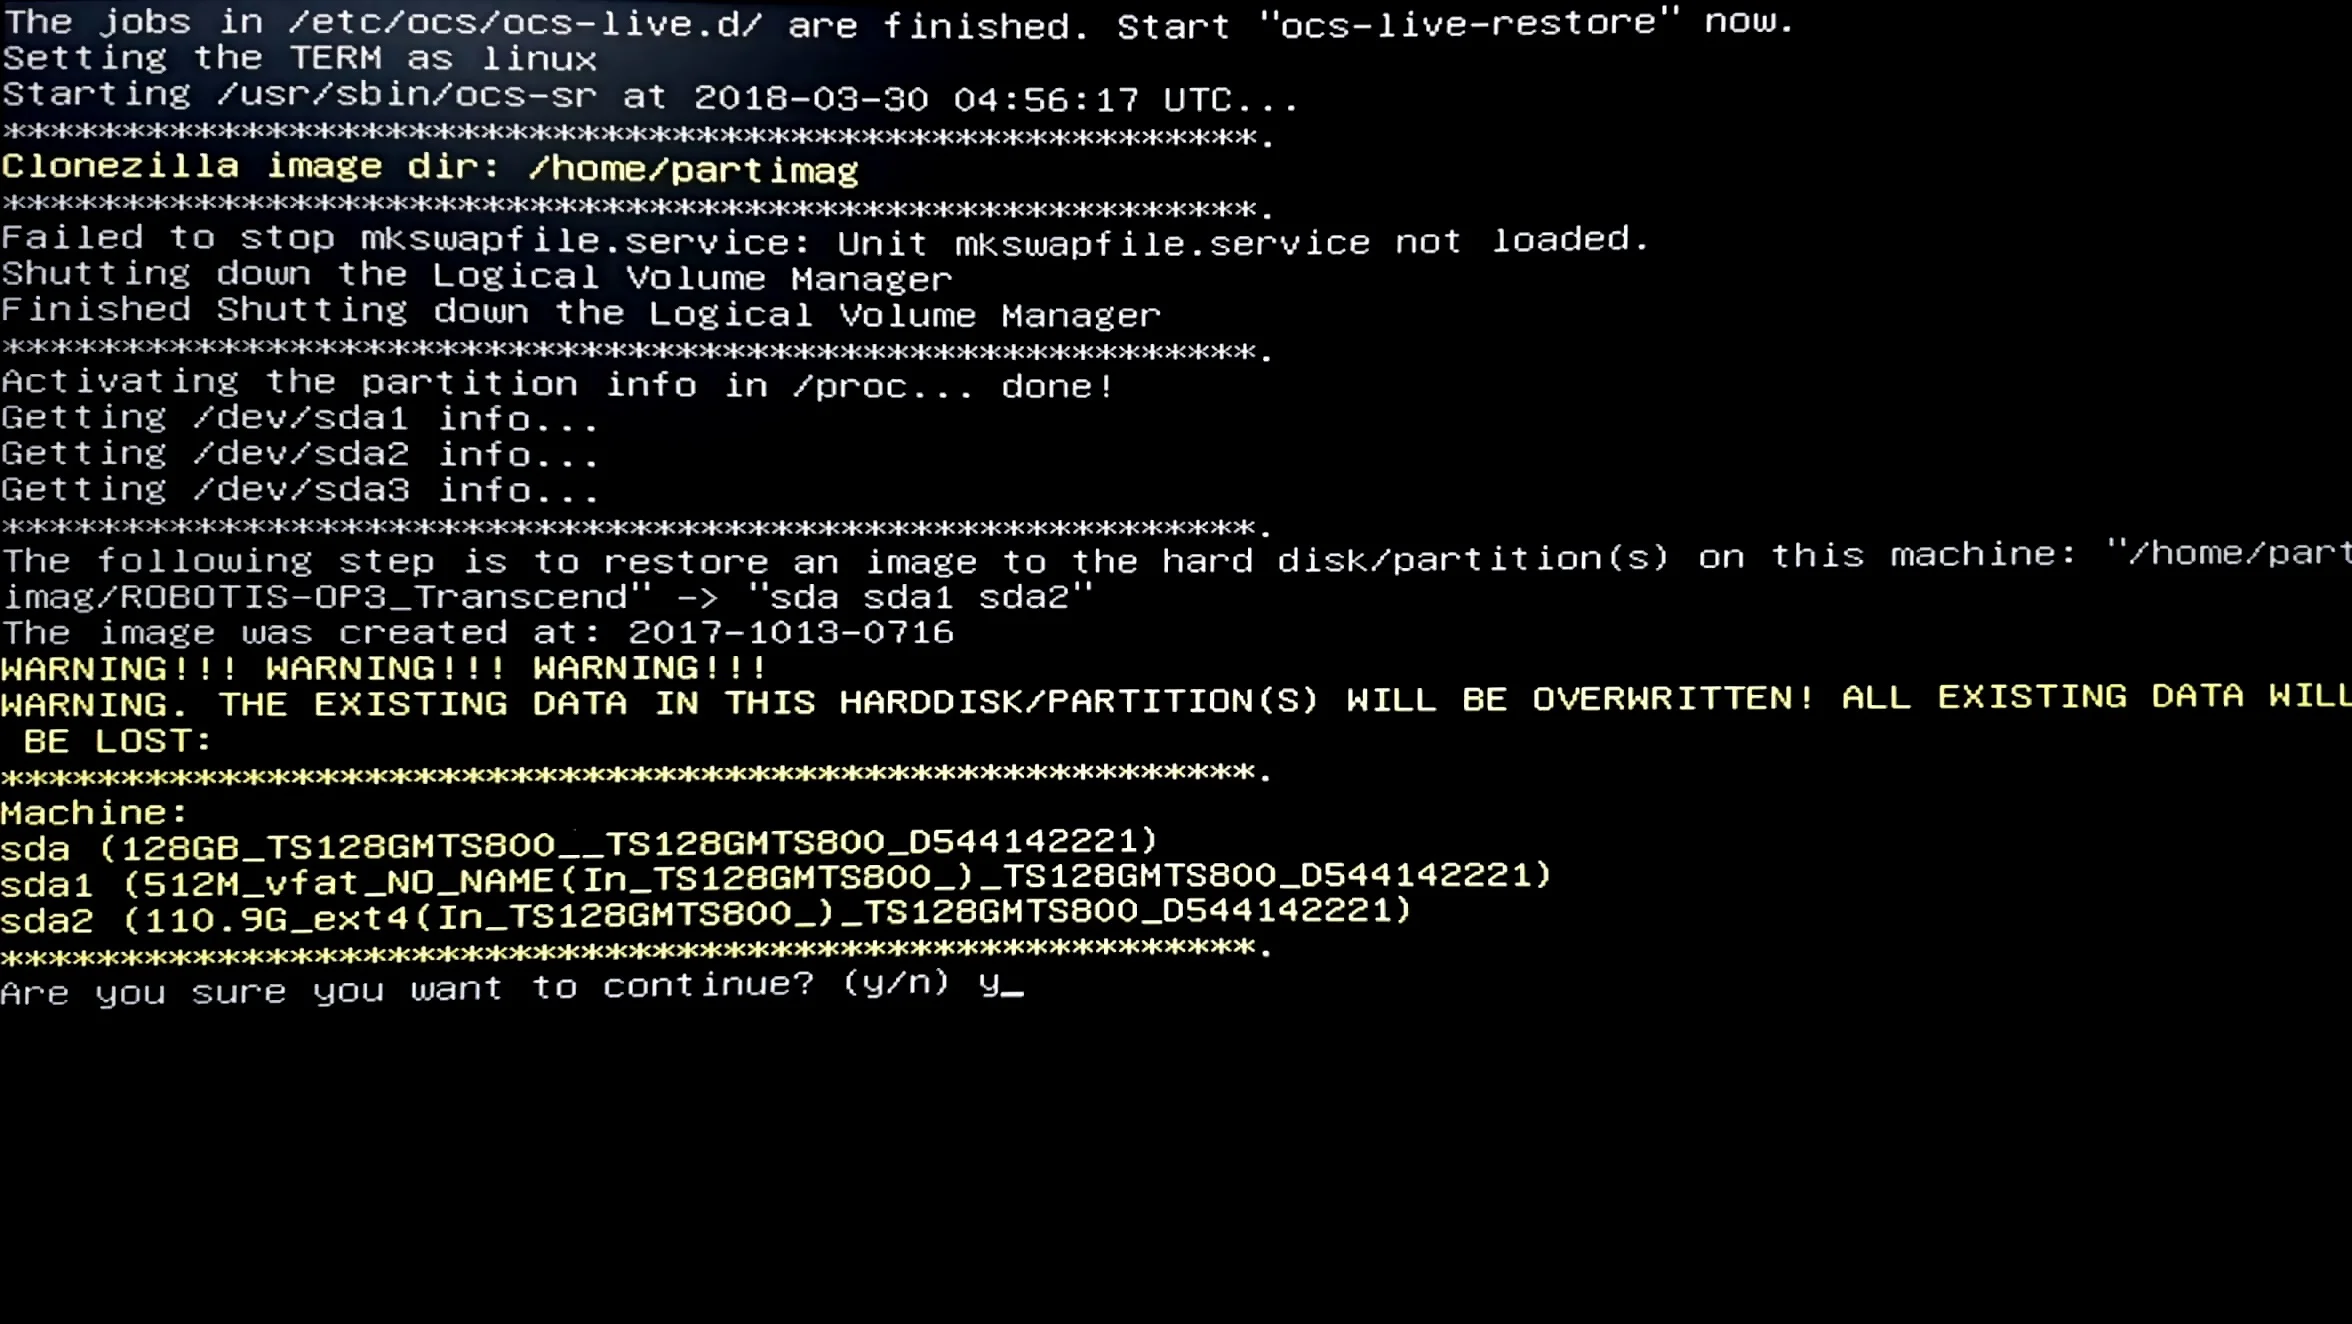
- Confirm to continue : enter
y
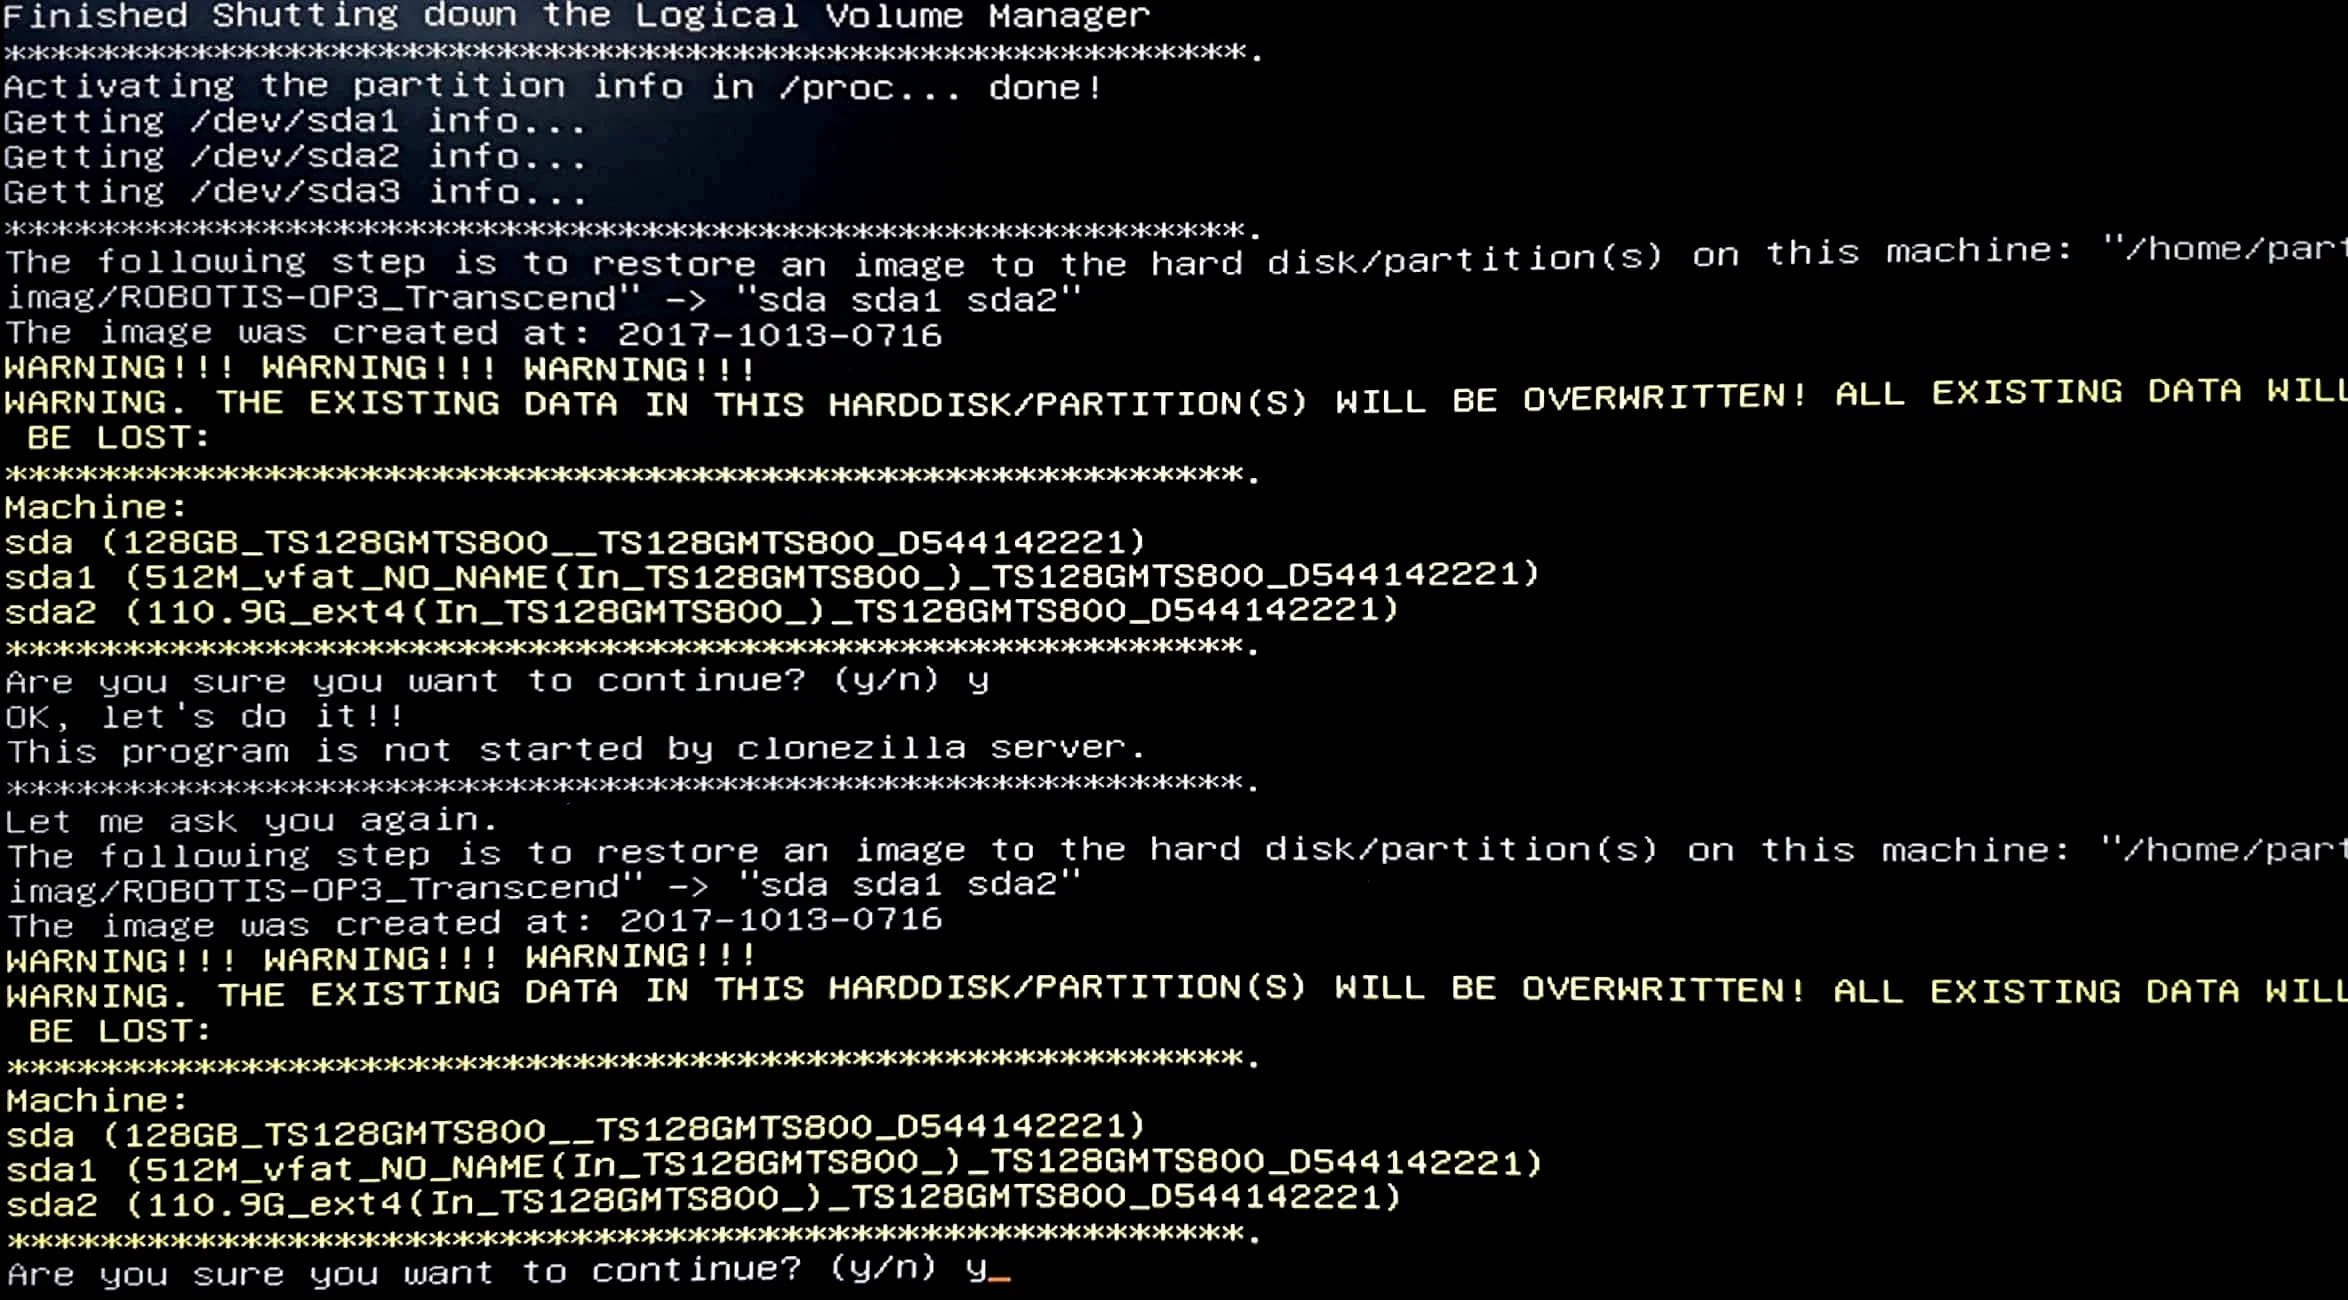
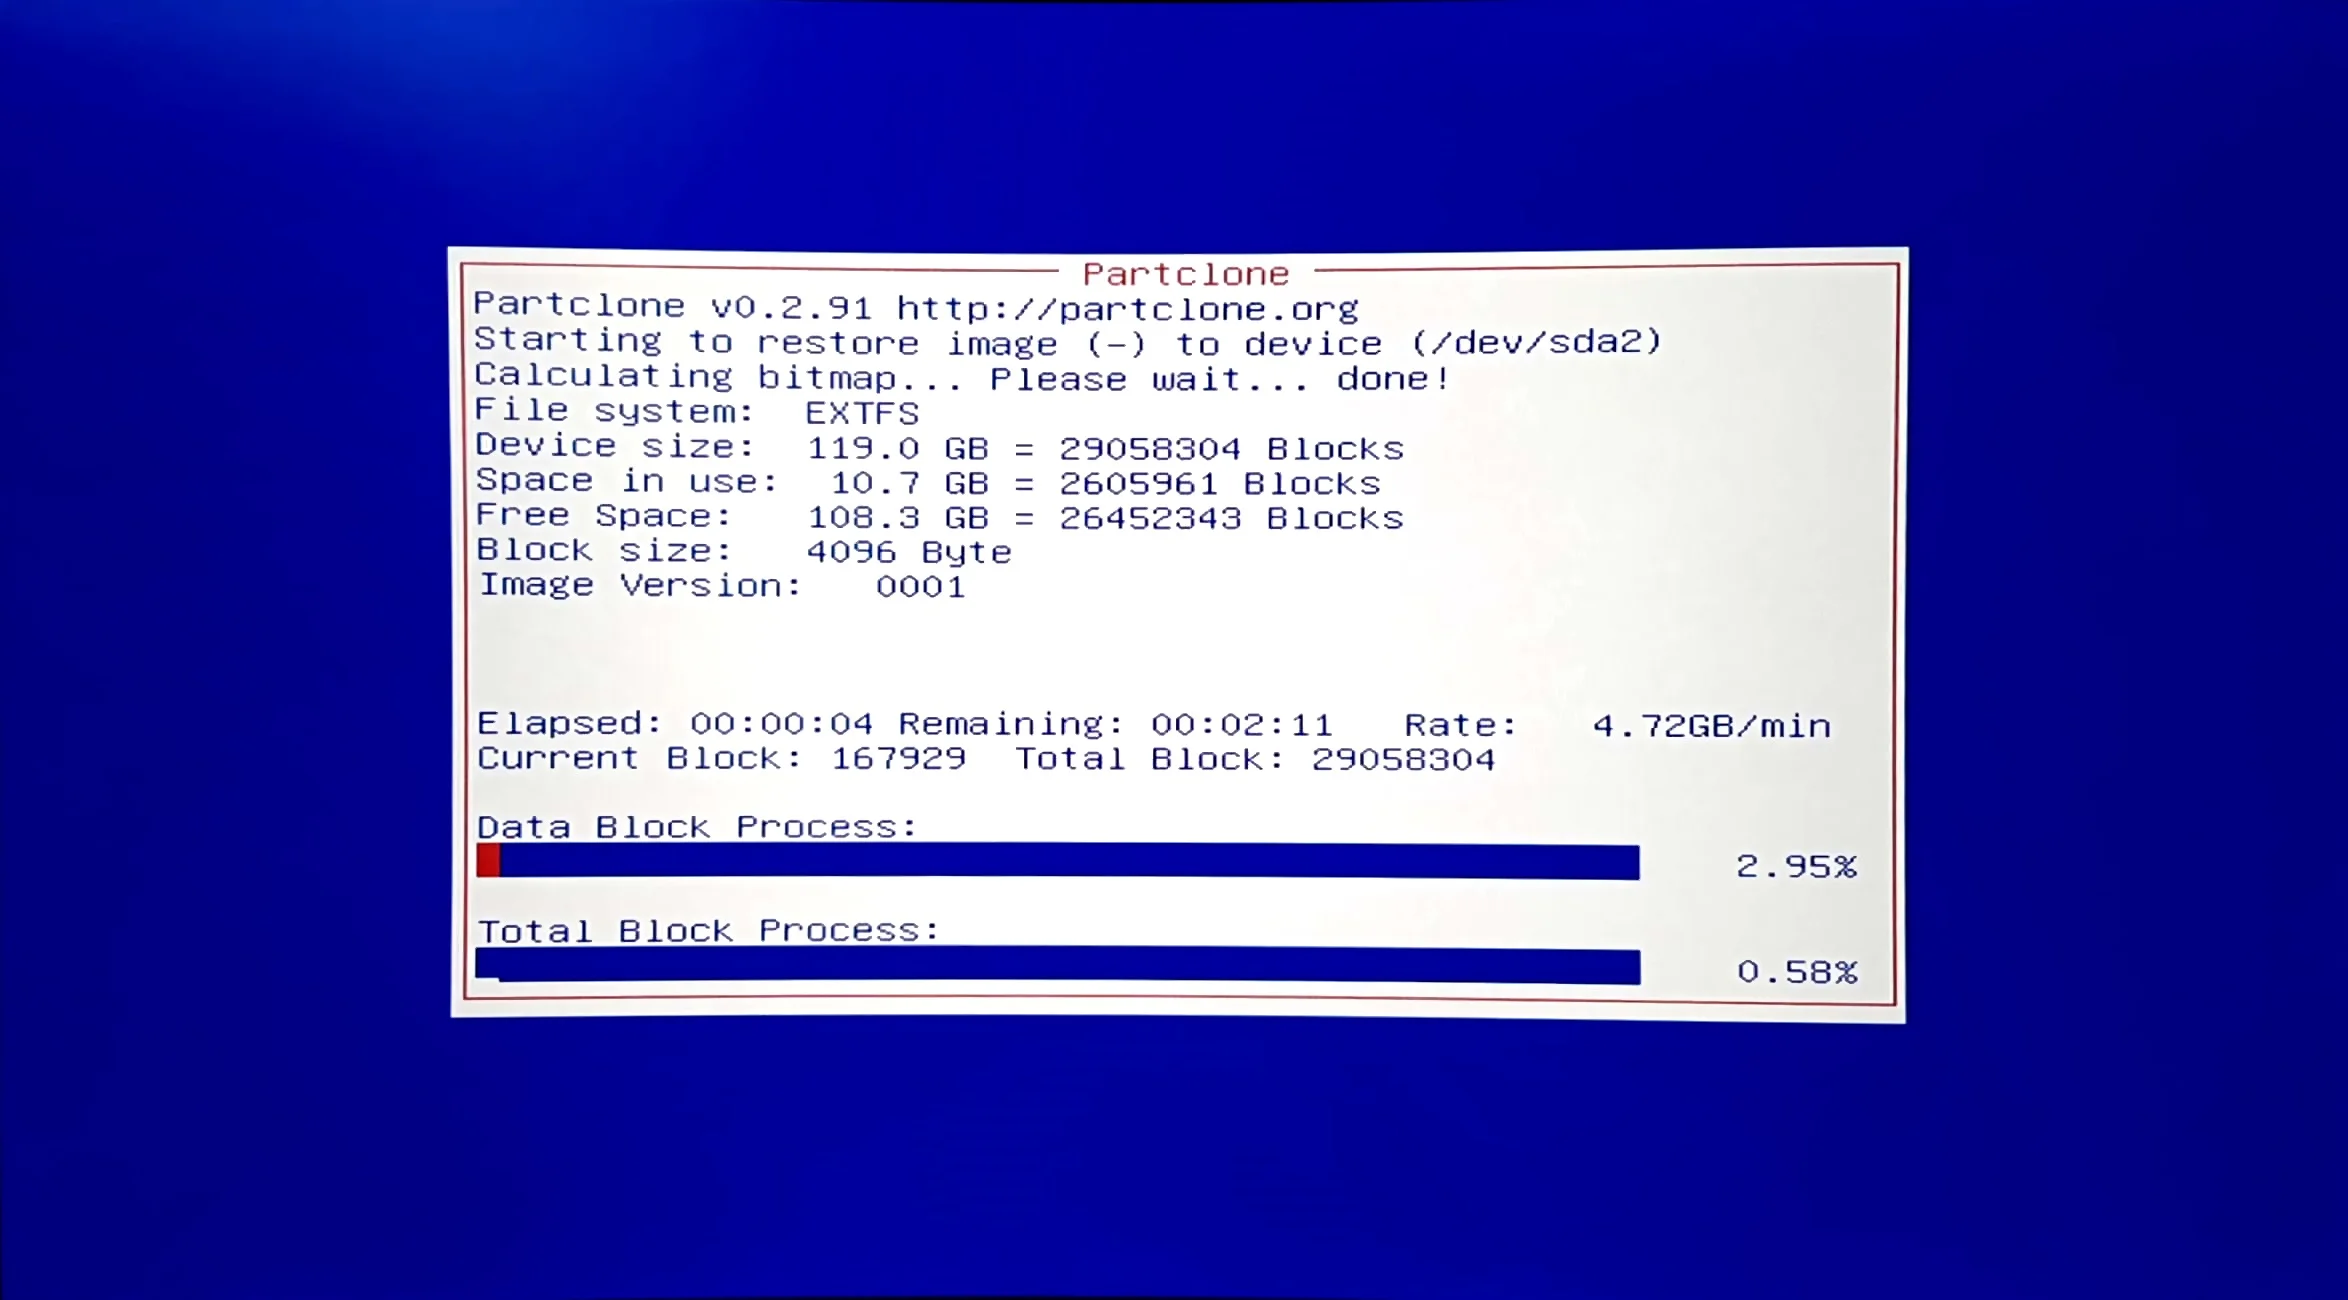
- Check the progress
- Turn off or reboot ROBOTIS-OP3
