Navigation
The Navigation group in Mission Canvas prepares the map and localization needed for mobile missions. It contains three stages that can also be used independently:
| Stage | Purpose |
|---|---|
| Mapping | Build and save an occupancy-grid map with SLAM and Mobile Teleop. |
| Map Edit | Correct occupancy pixels and define named map areas. |
| Navigation | Localize the robot and test the saved map with a single goal. |
Before following this guide, we recommend watching the Navigation UI walkthrough below. It provides an overview of the interface and shows how the Mapping, Map Edit, and Navigation stages fit together. If the embedded player does not open, watch it on YouTube.
For a new environment, use this recommended validation sequence:
Mapping → Map Edit → Navigation
After the map has been validated, continue to Mission to add Waypoints and run a route.
Mapping
Use the Mapping stage of Mission Canvas to build an occupancy-grid map with SLAM. The stage combines a live map viewer, mobile-base teleoperation, map saving, and saved-map deletion in one workspace.
Create a Map
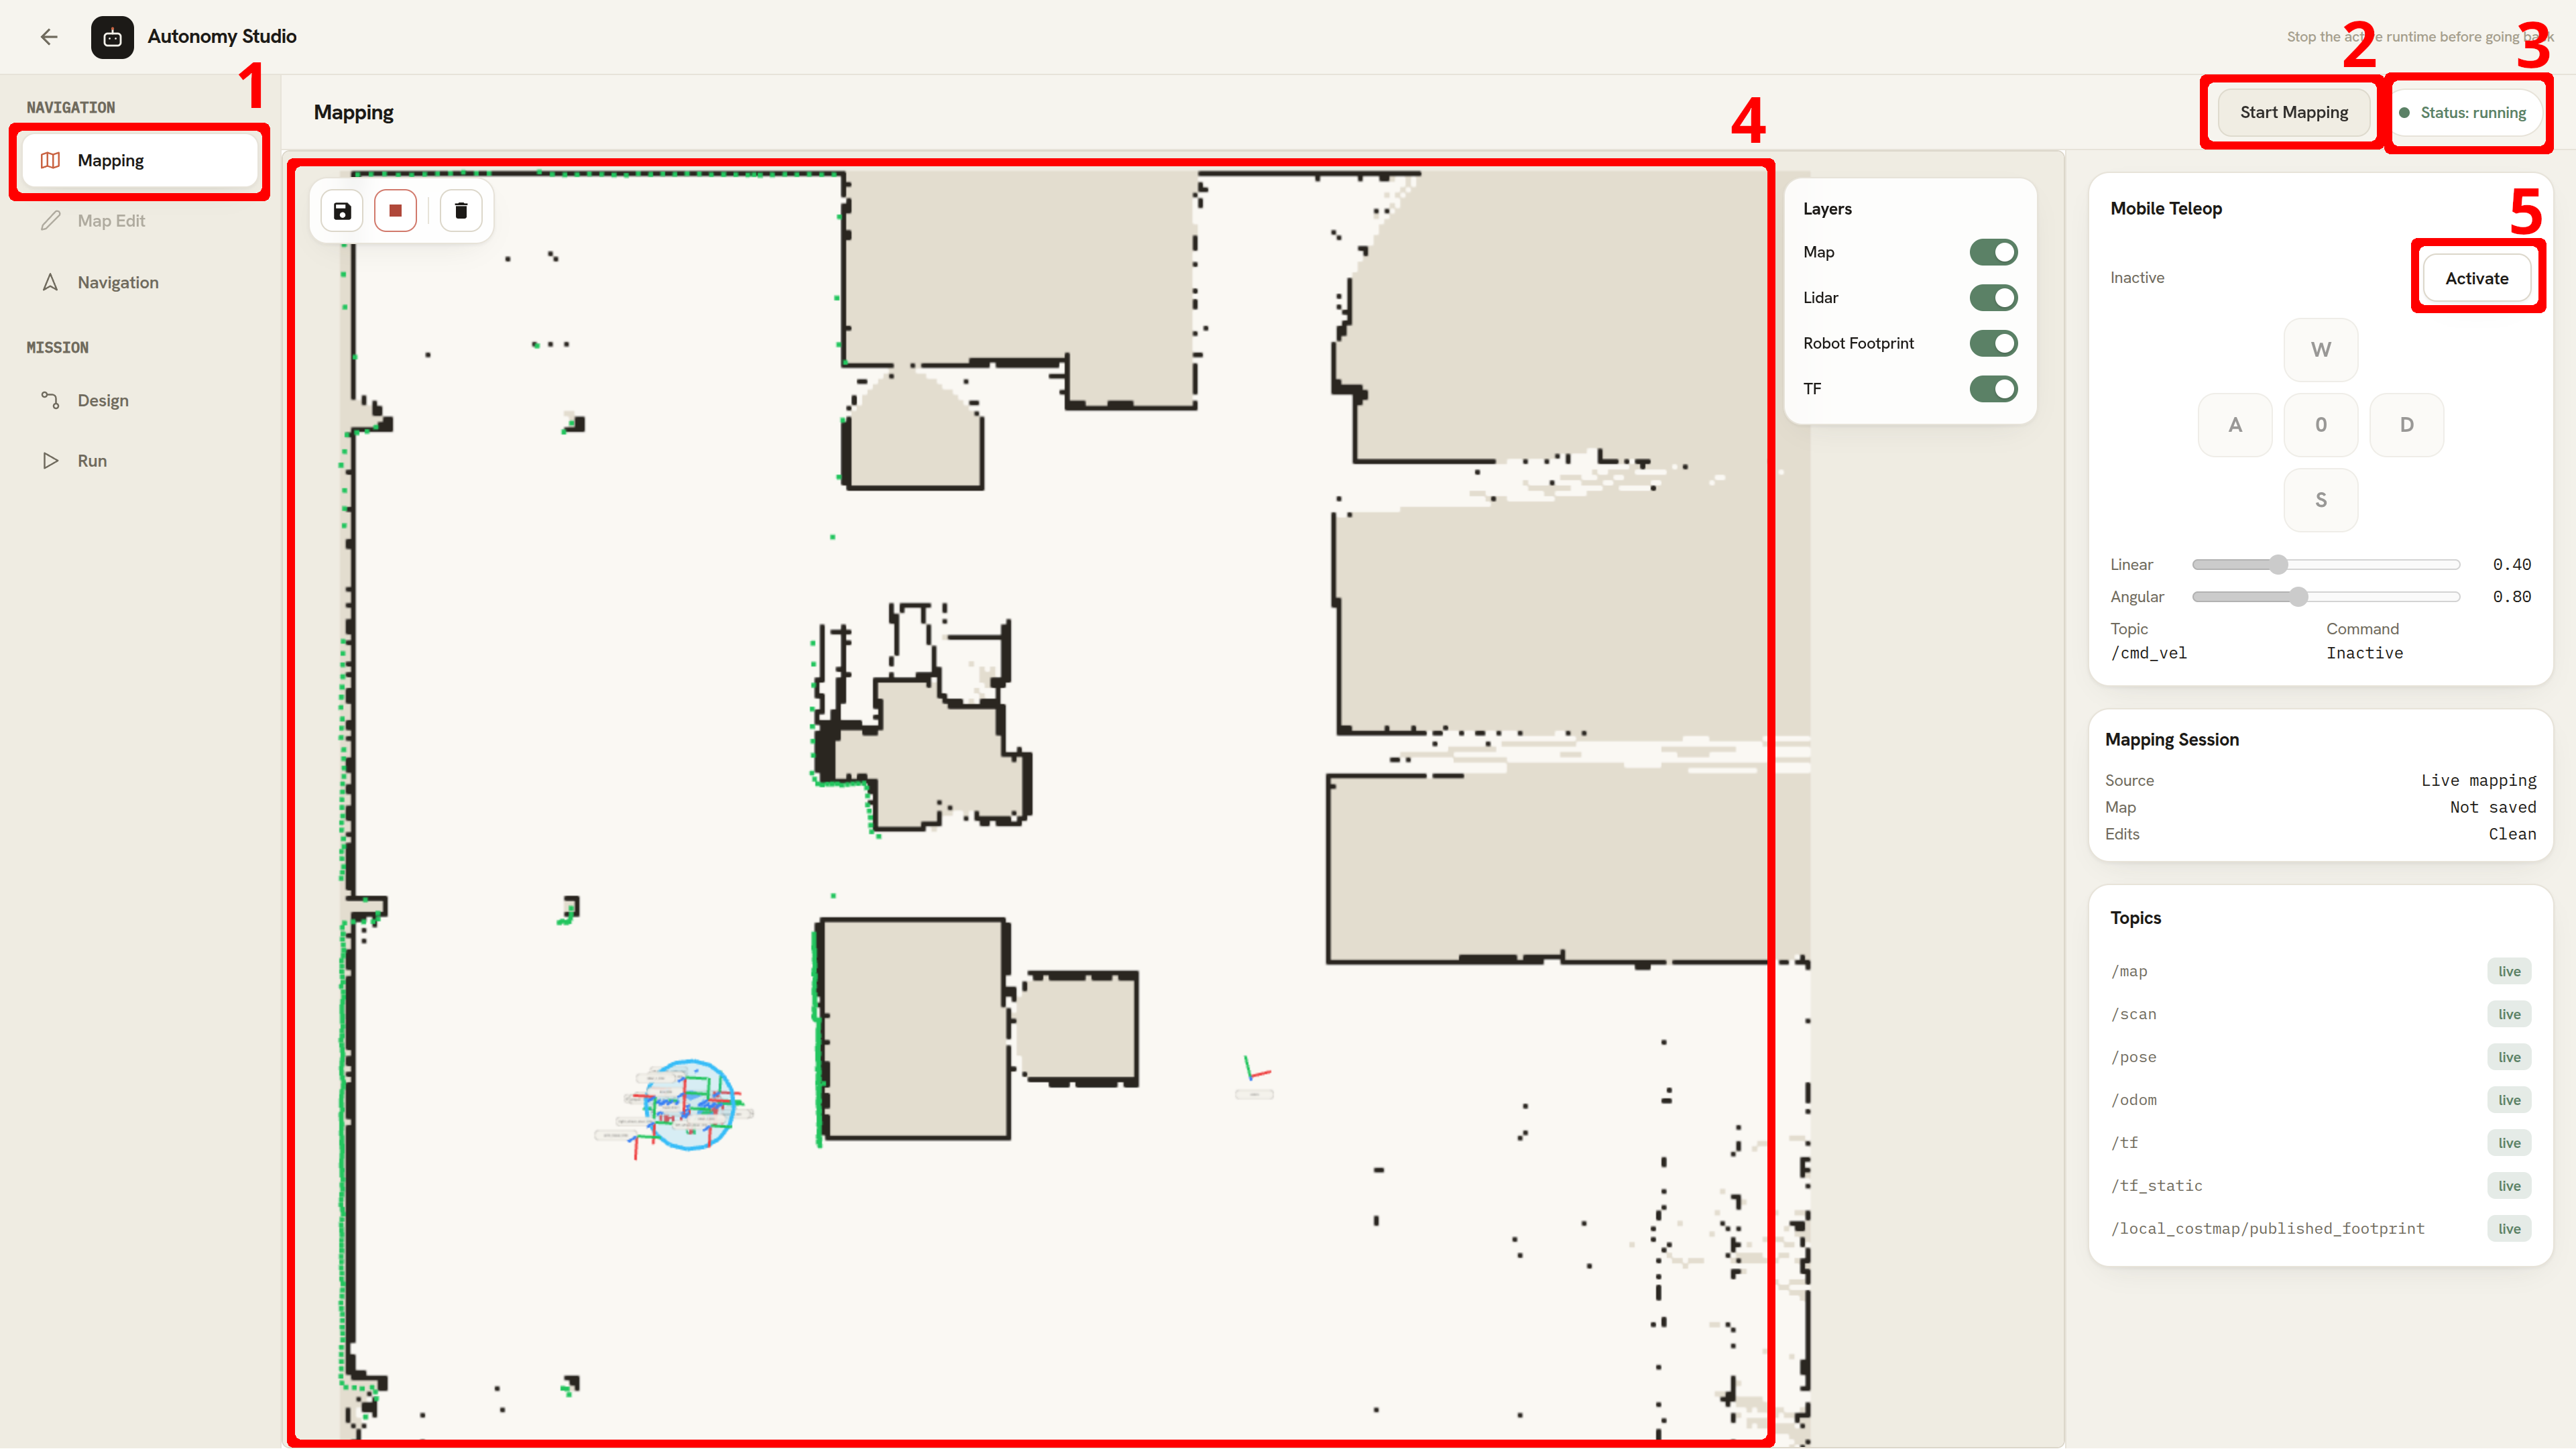
-
Select Mapping in the Mission Canvas stage rail.
-
Click Start Mapping.
-
Confirm that the header status changes to Status: running.
-
Confirm that the live map and LiDAR scan begin to appear in the map viewer.
-
In Mobile Teleop, click Activate.
Mobile Teleop is inactive when you first open the stage. After activation, use the on-screen controls or the keyboard to drive the robot:
Control Motion WDrive forward. SDrive backward. ARotate left. DRotate right. 0buttonStop. SpacekeyStop. Press and hold a direction button, or hold its keyboard key, to continue moving. Releasing the button or key stops the robot. Moving the pointer away from a held on-screen button also stops it.
The velocity command is refreshed every 200 ms while a direction remains held. The panel publishes a
geometry_msgs/msg/Twistcommand to/cmd_vel.Adjust the speed
Setting Default Range Step Linear (m/s) 0.40 0.05–1.20 0.05 Angular (rad/s) 0.80 0.05–2.00 0.05 Changing a speed while the robot is moving applies the new value immediately. Start with low values in narrow or unfamiliar spaces.
Click Deactivate when Mobile Teleop is no longer needed. Deactivation sends a stop command. The interface also sends a safety stop when an active control is released, when Teleop becomes unavailable, or when the panel closes.
Mobile Teleop must be activated again for every inactive session. Keyboard input is ignored while the panel is inactive or while focus is in a text input.
-
Drive the robot through the environment slowly to complete the map.
-
Save the map before stopping the runtime. The Save Map and Stop controls used in steps 7 and 8 are shown below.
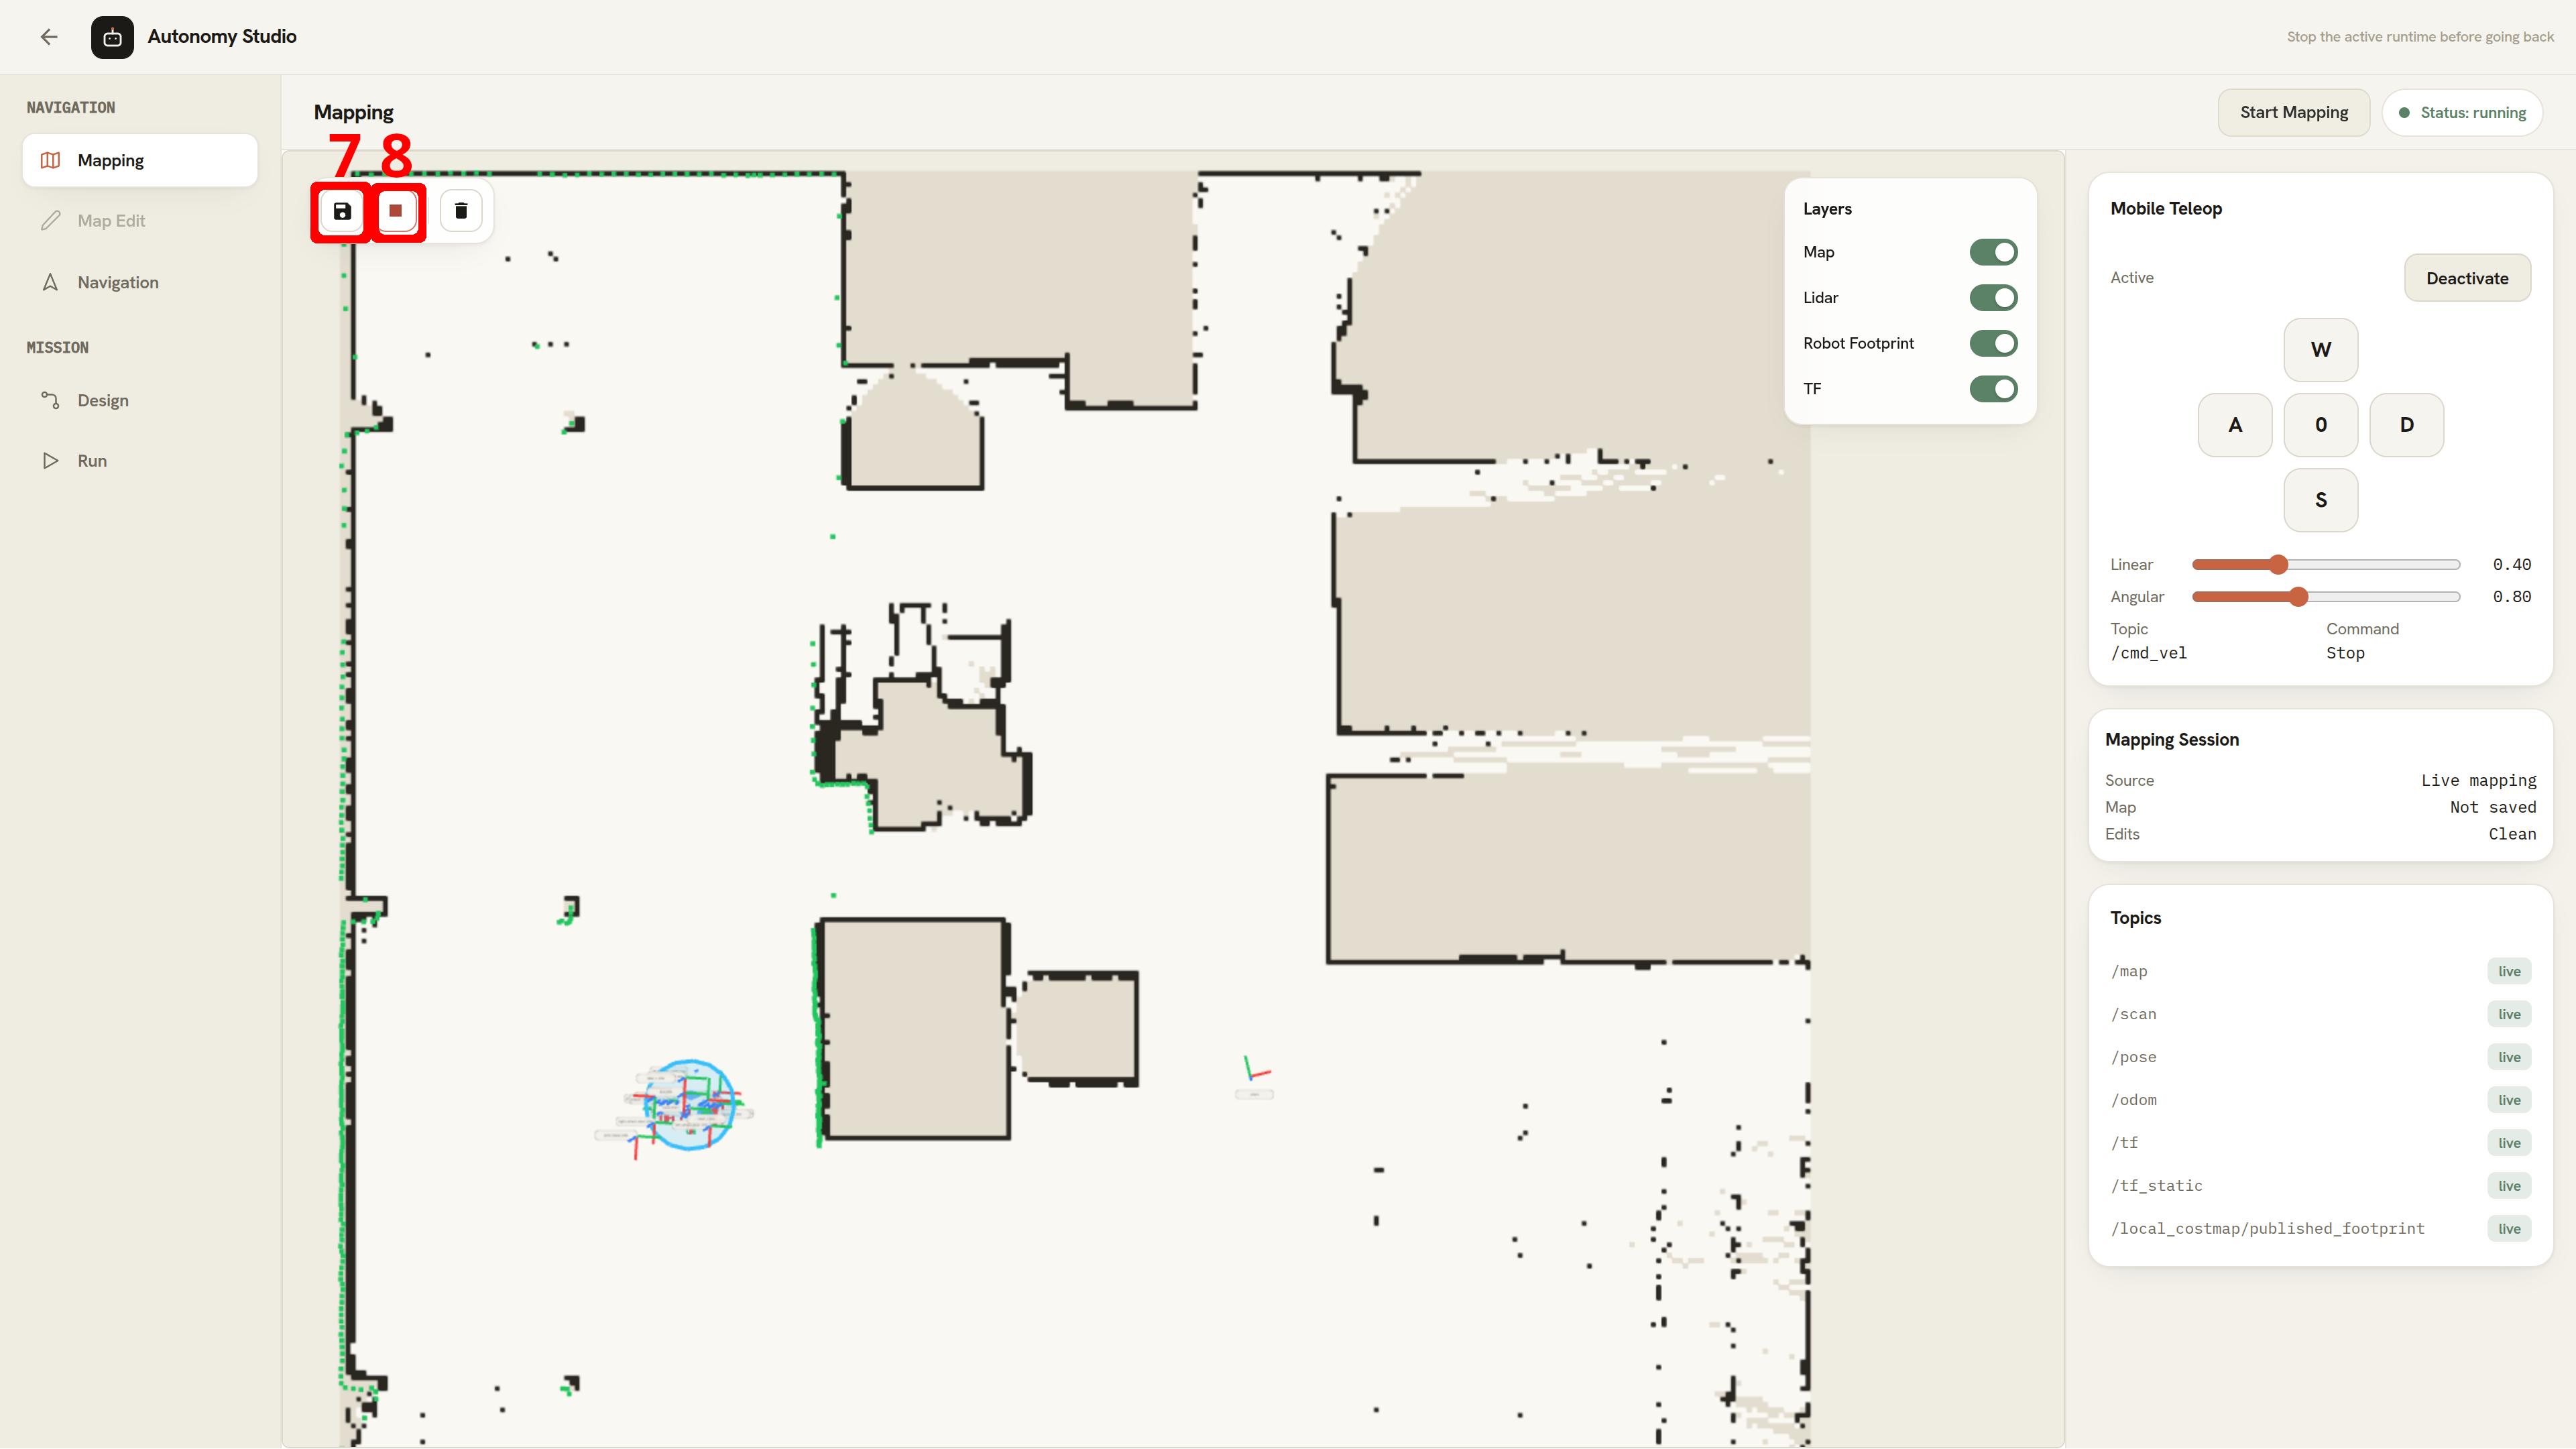
- While mapping is running, click Save Map in the map-viewer toolbar.
- Enter a value in Map name.
- Click Save.
- Wait for the completion message before stopping mapping or changing stages.
Save Map is available only while mapping is running. The saved map consists of:
<map-name>.pgm, the occupancy-grid image<map-name>.yaml, the map metadata used by navigation
A map name must be 1–128 characters and can contain only letters, numbers,
.,_, and-. For example, uselab-east-01instead of a name containing spaces. -
Click Stop after the map has been saved. Wait until the header shows Status: idle before changing stages or leaving the workspace.
Delete a Saved Map
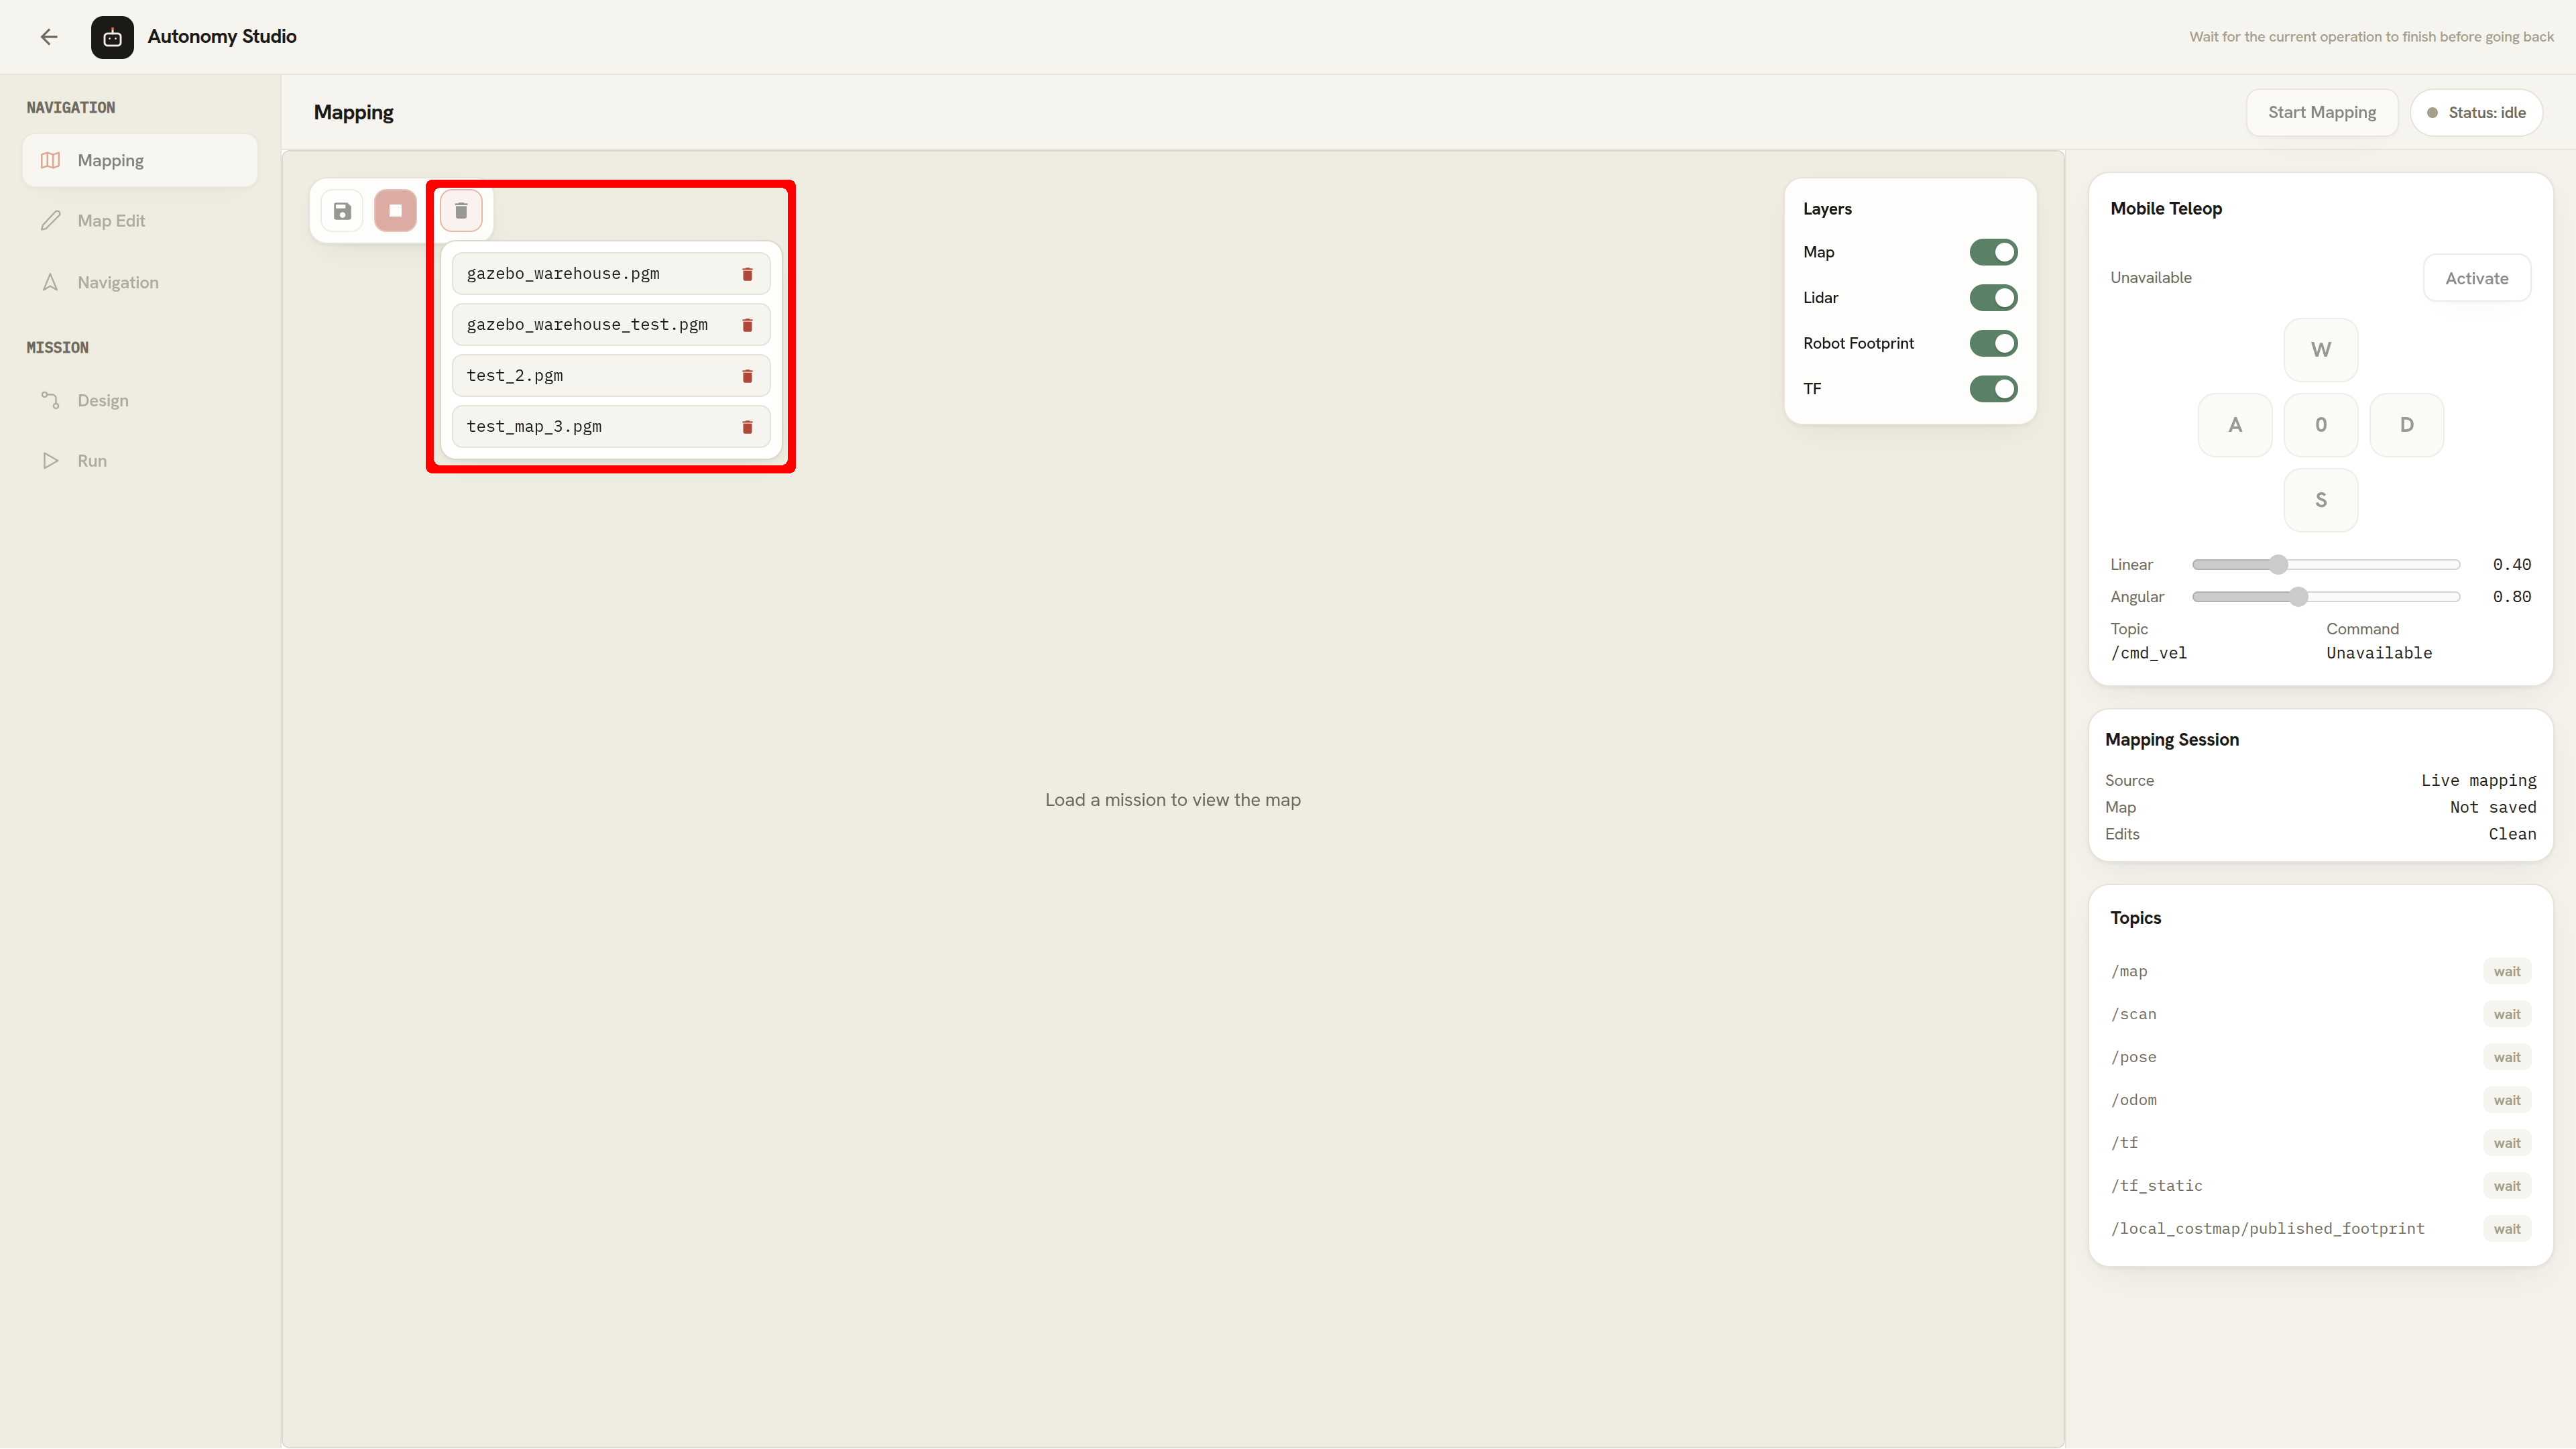
- Click the Delete Map trash can button in the map-viewer toolbar. The Saved maps list opens directly below the button.
- Find the PGM map that you want to remove and click the red trash can at the right side of its row.
- Review the Delete this map? dialog. It shows that the map and its areas will be deleted, along with the number of Missions that will also be removed when that information is available.
- Click Yes to delete the map, or No to keep it. Clicking the red trash can alone does not delete the map; deletion occurs only after you click Yes.
Deleting a map permanently removes its PGM image, YAML metadata, area-annotation file, and every Mission stored for that map. This action has no undo operation.
A map currently protected by an active navigation session is disabled in the deletion list. Stop navigation before deleting that map.
Map Edit
Use Map Edit to correct a saved PGM occupancy map and add named areas for Mission Canvas. Pixel edits and area annotations share the same canvas, history, and Save action.
Load a Map
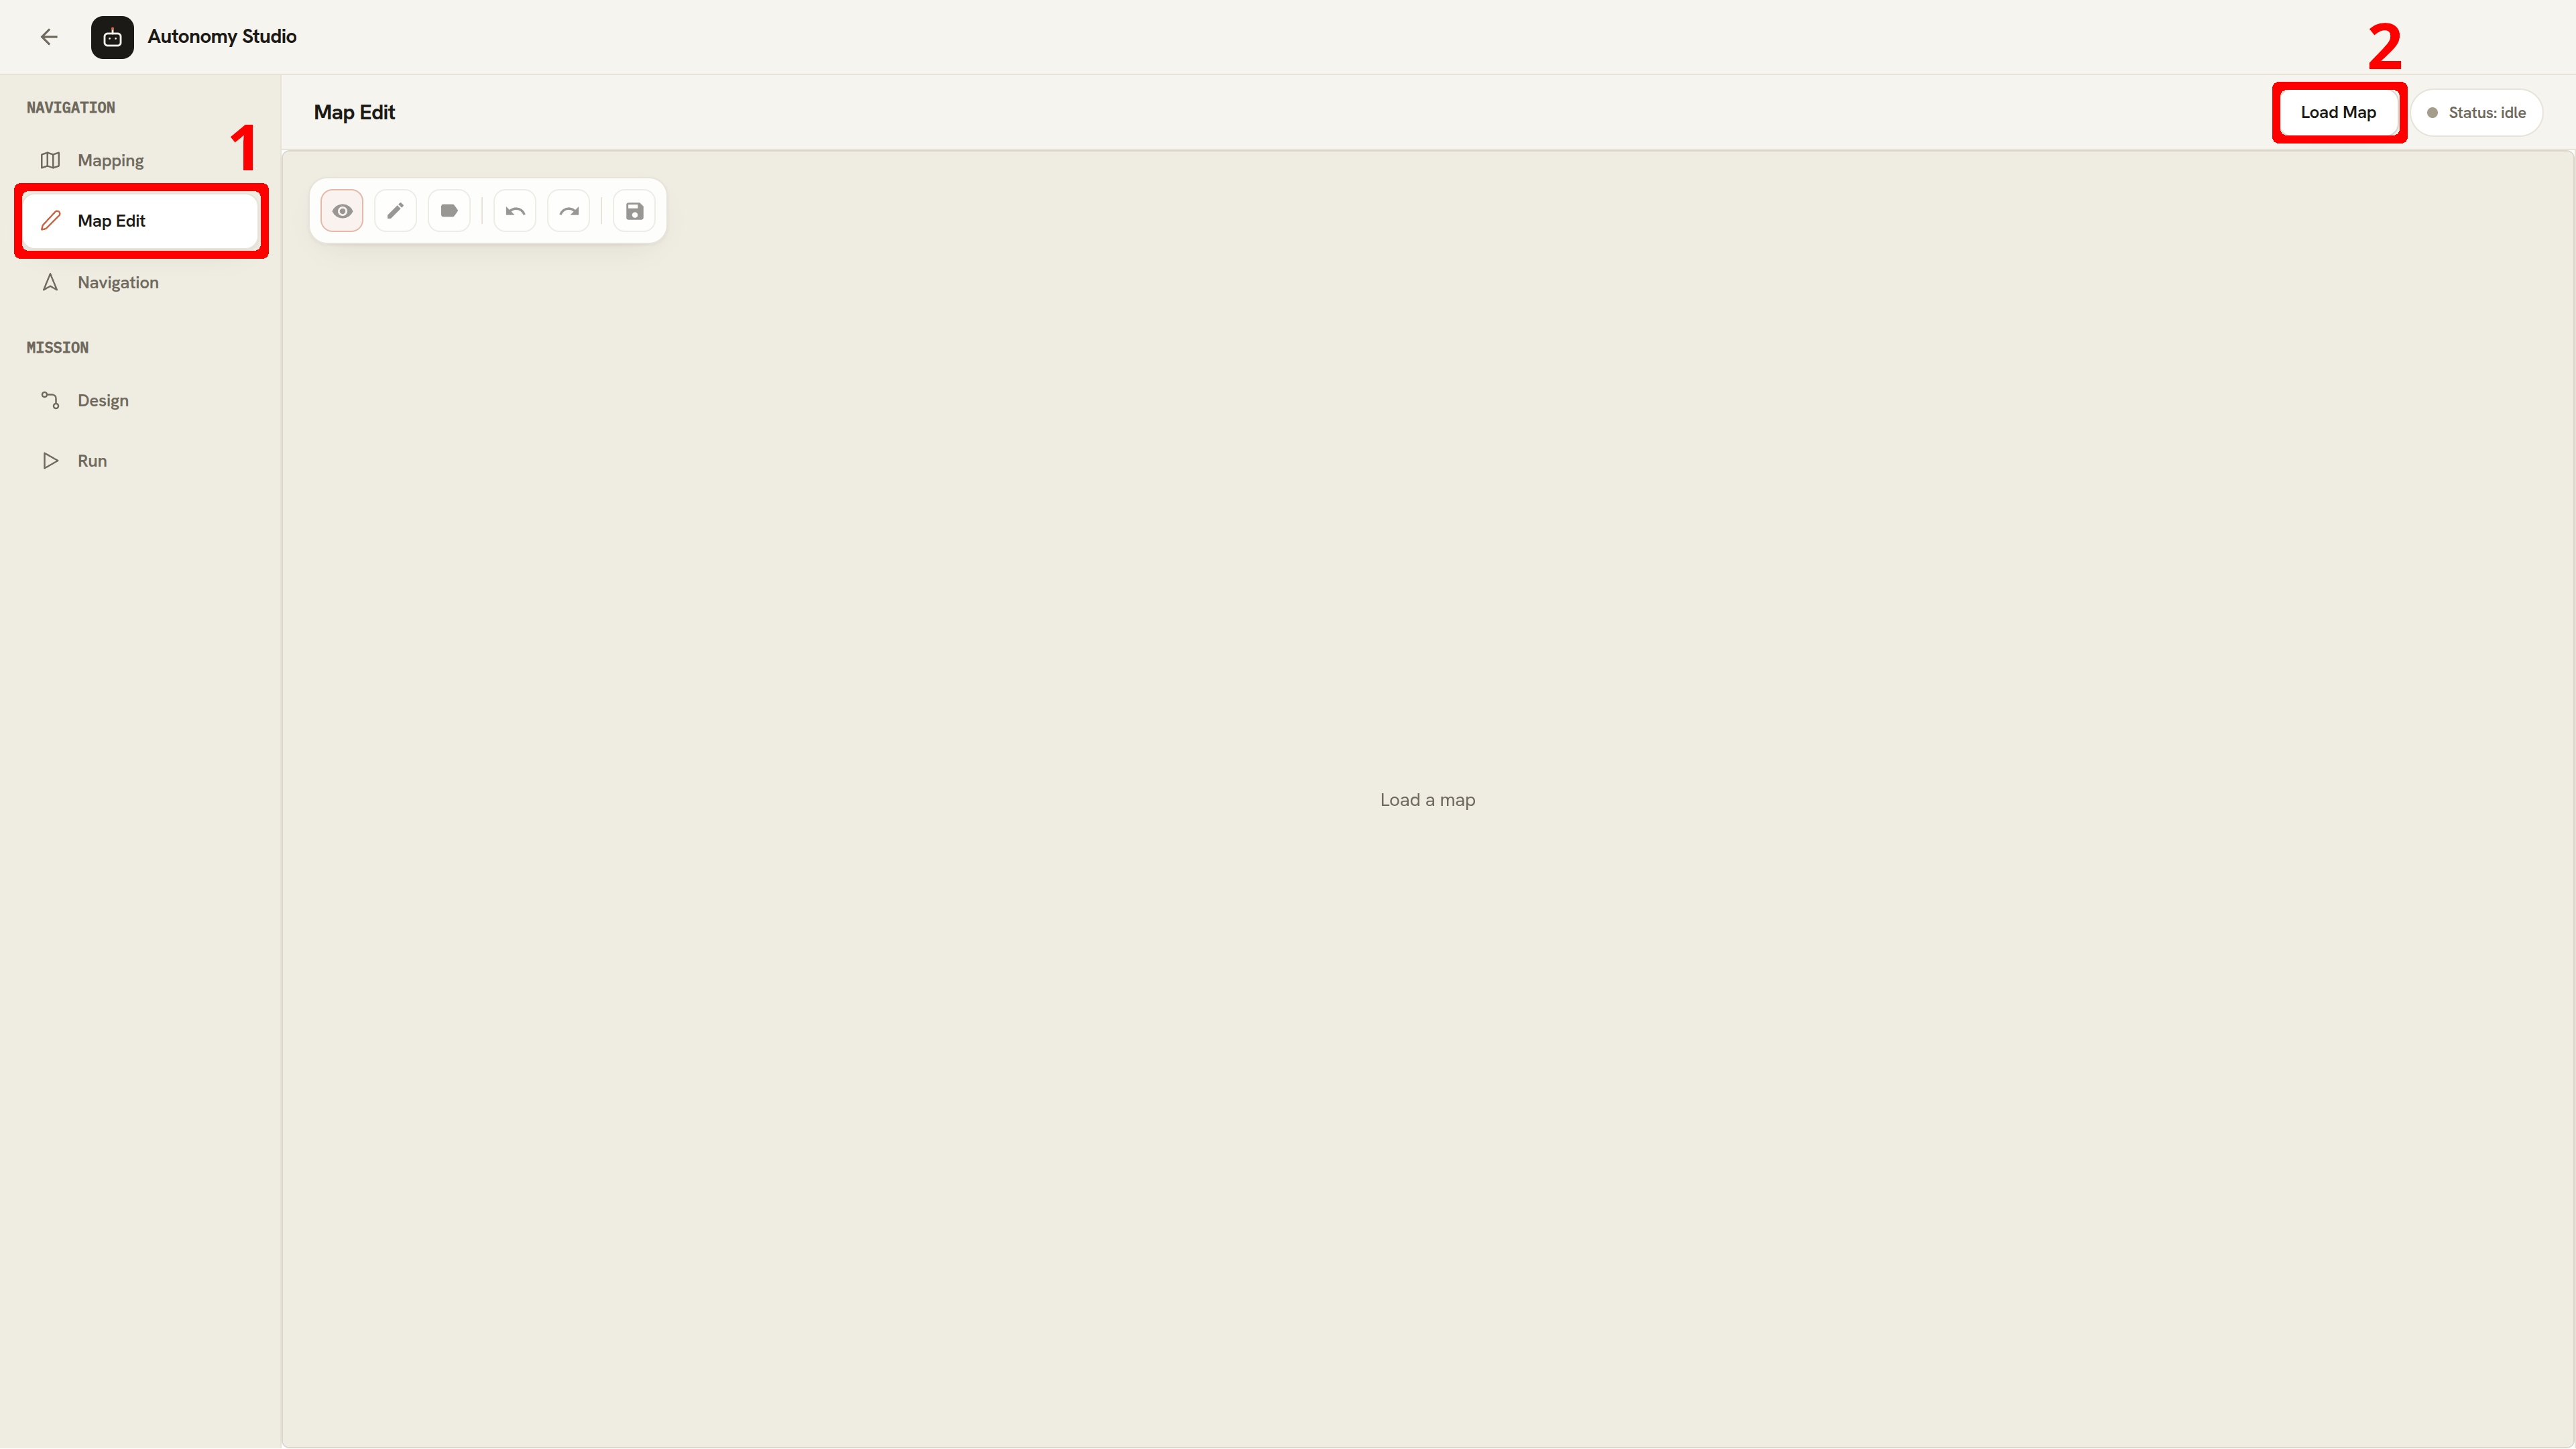
- Select Map Edit in the Mission Canvas stage rail.
- Click Load Map in the stage header.
- Select a file from Map. Only saved PGM maps are listed.
- Click Load.
- Confirm the loaded-file chip in the upper-right corner of the canvas. It shows the path and pixel dimensions of the selected map.
Edit Occupancy Pixels
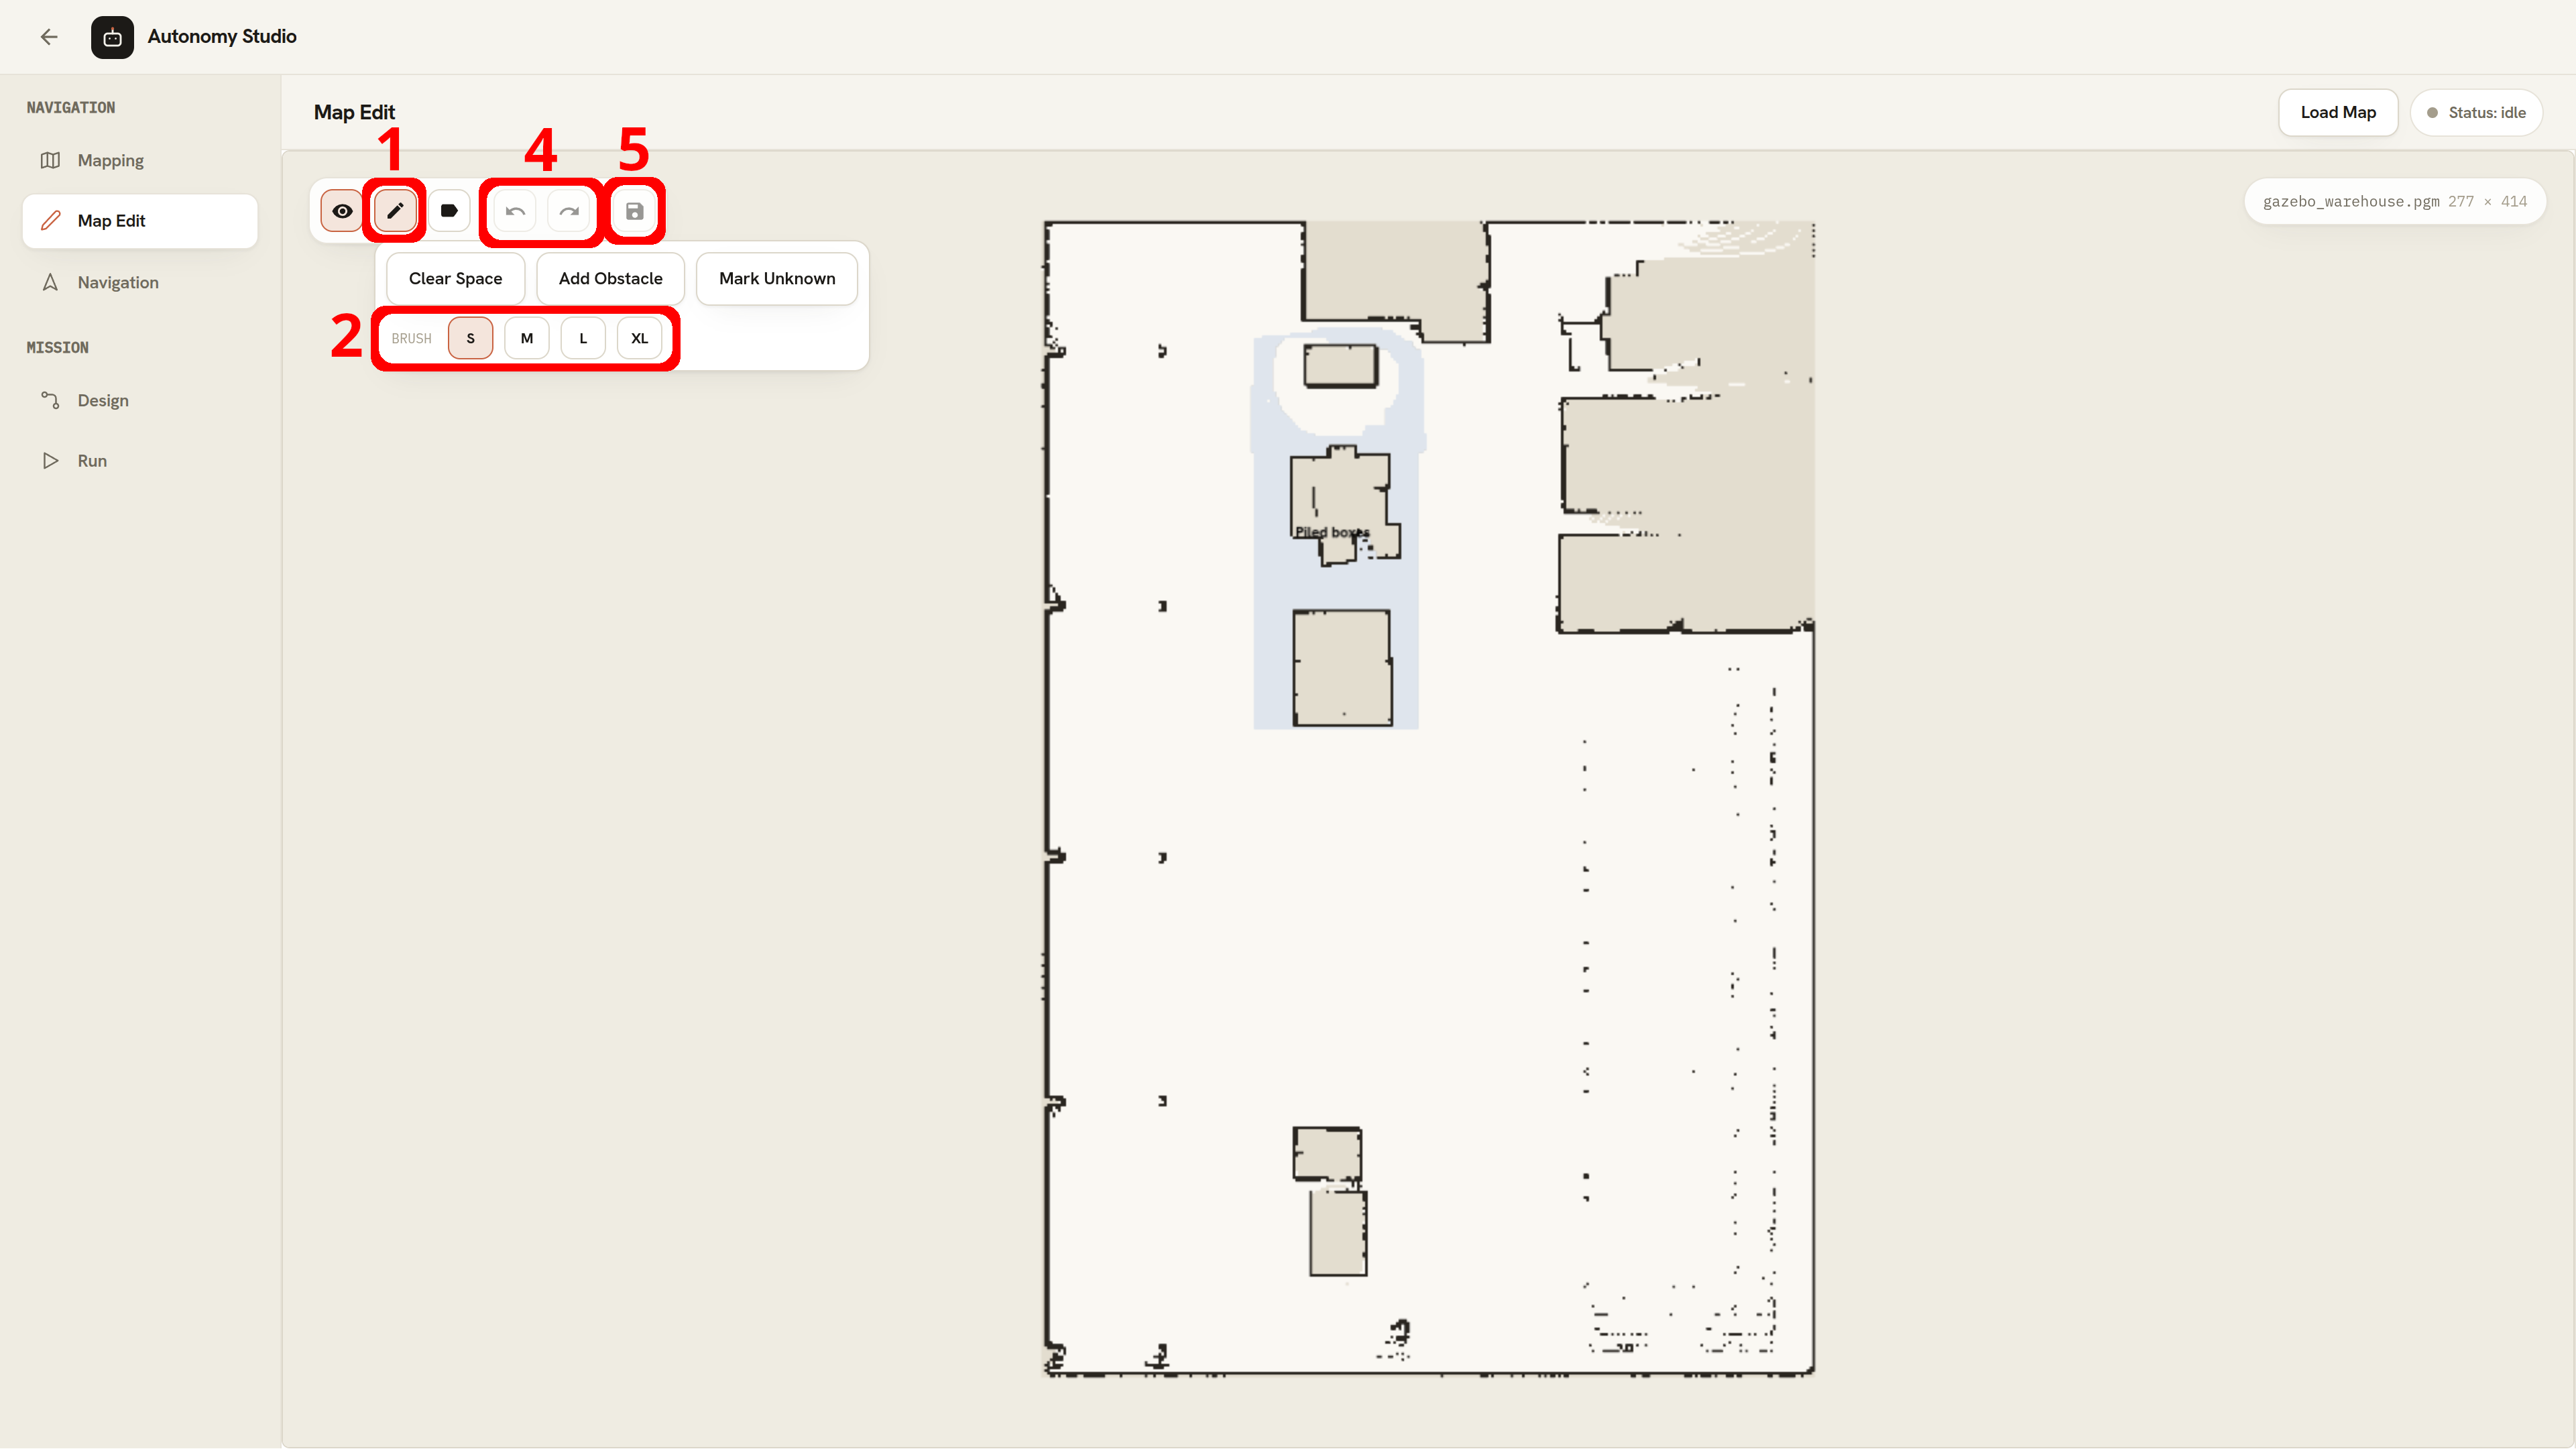
- Select an editing tool.
- Select a brush size.
- Press or drag over the map to paint. A continuous drag paints the cells between pointer positions.
- Use Undo or Redo if necessary.
- Click Save when the map is correct.
Pixel Tools
| Tool | Result | Stored PGM value |
|---|---|---|
| Clear Space | Marks cells as known free space. | 254 |
| Add Obstacle | Marks cells as occupied. | 0 |
| Mark Unknown | Marks cells as unexplored or unknown. | 205 |
Brush Sizes
| Button | Name | Width |
|---|---|---|
| S | Small | 1 cell |
| M | Medium | 3 cells |
| L | Large | 6 cells |
| XL | Extra Large | 10 cells |
Choose a small brush for corners and thin walls. Use a larger brush only for broad areas, and zoom in to verify that nearby doorways or corridors remain open.
Add and Manage Map Areas
Named areas are stored separately from the PGM pixels and can be displayed in the Navigation, Design, and Run stages through the Map areas layer.
Click Add Label to open the area tools.
| Tool | Operation |
|---|---|
| Area | Creates a new named area by selecting a rectangle. |
| Extend | Adds free cells to the selected area with the current brush. |
| Erase Area | Removes area cells under the current brush. |
Only white free-space cells that are not already claimed by another visible area can be added to an area. Obstacles, unknown cells, and already marked cells are ignored.
Create an Area
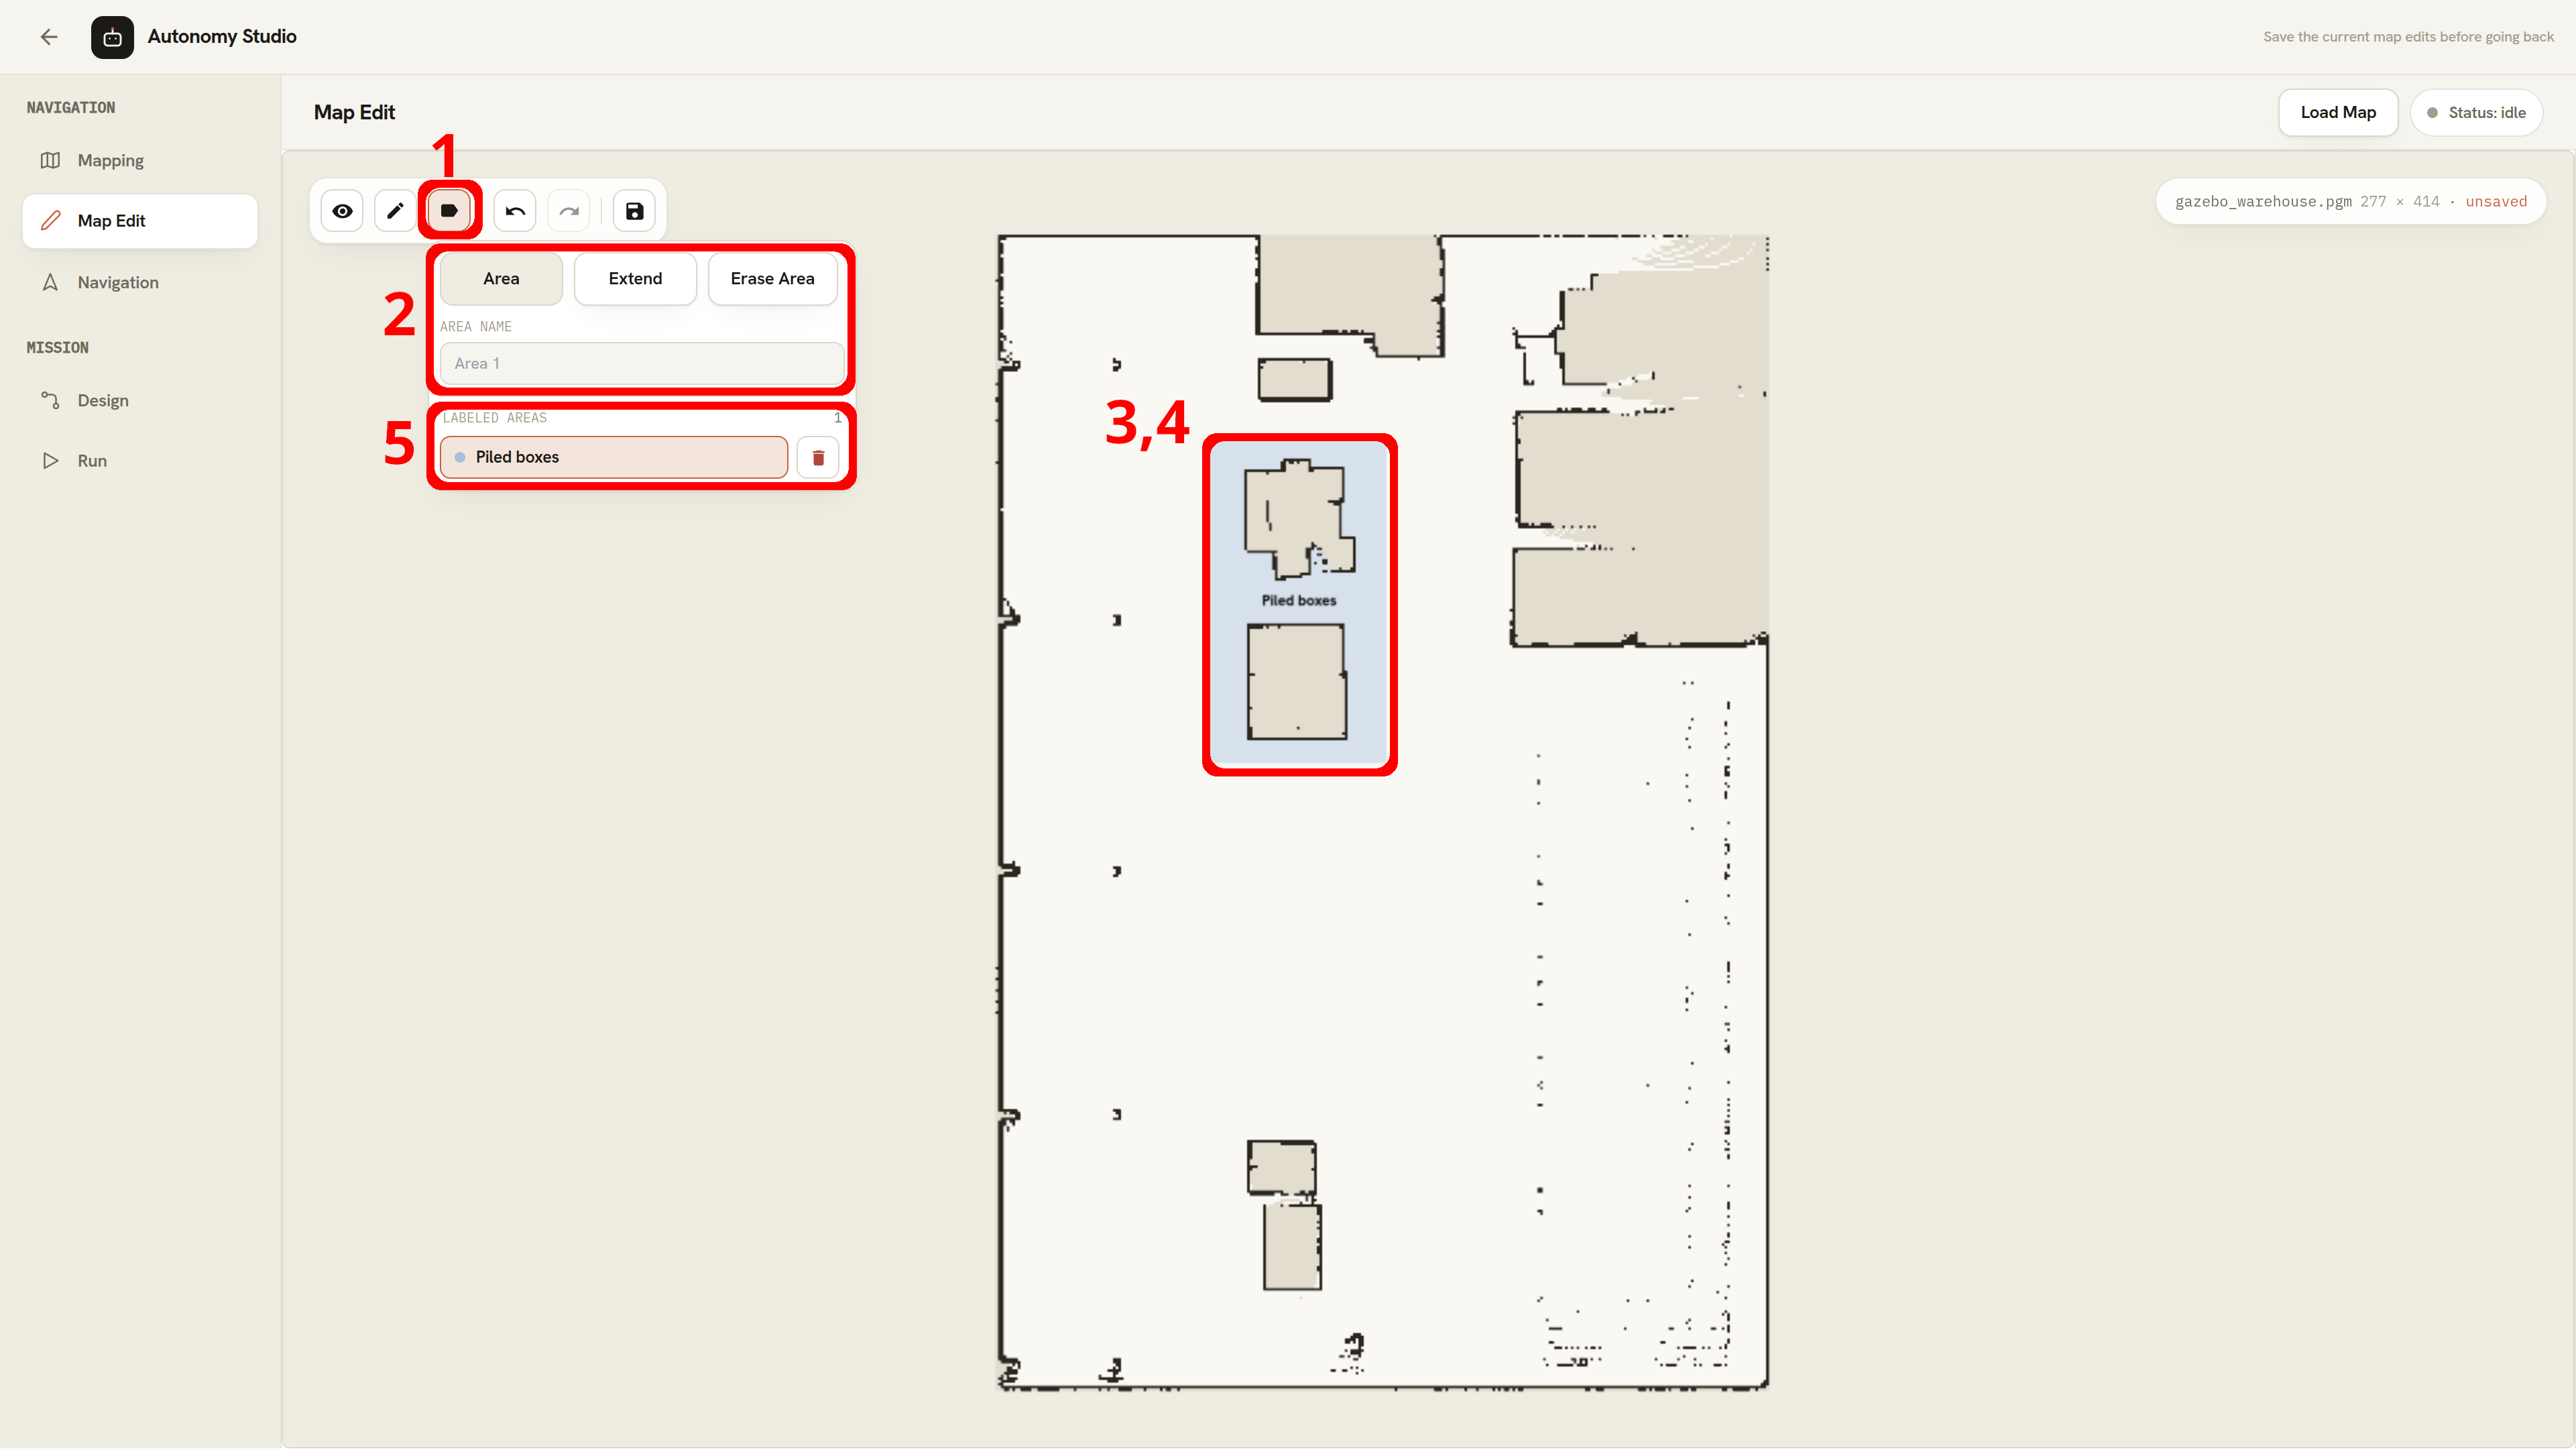
- Click Add Label, then select Area.
- Optionally enter an AREA NAME.
- Drag a rectangle over unmarked white free space on the map.
- Release the pointer to create the area.
- Confirm that the new item appears under LABELED AREAS.
If the name field is empty, Autonomy Studio assigns the next available name, such as Area 1 or Area 2. A display color is assigned automatically. Area names are trimmed to a maximum of 80 characters.
A selection that contains no available free cells is not created. If this happens, select a different region or correct its occupancy pixels first.
Extend an Area
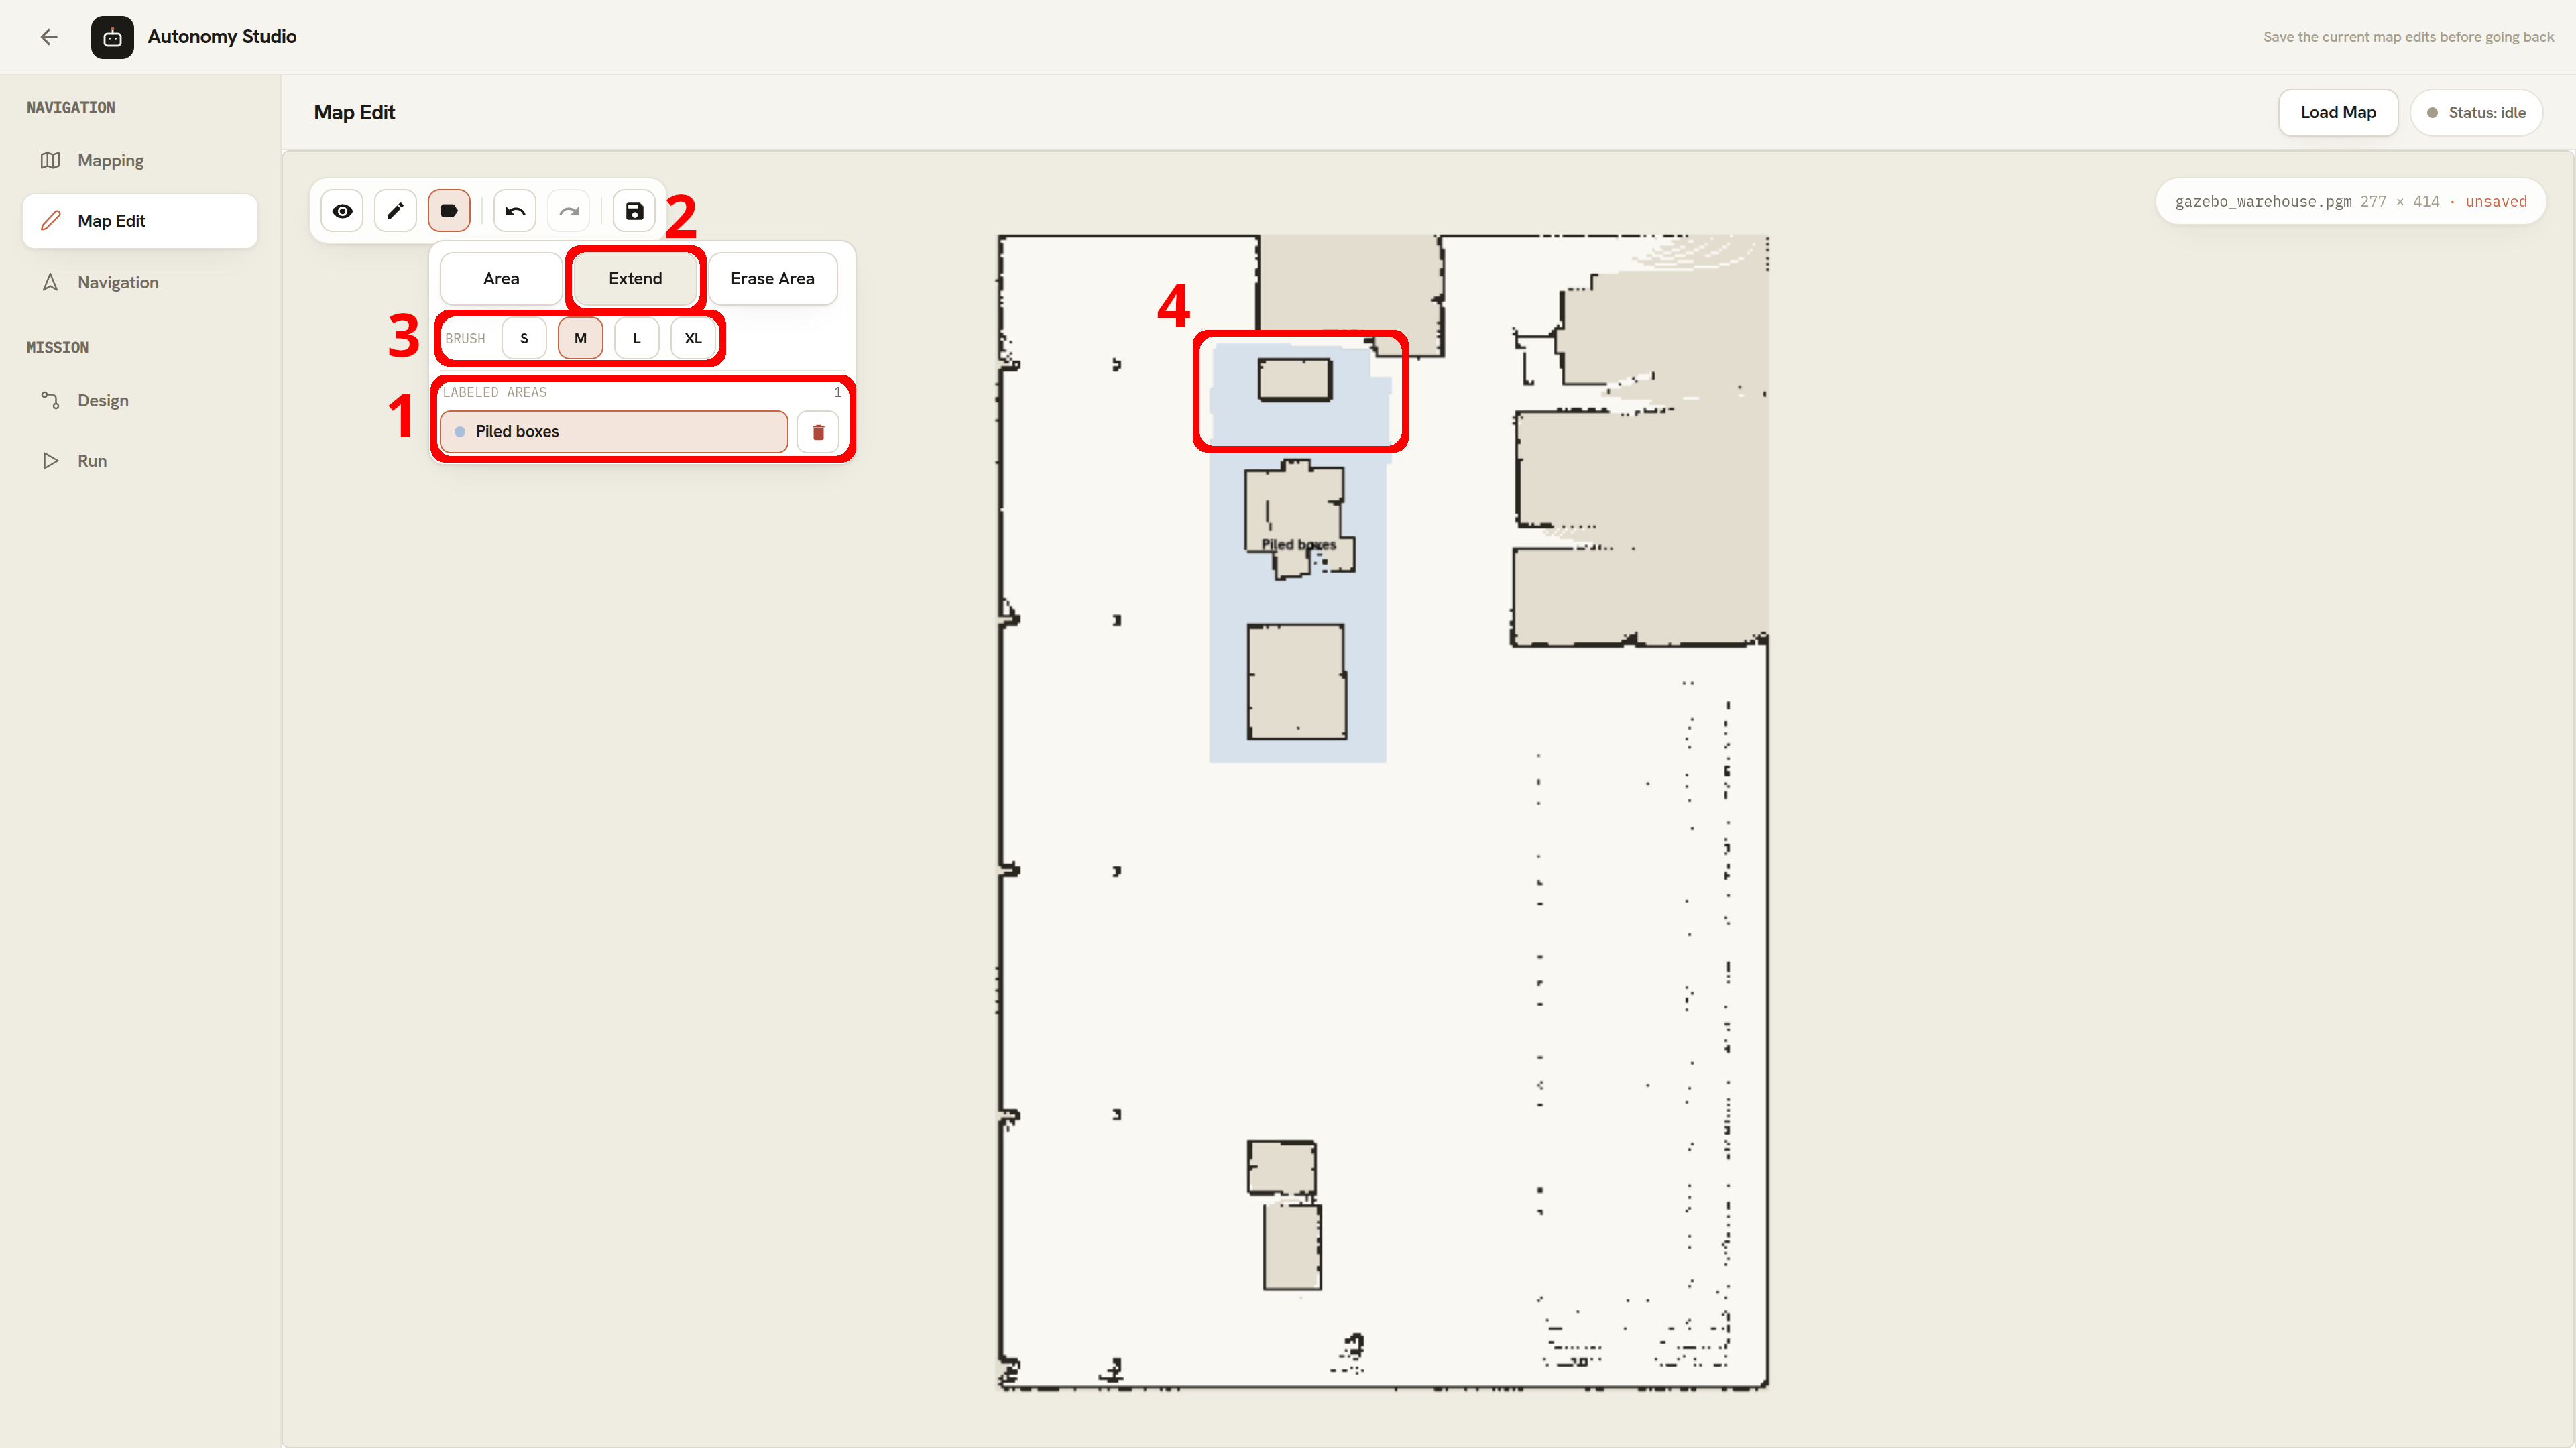
- Select the target under LABELED AREAS.
- Select Extend.
- Choose S, M, L, or XL.
- Paint over adjacent, unmarked white free-space cells.
Extend changes only the selected area. It does not overwrite cells owned by other areas and does not include occupied or unknown map cells.
Erase Area Cells
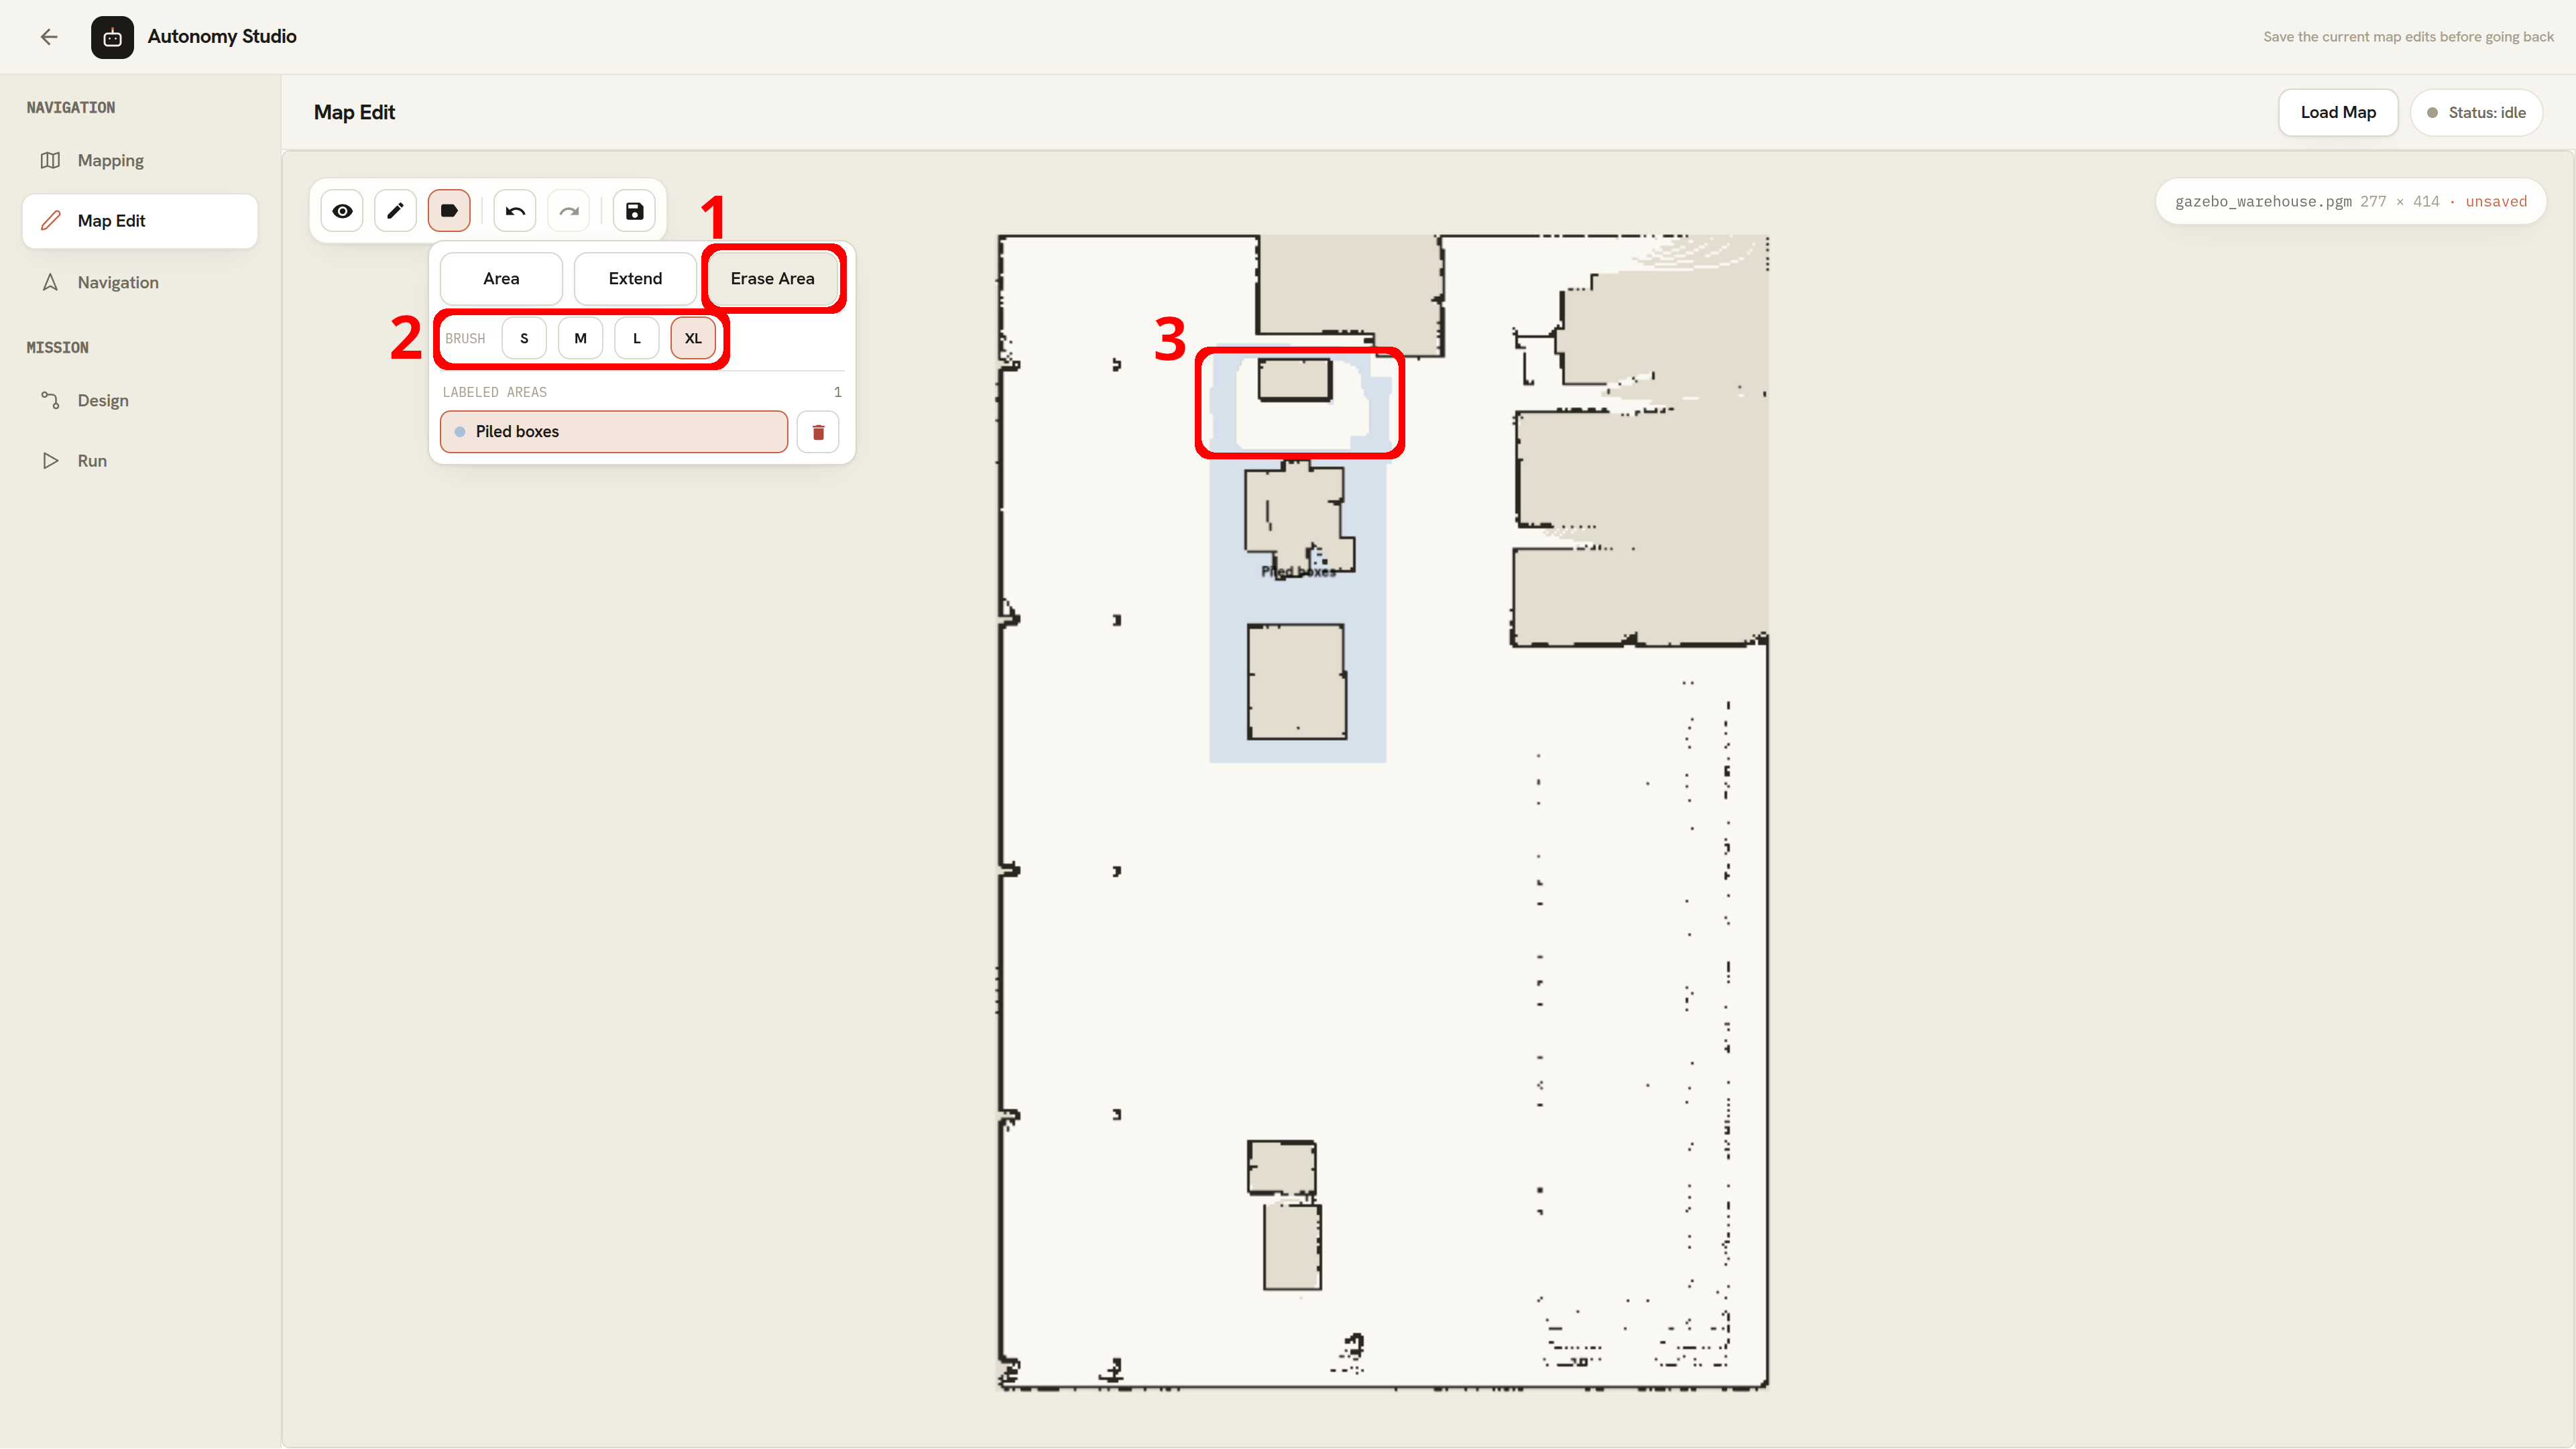
- Select Erase Area.
- Choose a brush size.
- Paint over the area cells that you want to remove.
Erase Area removes labeled cells under the brush, including cells from more than one area if the stroke crosses them. It does not change the underlying occupancy pixels.
If all visible cells of an area are erased, that area no longer appears in the list.
Select and Rename an Area
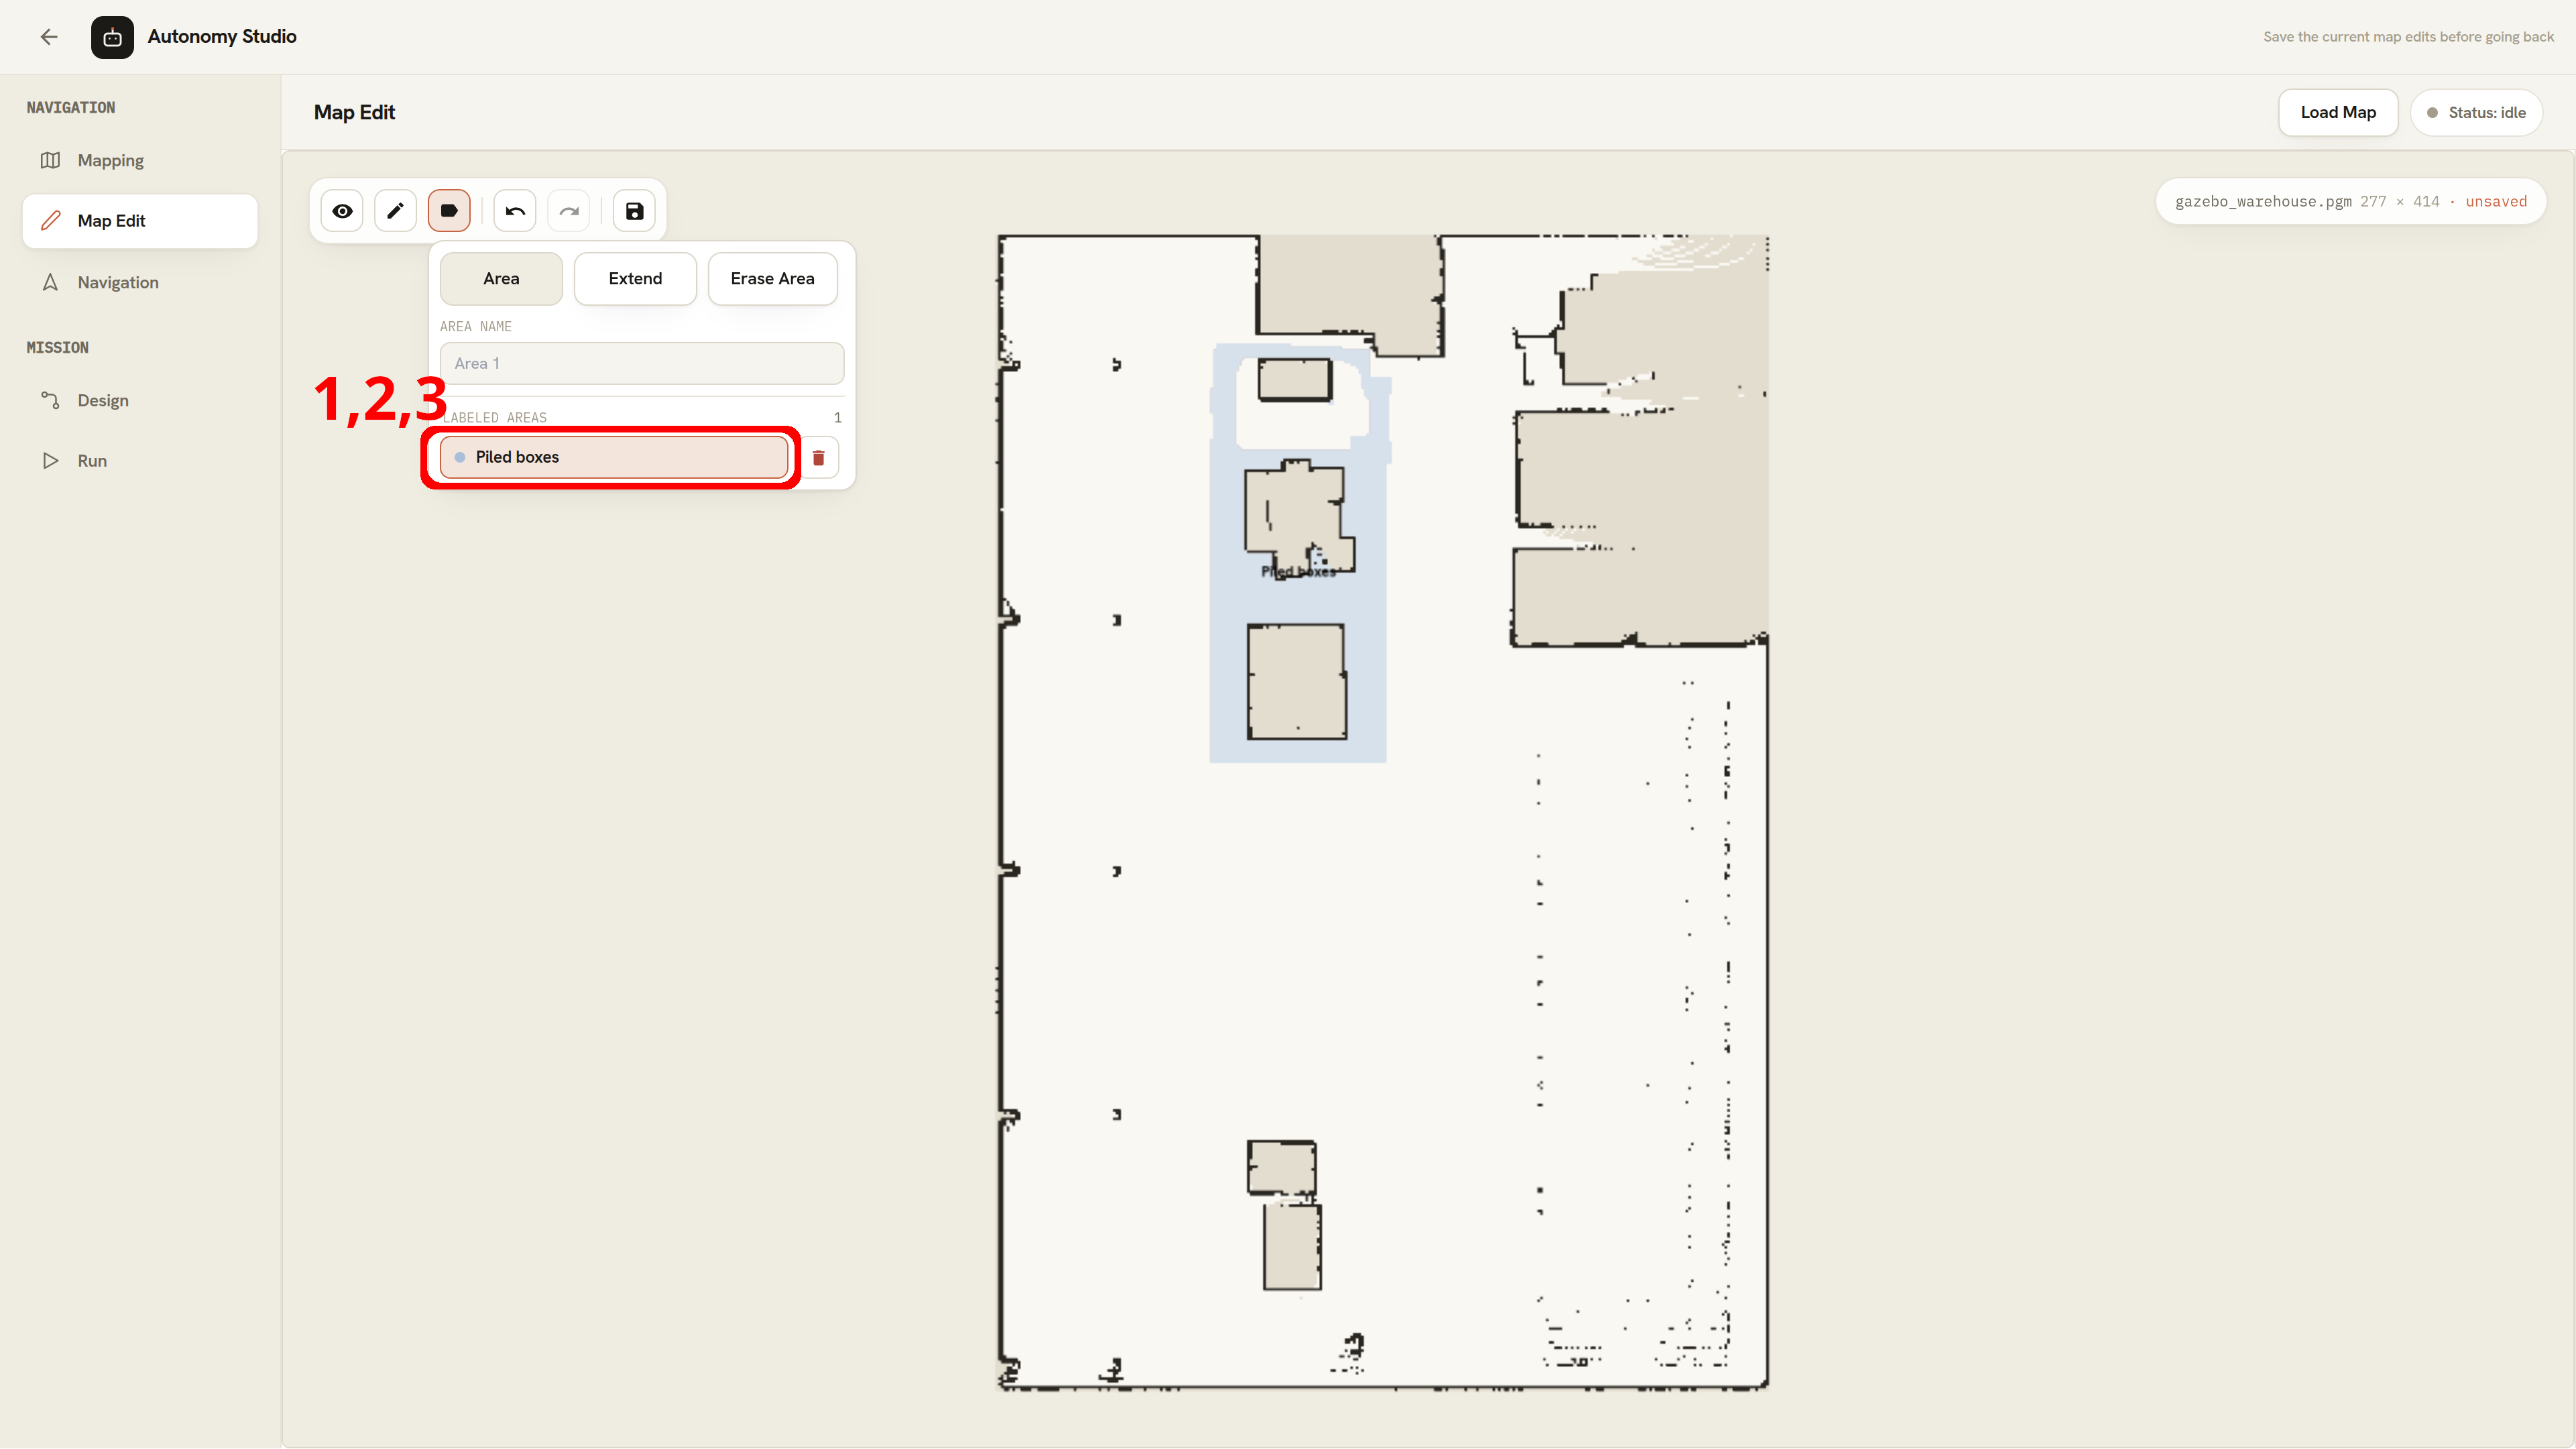
- Click an item under LABELED AREAS to select it.
- Double-click its name to edit it.
- Press
Enteror click outside the field to apply the new name.
Delete an Area
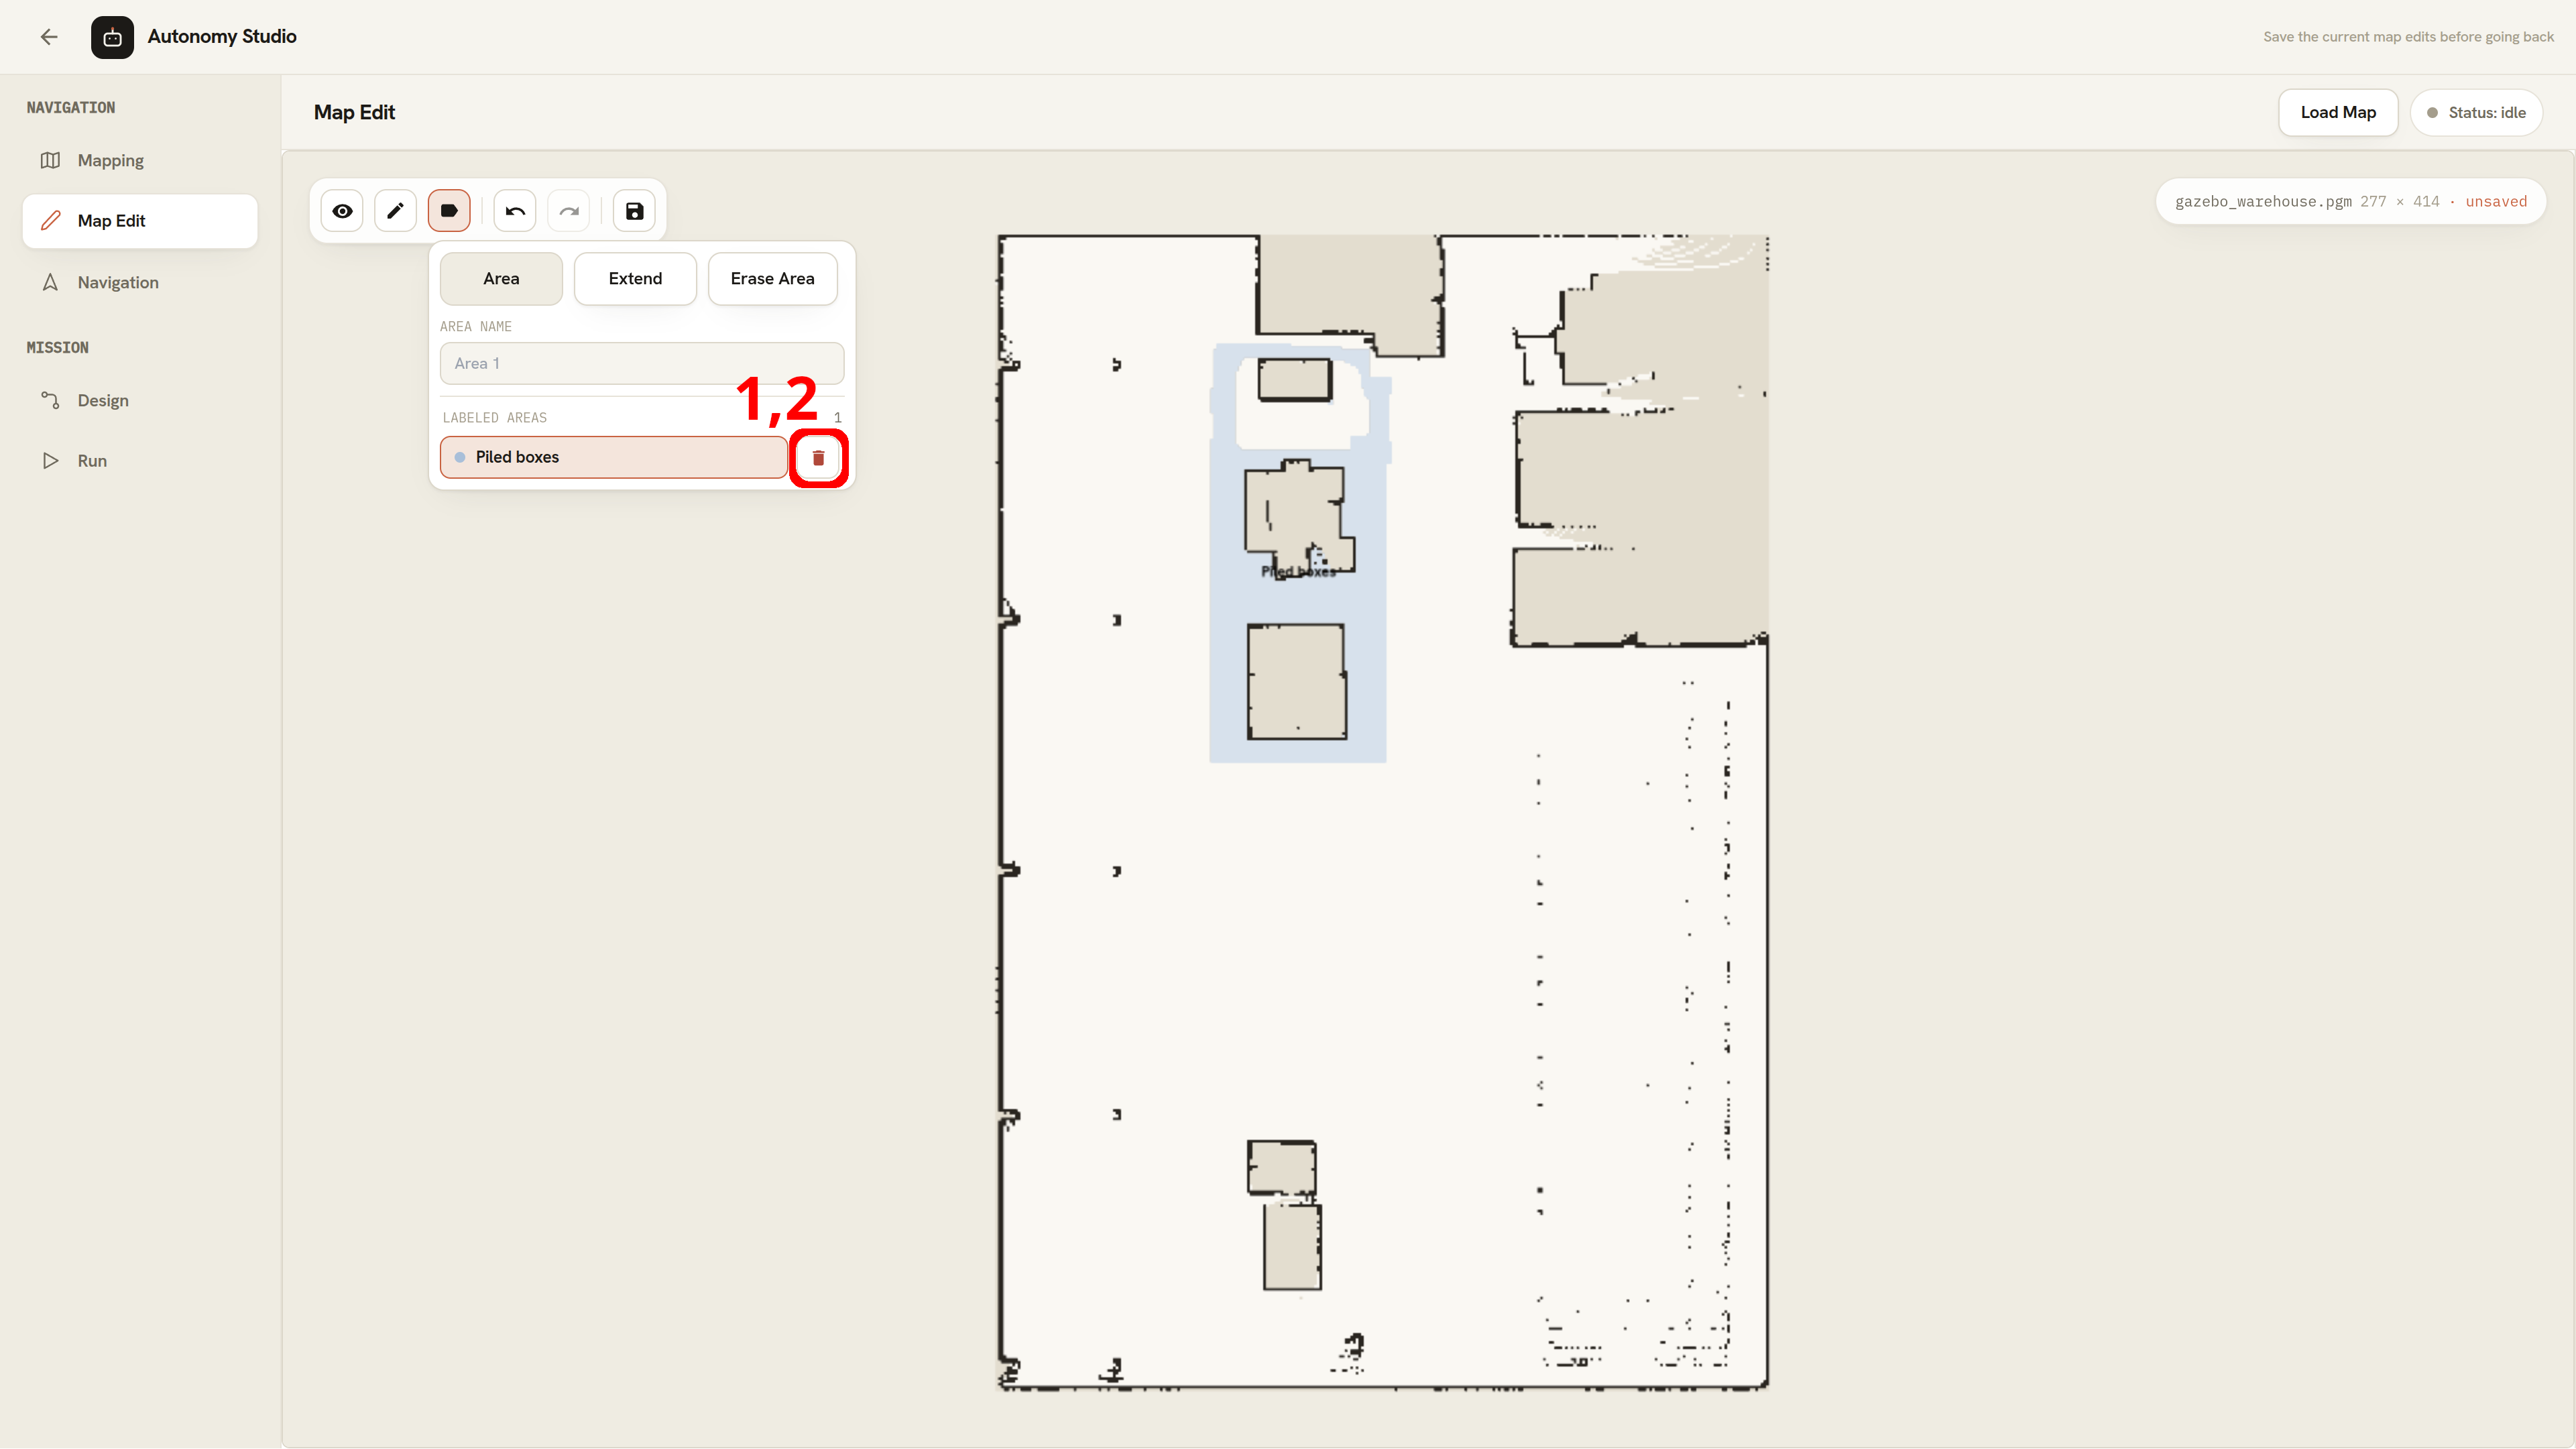
- Click the delete icon beside the area.
- Click it again within four seconds when the button changes to the confirmation state.
Deleting an area removes its label geometry but does not change the map's obstacle, free-space, or unknown pixels. Where stored areas overlap, deleting one preserves the visible cells belonging to the remaining areas.
Navigation Stage
Use the Navigation stage to validate a saved map, localize the robot, and drive to one map goal without creating or running a Mission. This is useful for checking map quality, localization, costmaps, and path planning before you build a multi-waypoint route.
Load a Map
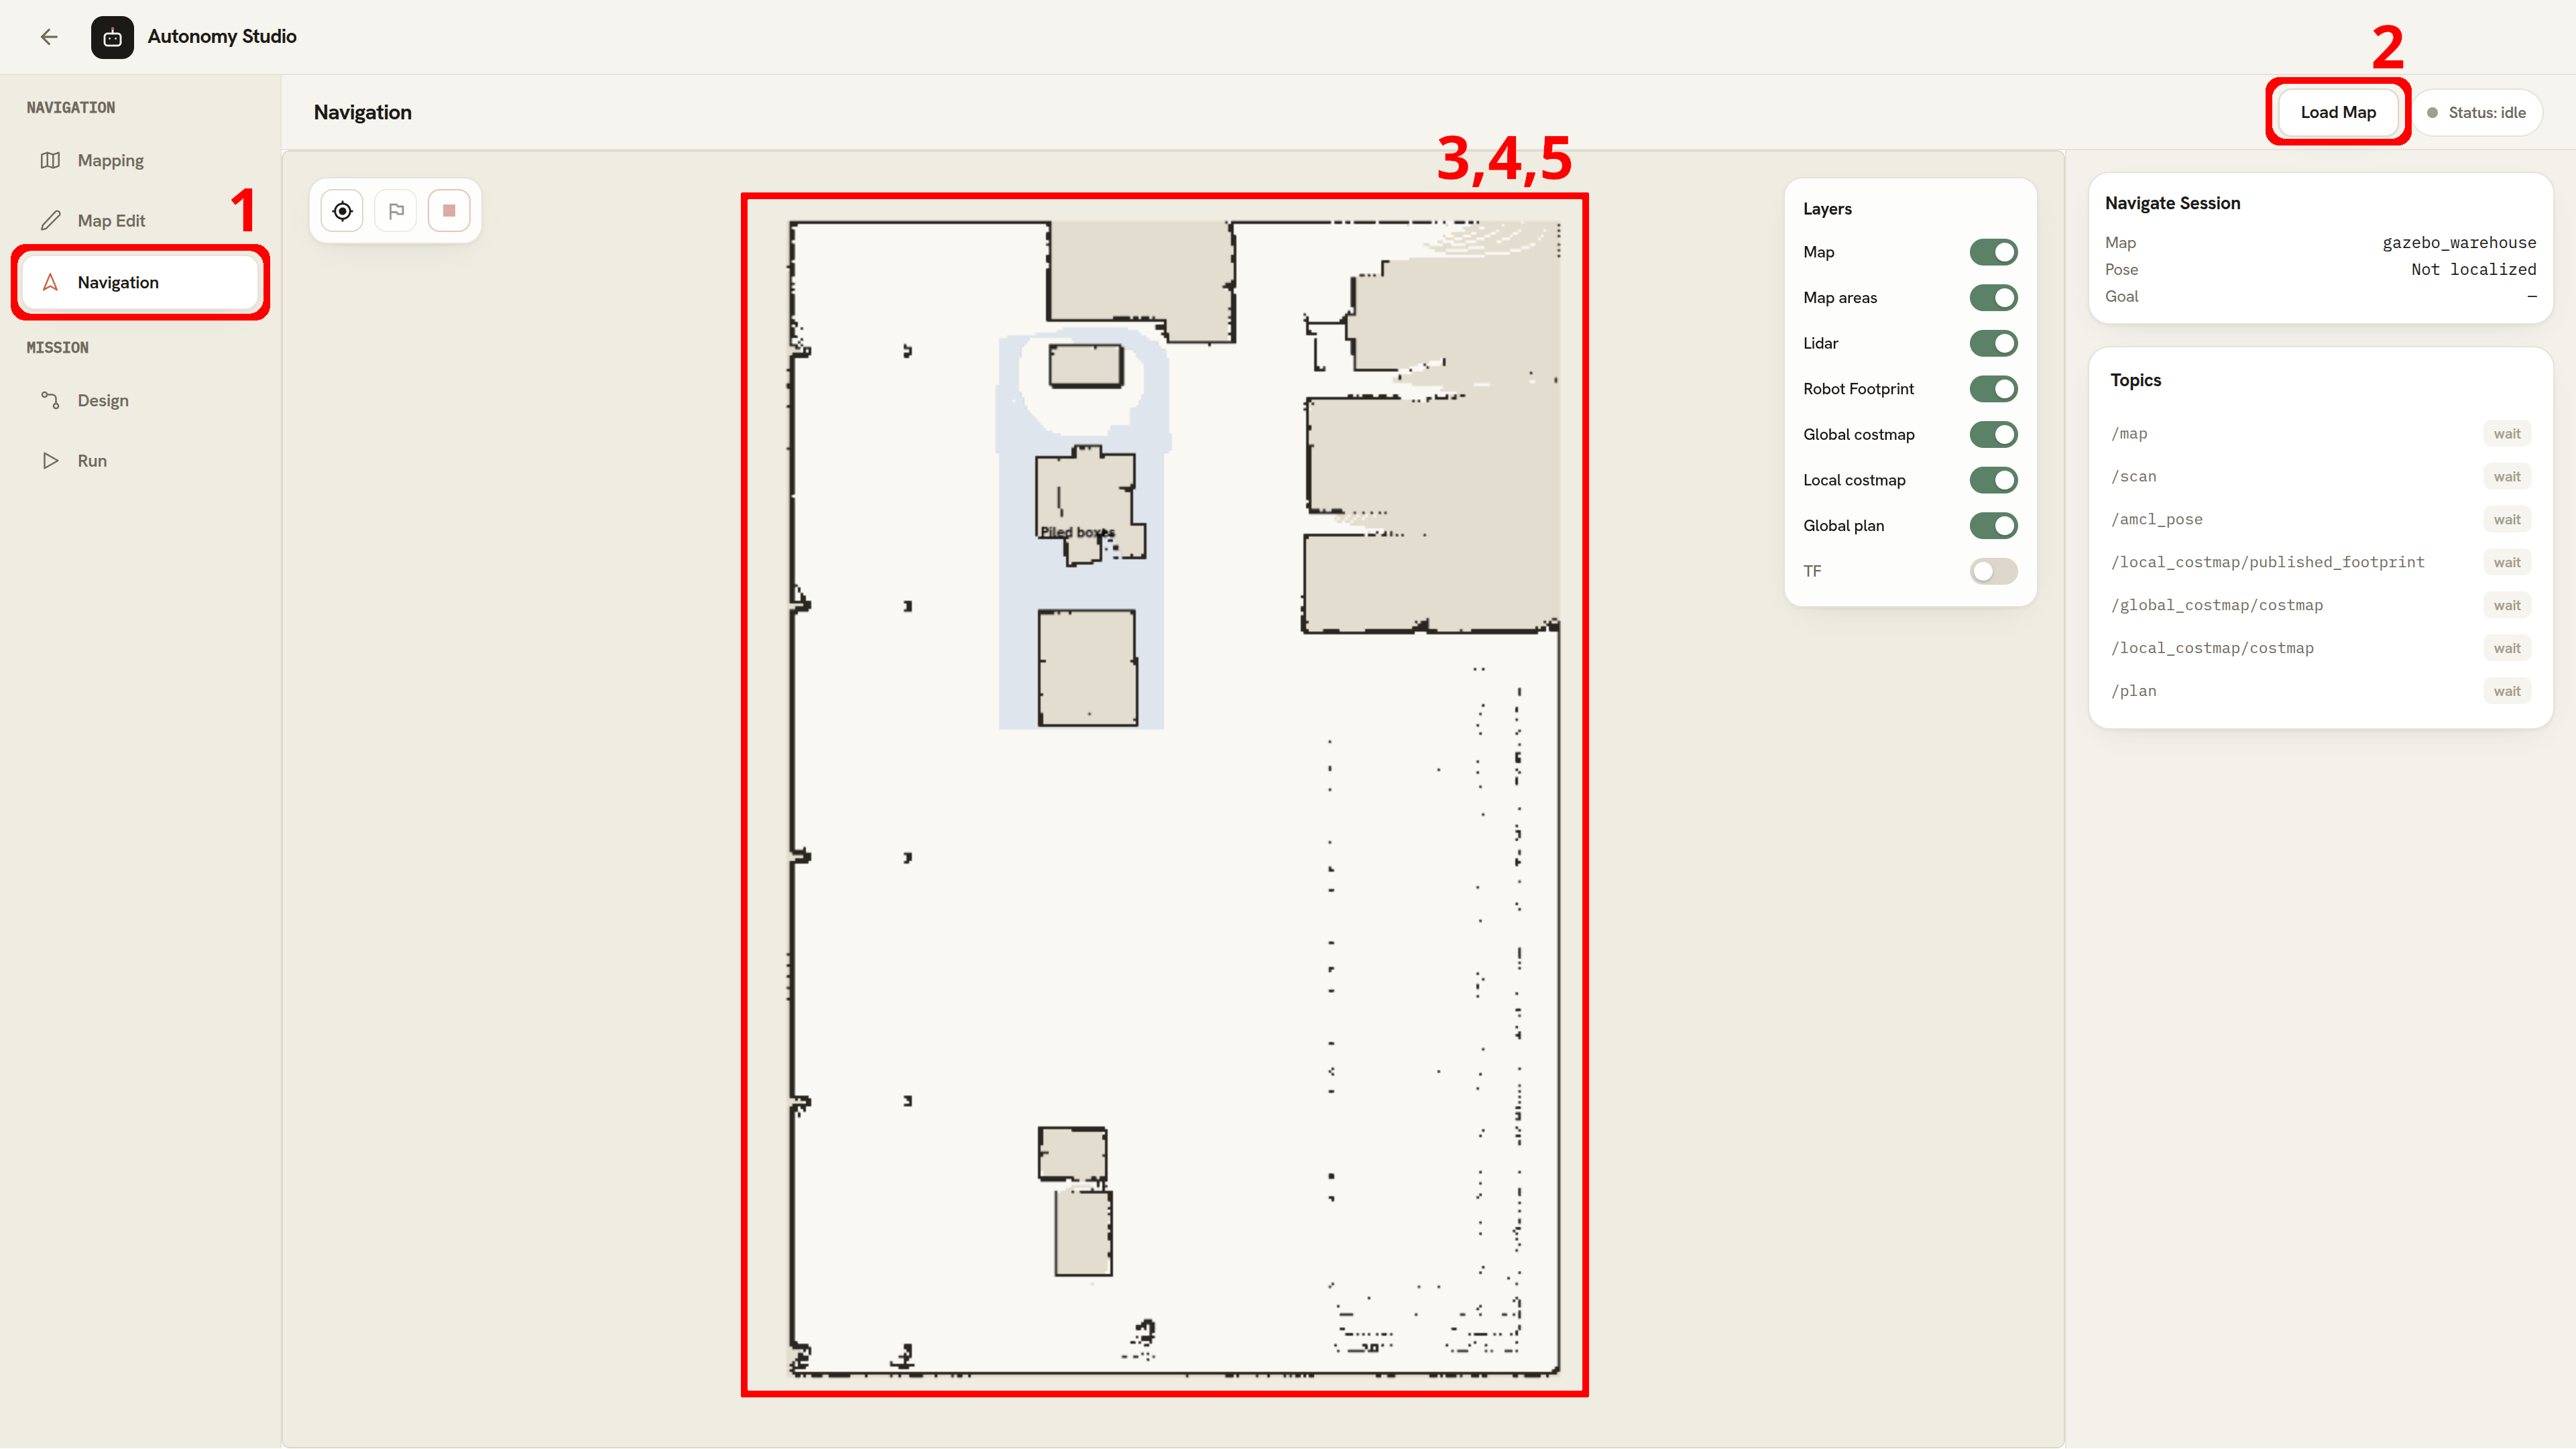
- Select Navigation in the Mission Canvas stage rail.
- Click Load Map in the stage header.
- Select a saved PGM file from Map.
- Click Load.
- Confirm that Navigate Session shows the selected map.
Loading a map prepares the display but does not start navigation. The header remains Status: idle until you click Localize.
The Navigation picker is map-only. Mission selection and Mission execution are handled in the Mission Run stage.
Localize the Robot
Localization tells the navigation system where the physical robot is on the loaded map.
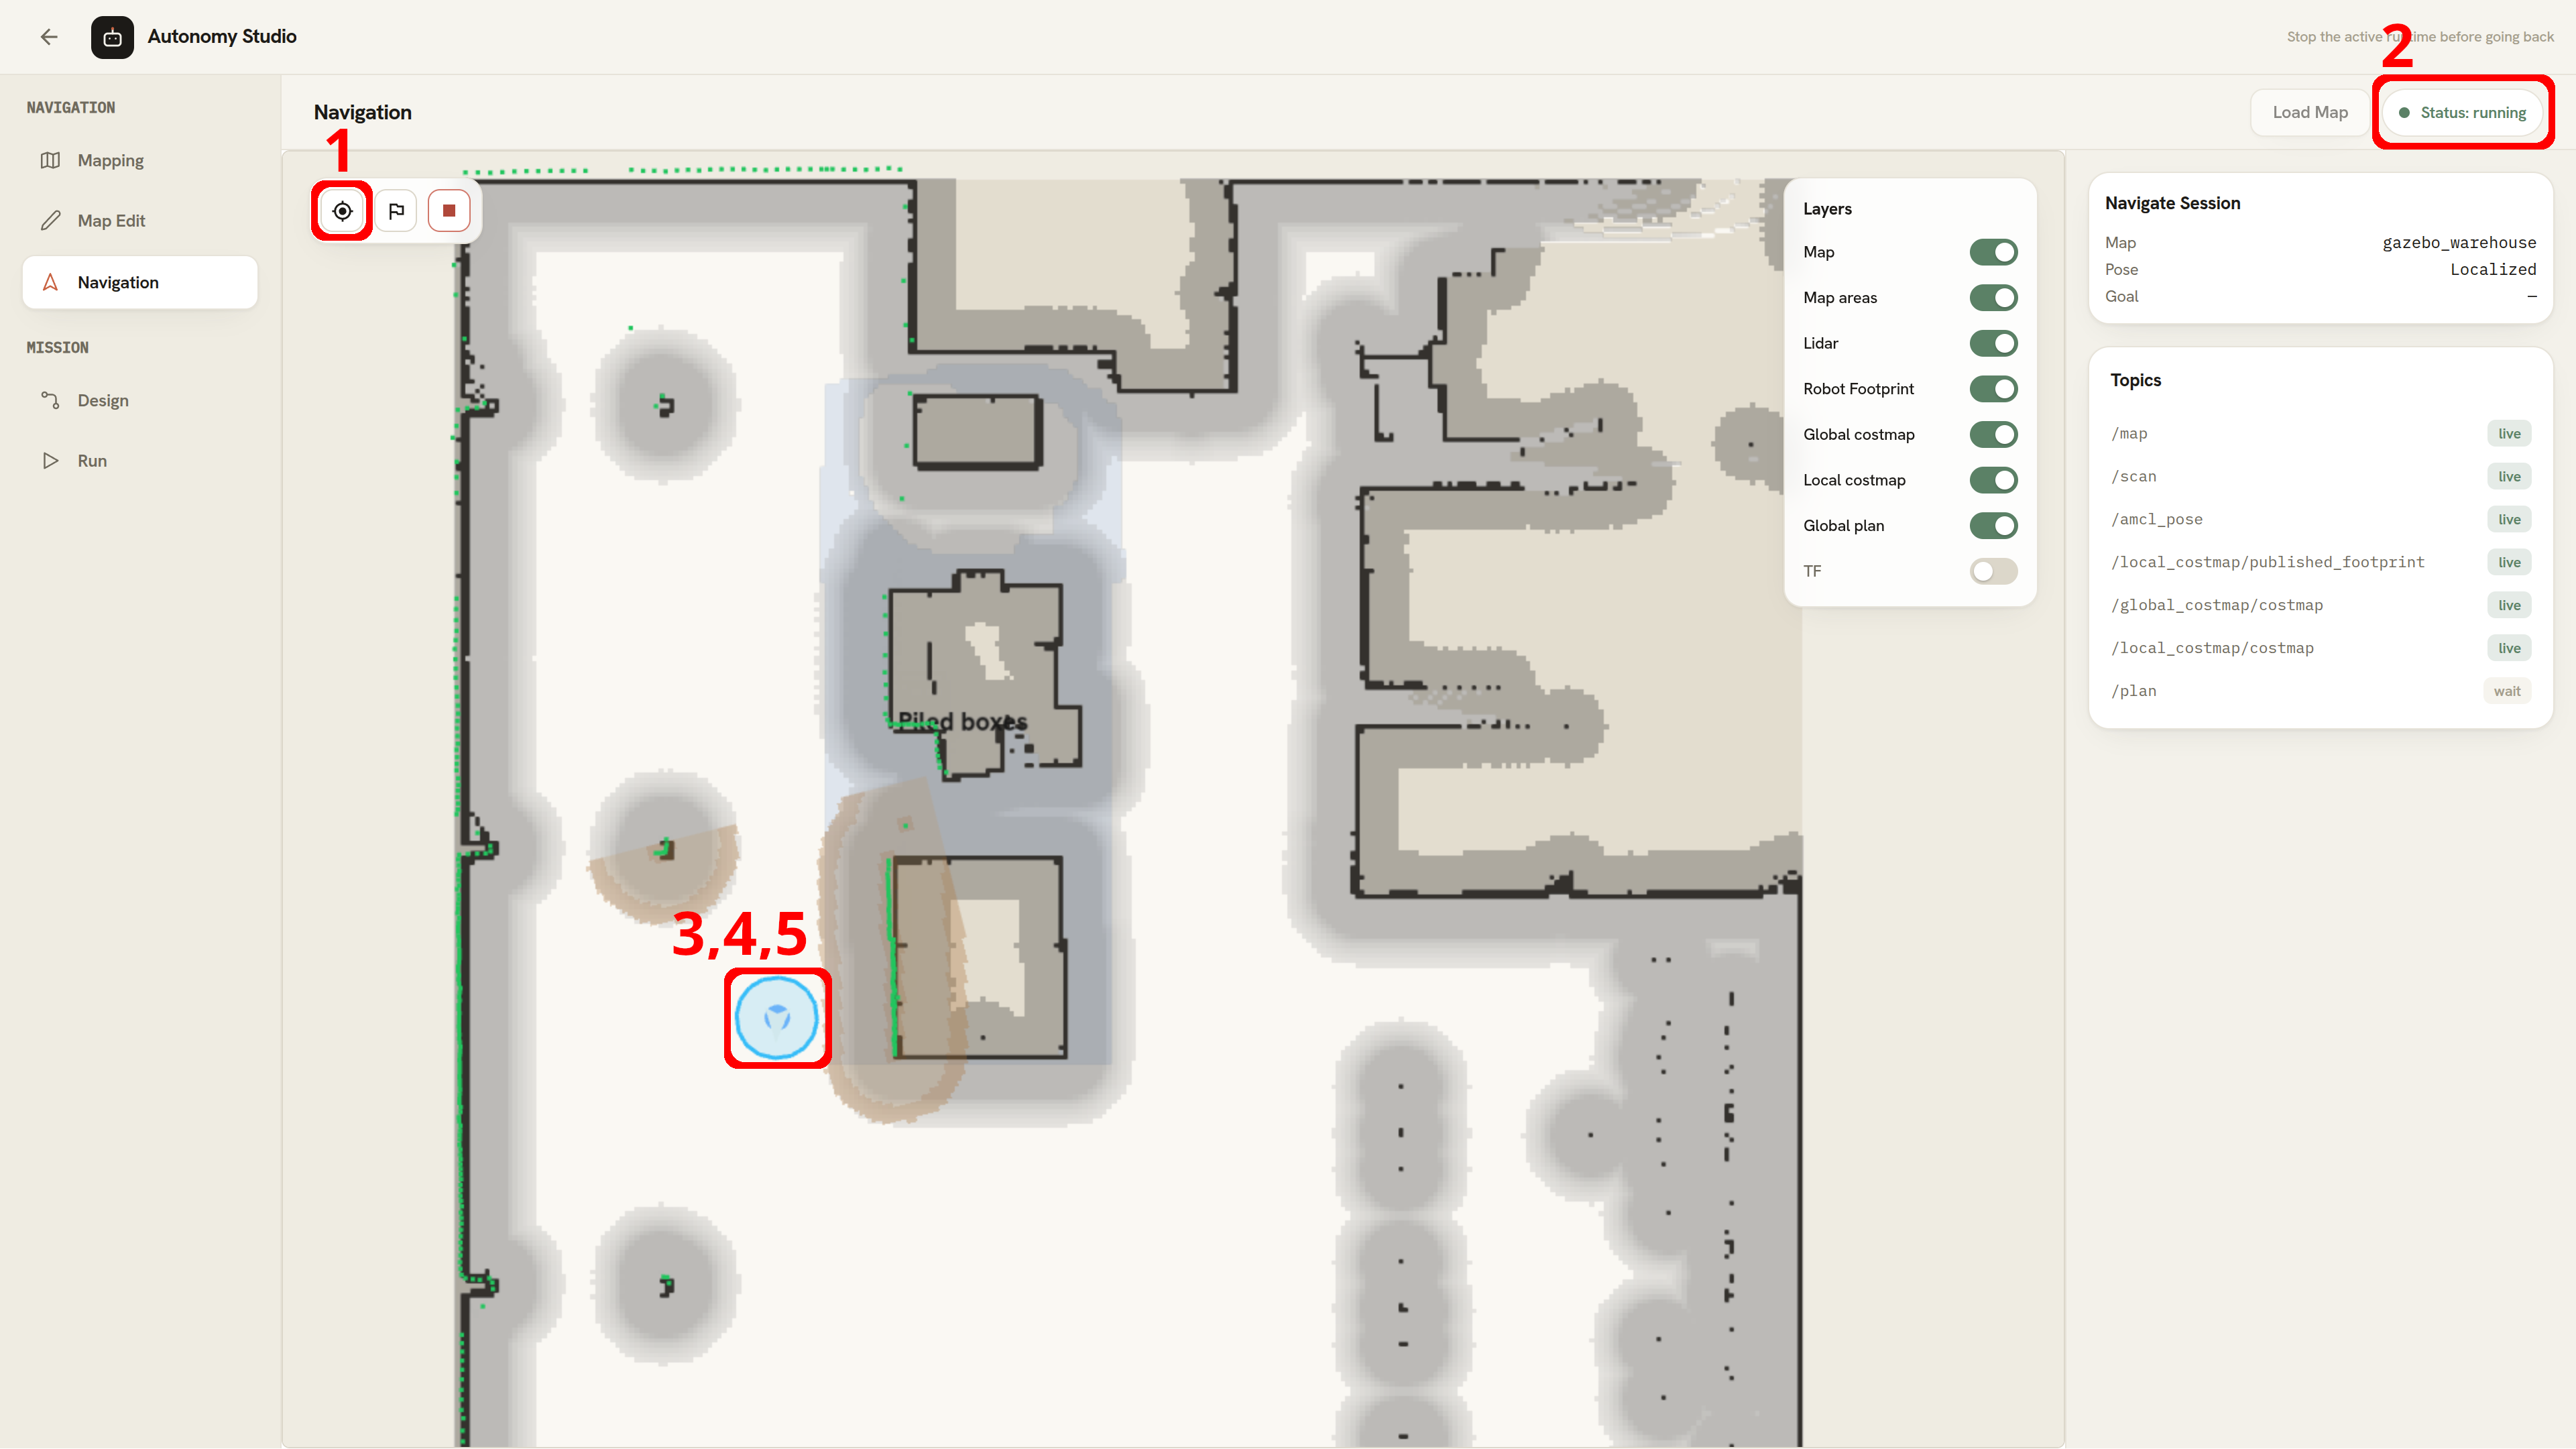
- Click Localize.
- Wait for the navigation runtime to start. The header changes to Status: running.
- Press the map at the robot's current position.
- Drag in the direction that the robot is facing, then release.
- Wait while Autonomy Studio submits the initial pose and requests AMCL no-motion updates.
Set the pose as close as possible to the robot's real position and heading. A poor initial estimate can cause the scan and map to remain misaligned or can produce an unsafe plan.
Send a Goal
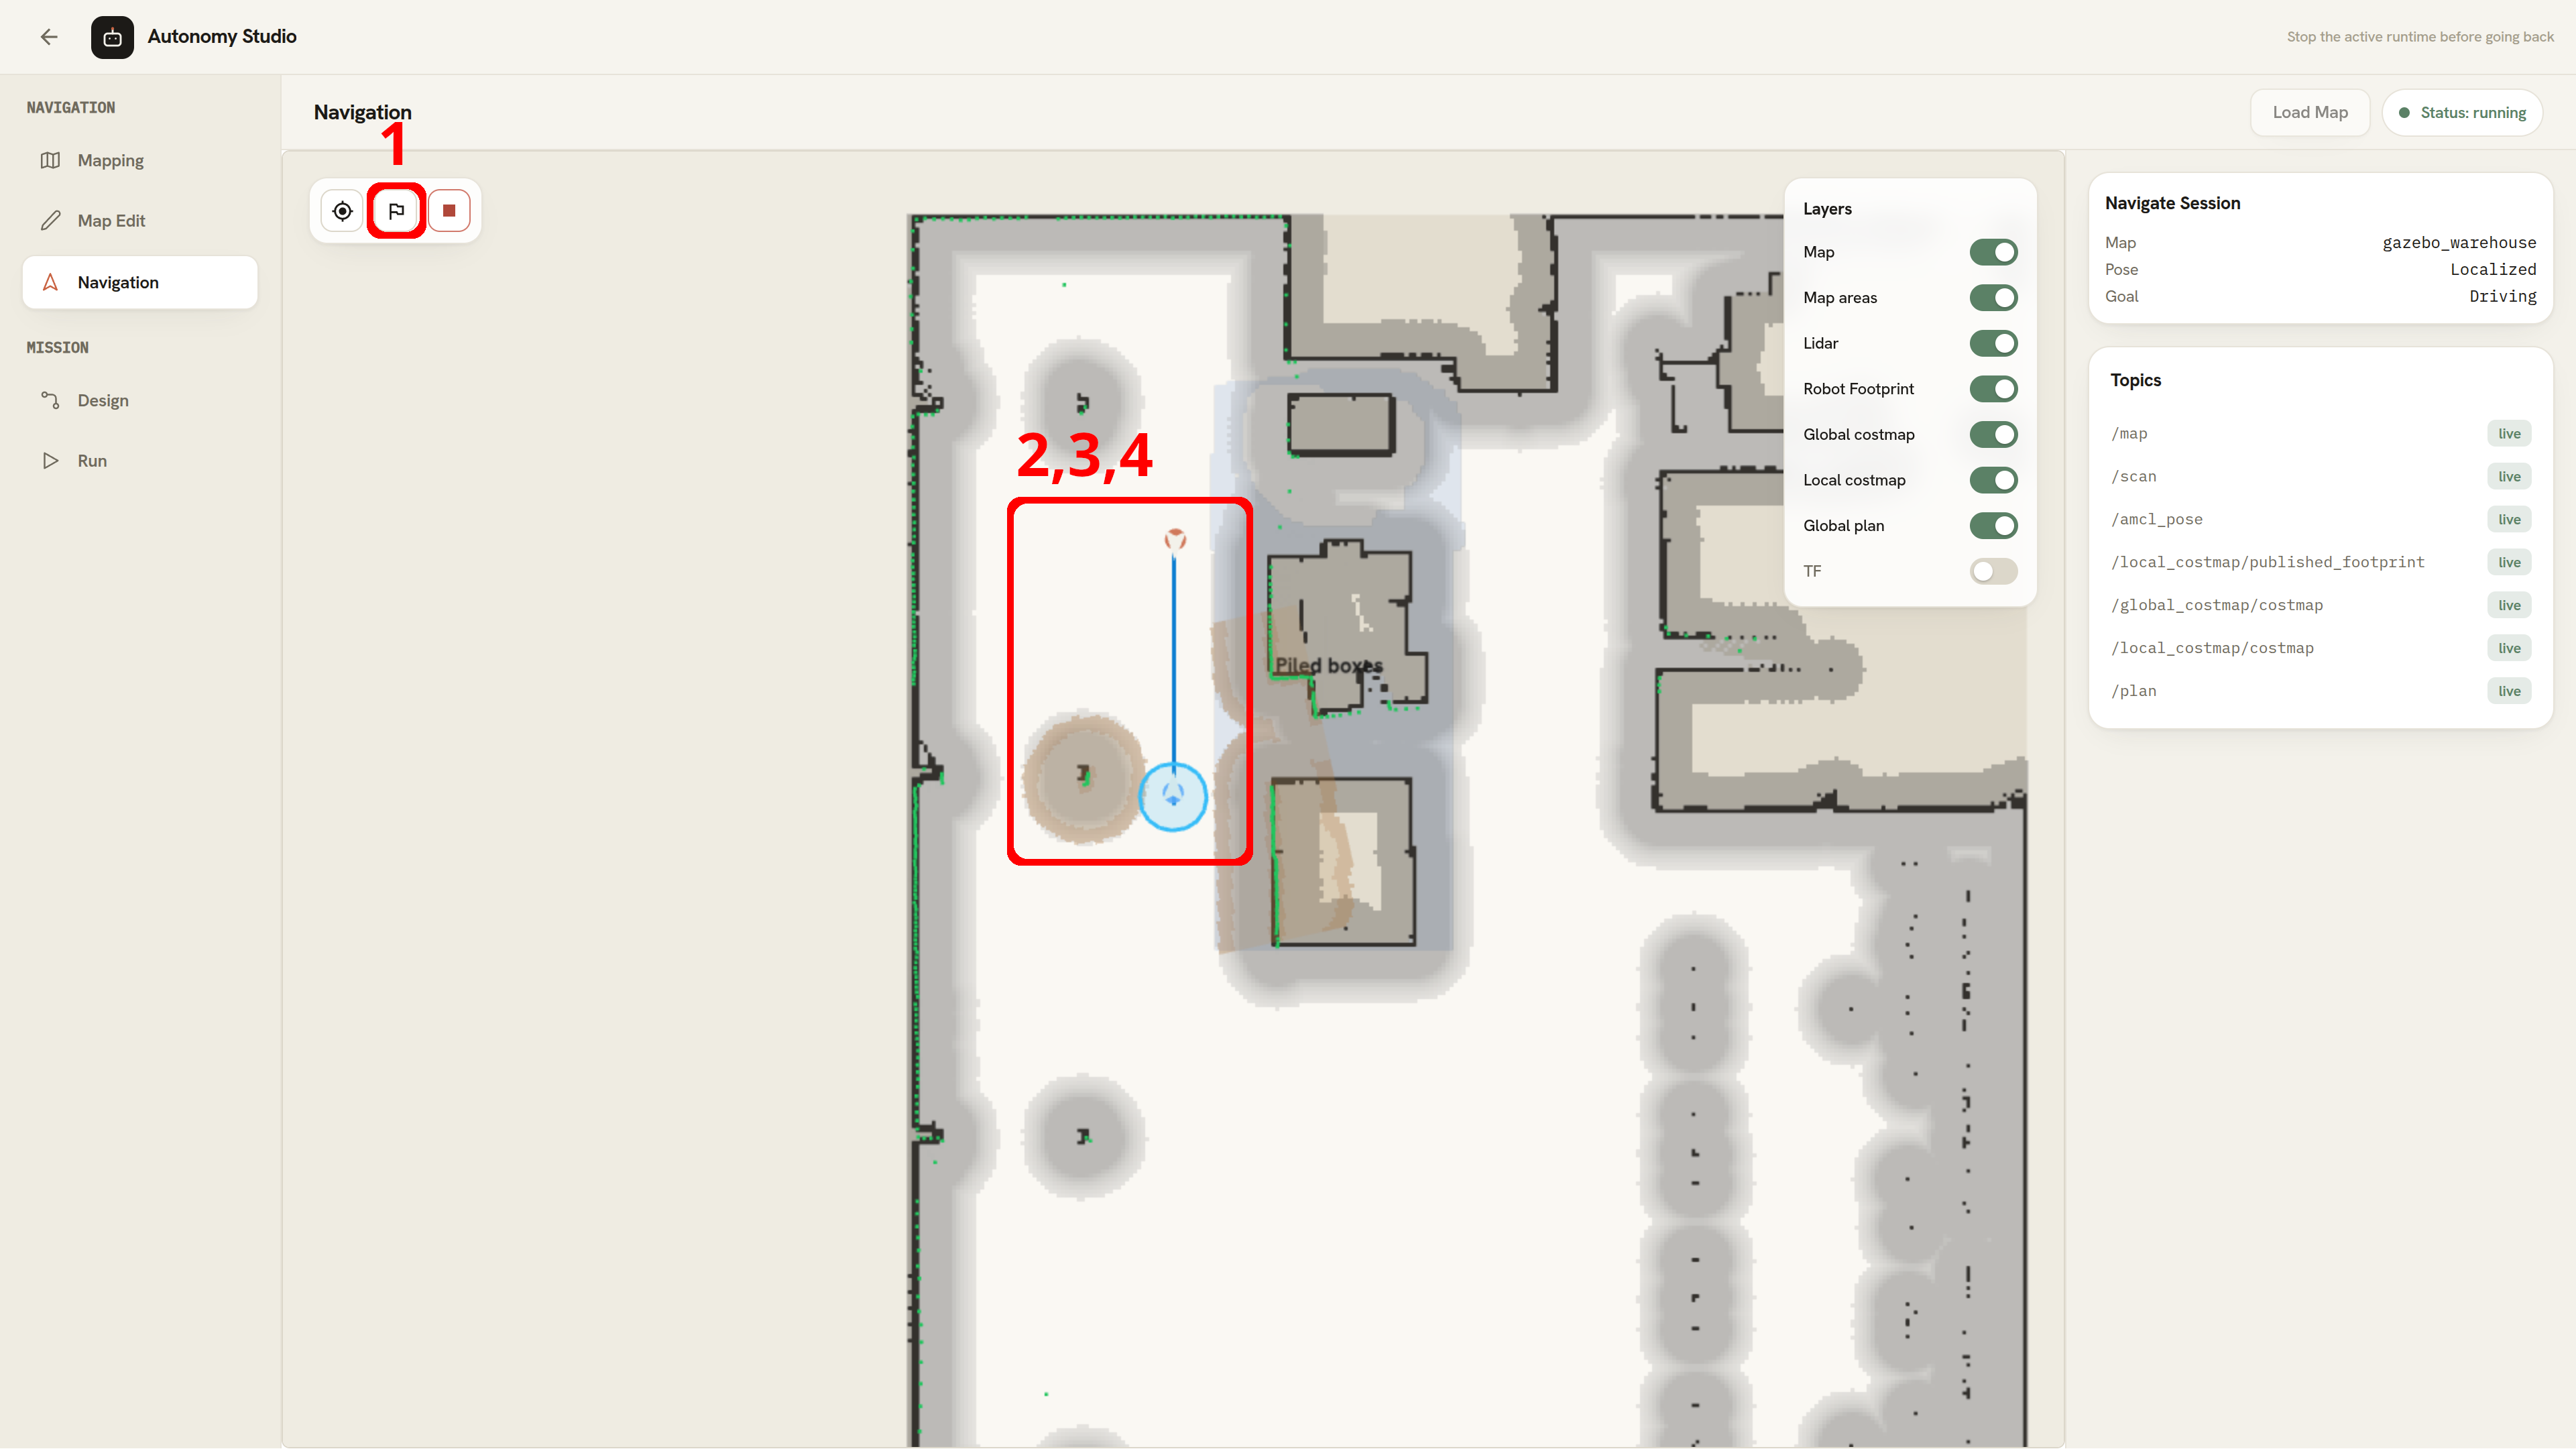
- Click Set Goal.
- Press the target position on the map.
- Drag in the direction that the robot should face at the destination, then release.
- Confirm that Navigate Session → Goal changes to Driving.