Mission
The Mission group in Mission Canvas turns a validated map into an executable mobile workflow. Its complete authoring and execution flow is documented on this page:
Mission Design → Waypoint Tasks (optional) → Mission Run
| Section | Purpose |
|---|---|
| Mission Design | Create and manage Missions, Waypoints, routes, and route loops. |
| Waypoint Tasks | Build the Task that runs after the robot arrives at each Waypoint. |
| Mission Run | Load a saved Mission, localize the robot, and execute the complete route. |
Mission Design
Use the Design stage of Mission Canvas to create a mobile Mission on a saved map. A Mission combines:
- Waypoints with a position and heading
- An ordered route through those Waypoints
- An optional Waypoint Task for each Waypoint
- An optional return from the last Waypoint to the first
Load a Map and Mission
Design does not automatically open a Mission from the last stage. Load a complete map-and-Mission document before editing it.
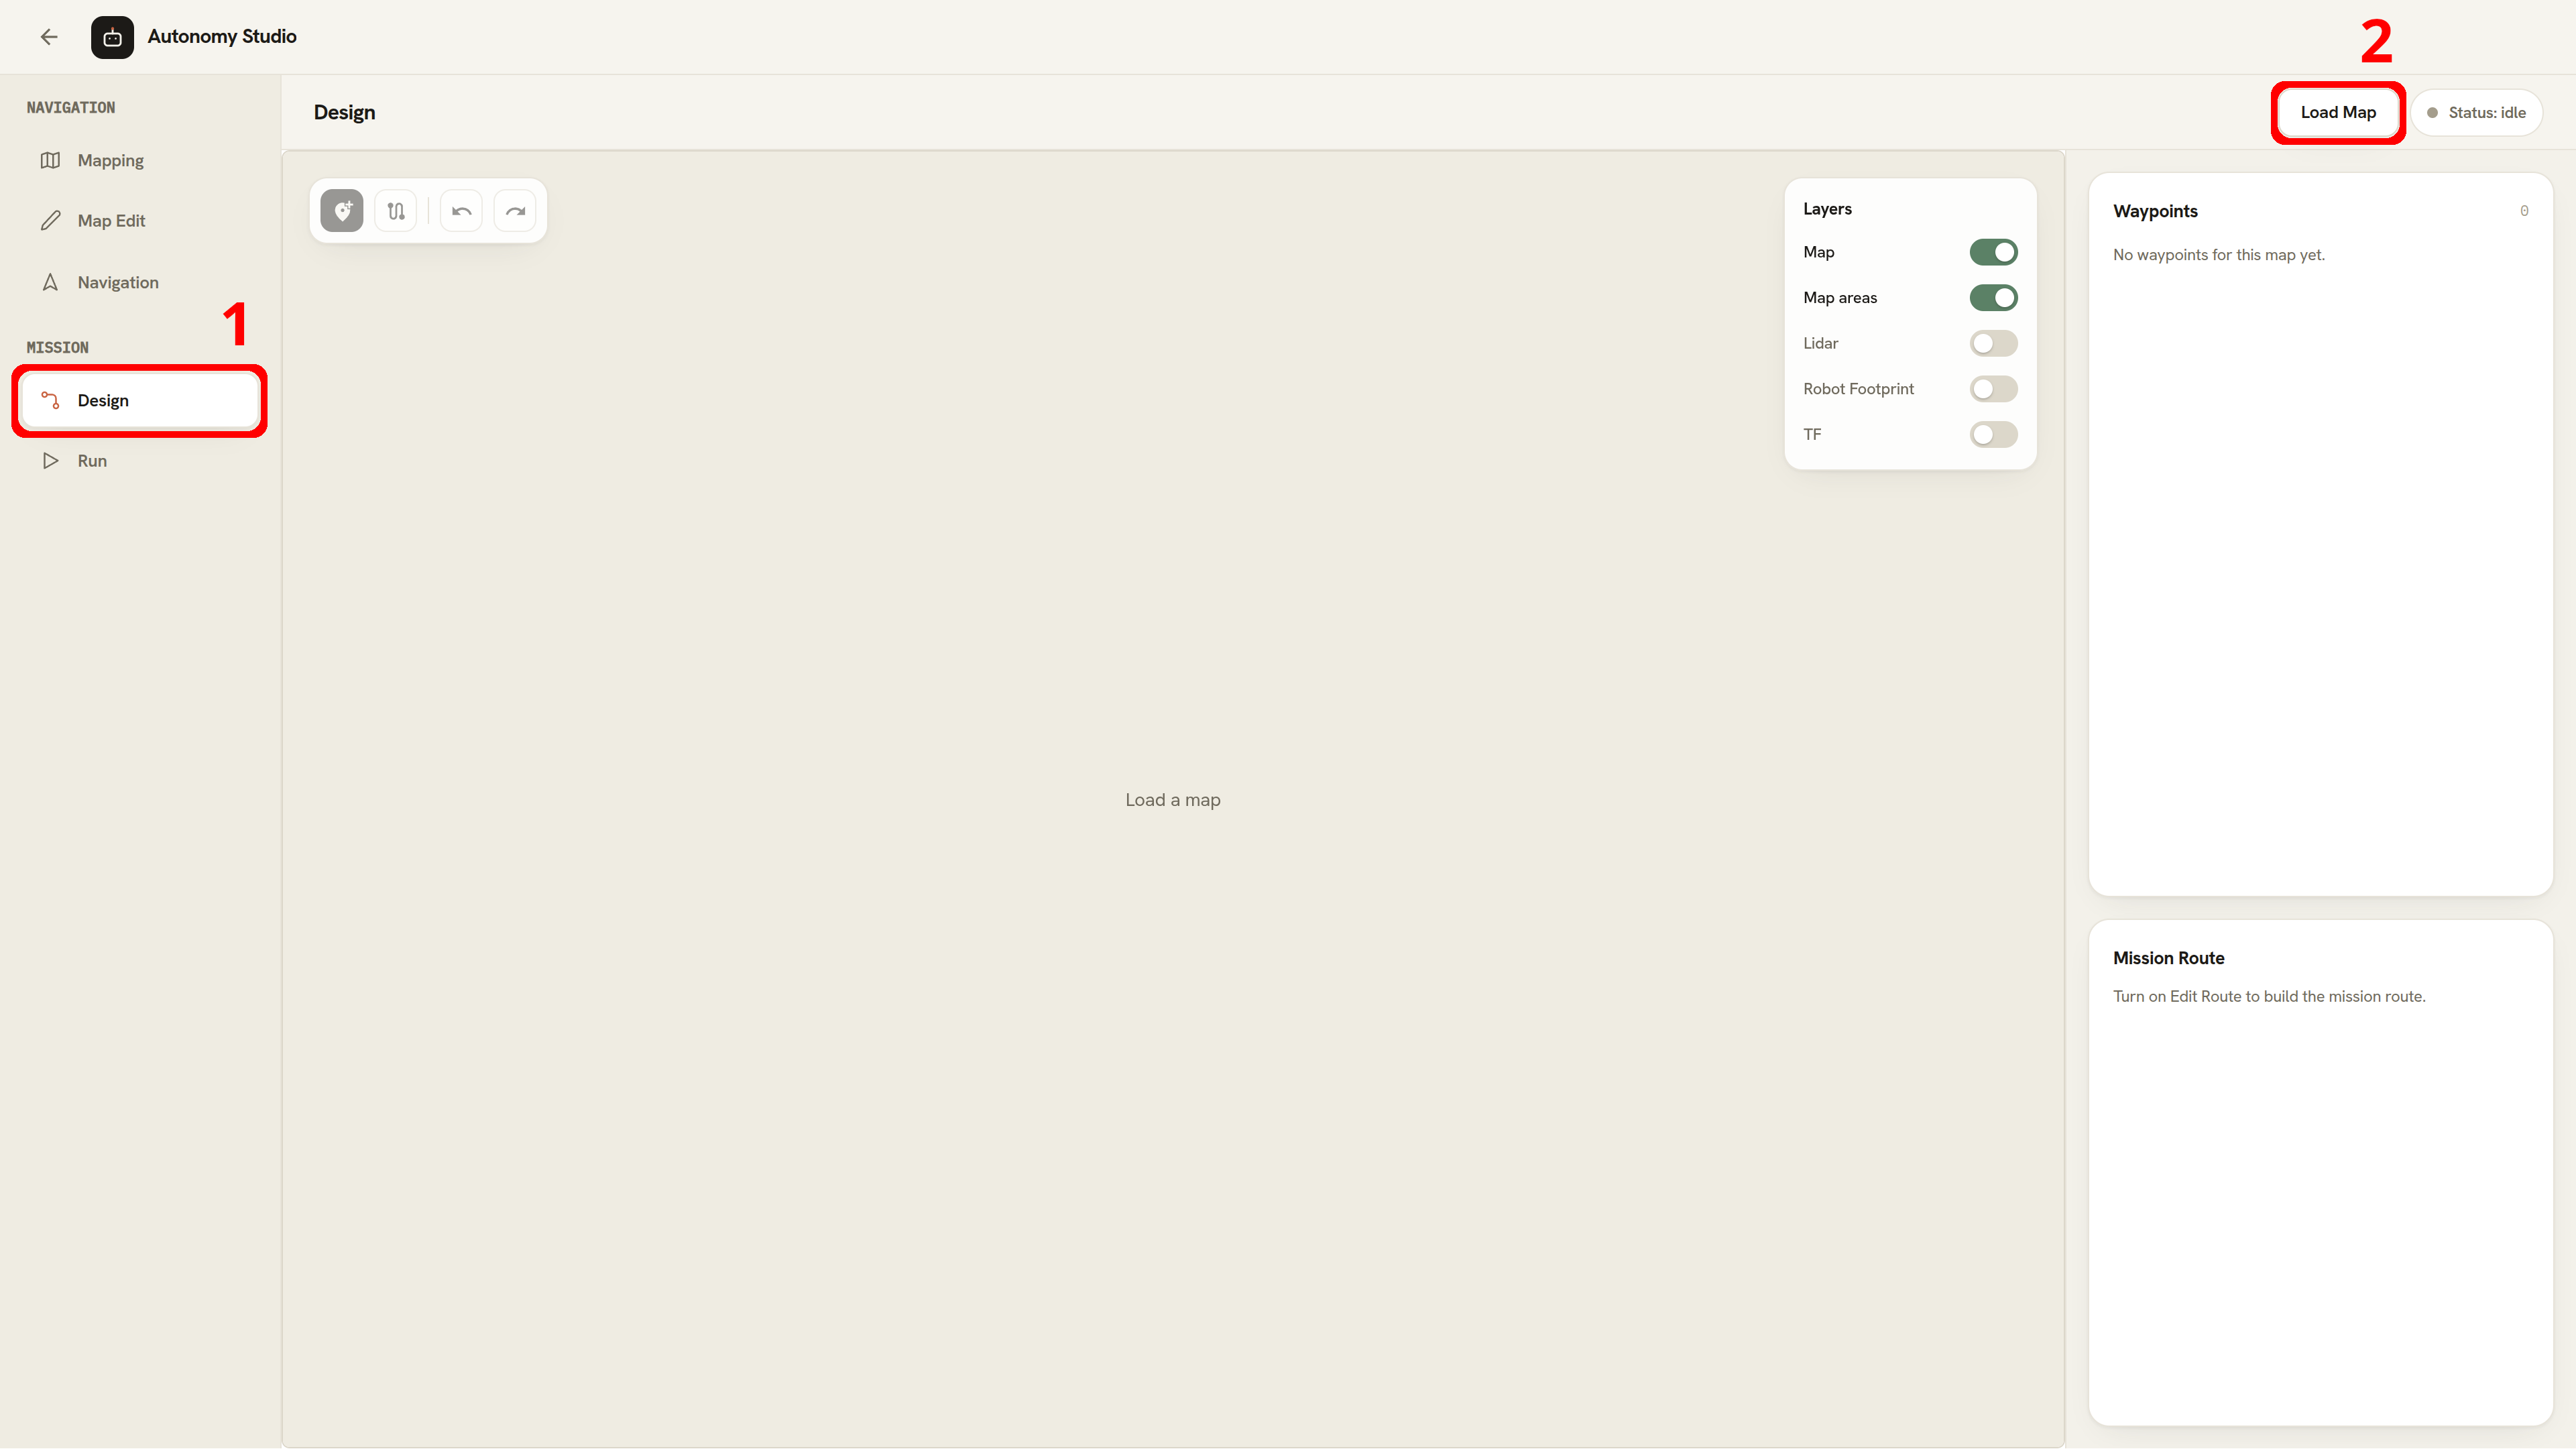
- In the MISSION group, select Design.
- Click Load Map in the stage header.
- Select a saved Map.
- Select a Mission associated with that map.
- Click Load.
Manage Missions
Use the Mission hub over the upper-left corner of the map.
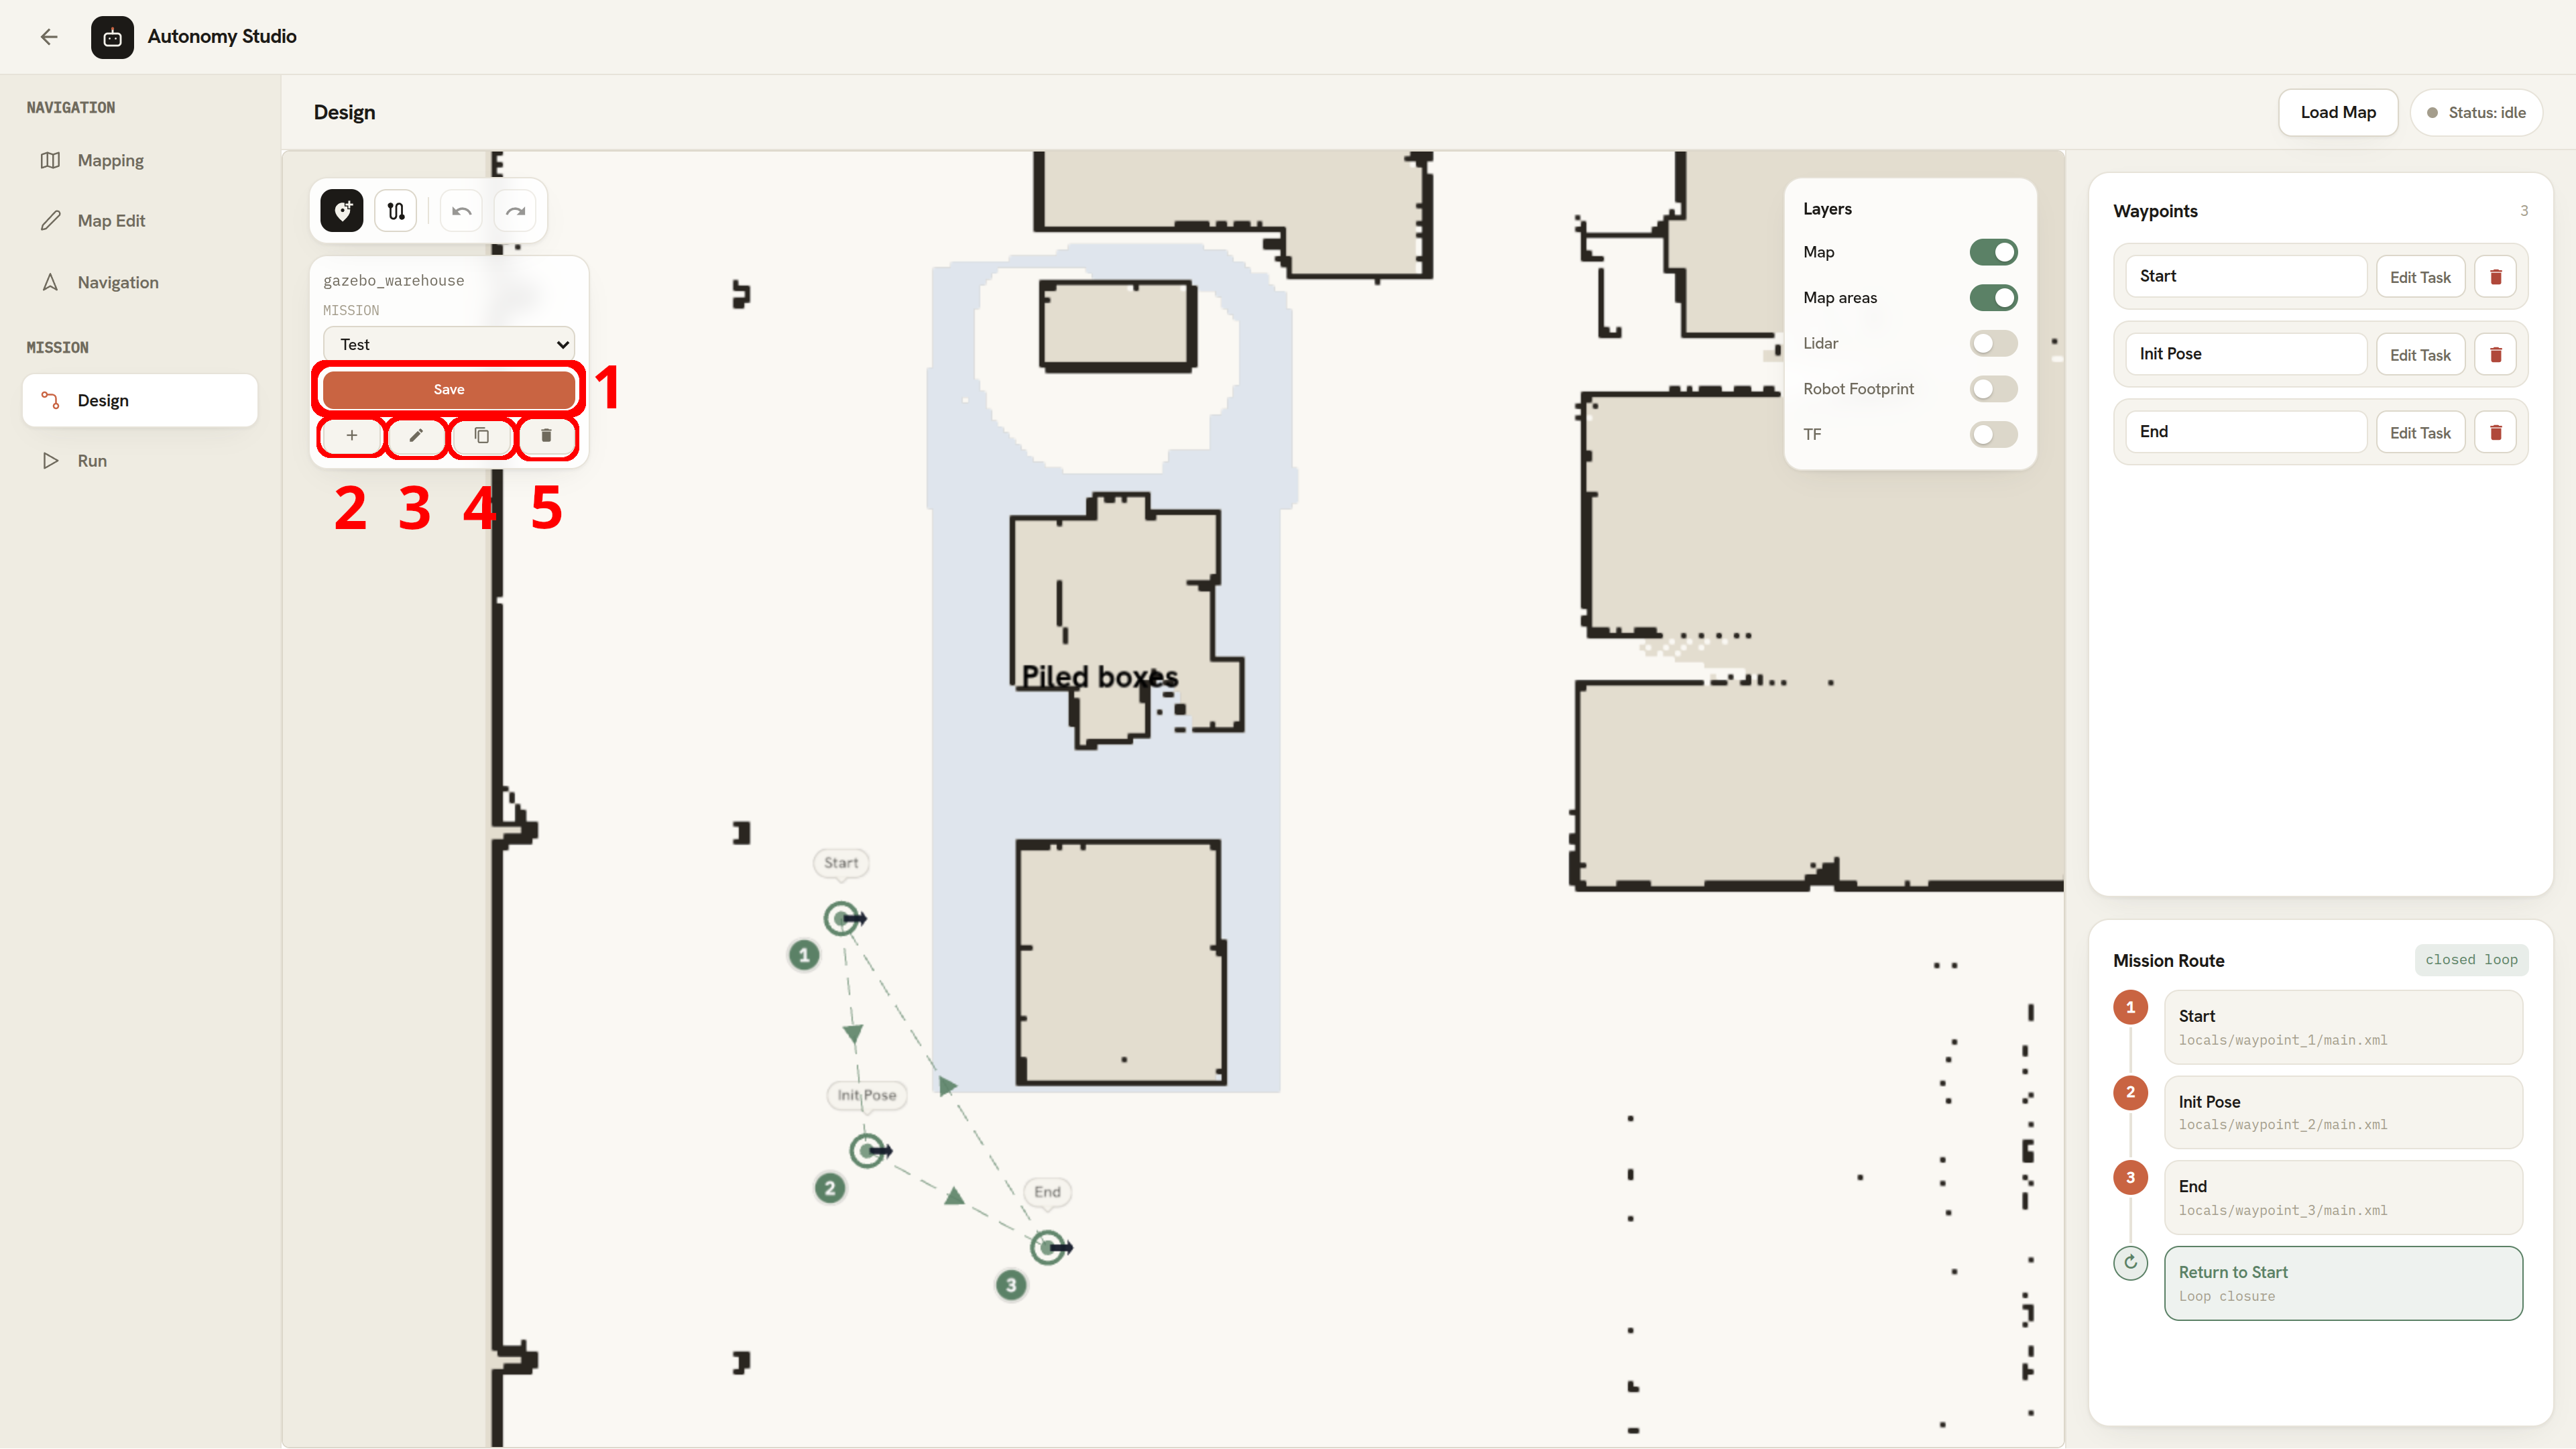
- Save saves the current Waypoints, poses, route, loop state, and Waypoint Task references. Task XML changes are also saved. An existing Mission saves in place.
- New clears the current Design canvas and starts
untitled. If that name exists, Design usesuntitled-2,untitled-3, and so on. The Mission starts unsaved; Save persists it, and saving its first unregistered Waypoint Task can also persist the complete Design automatically. - Rename changes the name of the saved Mission. The current canvas and any in-memory edits remain open under the new name.
- Duplicate copies the last saved state to a new Mission name. Unsaved edits in the current canvas are not included.
- Delete permanently deletes the selected Mission, including its Waypoints, route, and Waypoint Tasks. If another Mission exists, Design loads it; otherwise, Design starts a new Mission.
Deleting a Mission also discards any unsaved edits currently open for that Mission. This action cannot be undone from Design history.
Create Waypoints
Each new Waypoint receives a name such as Waypoint 1 and an empty default Waypoint Task. An empty Task makes the Waypoint navigation-only when the Mission runs.
Create a Waypoint on the Map
- Click Create Waypoint in the map toolbar.
- Select On Map.
- Click the intended position on the map.
- To set the heading, press the position, drag in the direction the robot should face, and release.
Design creates the Waypoint, selects it, and returns to normal view mode. Repeat the process for each additional Waypoint.
Create a Waypoint at the Robot
Use At Robot when the robot is physically at the intended Waypoint.
- Make sure no Mapping, Navigation, Run, or Design-localization session is active.
- Click Create Waypoint, then select At Robot.
- Wait for the localization runtime to start.
- Click and drag on the map to provide the robot's approximate current position and heading.
- Wait while AMCL refines the pose.
Design creates the Waypoint at the localized robot pose and stops the temporary localization runtime.
The position selected in step 4 must represent the robot's actual pose on the loaded map. An incorrect initial pose can produce an incorrect Waypoint and unreliable navigation.
Edit Waypoints
Select a Waypoint
Click a Waypoint marker on the map or its row in the Waypoints panel. The selected marker is highlighted.
Move or Rotate a Waypoint
- Drag the Waypoint marker to change its position.
- Drag its heading arrow to change the direction the robot should face at that Waypoint.
Route lines update with the Waypoint pose. Save the Mission to make the new pose persistent.
Rename a Waypoint
- Double-click the Waypoint name in the Waypoints panel.
- Enter the new display name.
- Press Enter or click outside the field to apply it.
Press Escape to cancel. Renaming a Waypoint does not rename or replace its Waypoint Task files; their association remains with the Waypoint.
Delete a Waypoint
Click the delete button in the Waypoint row. Deleting a Waypoint:
- Removes it from the Design canvas
- Removes it from the route
- Reconnects its previous and next route neighbors when possible
- Keeps a closed route closed when at least two routed Waypoints remain
- Schedules its Waypoint Task files for removal when the Mission is saved
Use Undo before saving if the Waypoint was deleted accidentally.
Build the Mission Route
A Mission needs at least one route connection before Run Mission can start. Waypoints that are not in the route remain stored in the Mission but are not executed.
- Click Edit On Map in the Design toolbar.
- Click the first Waypoint. It becomes the route start.
- Click each additional Waypoint in execution order.
- Review the numbered order in the Mission Route panel.
- Click Edit On Map again when route editing is complete.
A Waypoint can appear only once in an open route. Clicking a Waypoint that is already in the route does not add a duplicate.
Reorder the Route
While Edit On Map is active, use the up and down buttons beside a routed Waypoint to move it one position earlier or later. The route connections are rebuilt to match the new order.
Remove a Waypoint from the Route
Click the × button beside a Waypoint in the Mission Route panel. This removes only its route membership:
- The Waypoint remains in the Waypoints panel and on the map.
- Its neighboring route entries are connected to each other.
- A closed route remains closed when enough Waypoints remain.
Use the delete button in the Waypoints panel only when the Waypoint itself should also be removed.
Clear the Route
While Edit On Map is active, click Clear Route to remove every route connection. All Waypoints and their Tasks remain in the Mission.
Create a Closed Loop
- Build an open route with at least two Waypoints.
- Leave Edit On Map active.
- Click the first Waypoint from the current route end.
The Mission Route panel displays closed loop and a Return to first waypoint row. During Run, the robot returns to the first Waypoint and processes that Waypoint again as the final Mission step.
Assign Waypoint Tasks
Click Edit Task beside a Waypoint to open its Task editor. Each Waypoint has its own Task file library and one default Task selected for Run.
- If the default Task is empty, Run labels the Waypoint Nav only and does not execute a Task at that Waypoint. The Task Engine can still be active for Tasks assigned to other Waypoints.
- Saving an alternate Task file does not automatically select it for Mission execution.
- Use Use for Run in the Waypoint Task editor to change the default file.
- The Mission and the selected Task file must be saved before a different default can be selected.
See Waypoint Tasks for Step editing, Task file management, and Use for Run.
Undo, Redo, and Save
Use the toolbar buttons or these shortcuts while the Design map is active:
| Action | Shortcut |
|---|---|
| Undo | Ctrl+Z or Command+Z |
| Redo | Ctrl+Shift+Z, Command+Shift+Z, Ctrl+Y, or Command+Y |
Undo and Redo are unavailable in Design while a Waypoint Task editor is open or another operation is in progress. The Waypoint Task editor provides its own history controls.
Click Save after changing any of the following:
- Waypoint creation, pose, name, or deletion
- Route order, membership, or loop state
- Waypoint Task contents or references
Saving establishes a new history baseline. If additional edits are made while a save is still completing, the saved snapshot remains valid and the newer edits remain unsaved; click Save again.
Waypoint Tasks
A Waypoint Task is a set of connected Steps assigned to one waypoint. During Mission execution, the robot first reaches the waypoint and then runs the selected Task. Each waypoint can keep several saved Task files, but only one is selected for Run.
Waypoint Tasks use the same Flow Controls, Actions, connection rules, and parameter inspector as Action Canvas. Unlike Action Canvas, they are stored inside a Map and Mission rather than in the standalone Task library.
Open a Waypoint Task
- In the Waypoints panel, find the intended waypoint.
- Click Edit Task.
The header changes to Design > waypoint name · Waypoint Task. The map remains visible as a narrow context area on the left, and the Task editor opens on the right.
To return to Mission Design, click Back to Map in the header or click the left map context area. The current in-memory edits remain part of the Design document; returning to the map does not automatically save them to the server.
Build the Waypoint Task
Waypoint Tasks use the same editor and workflow as Action Canvas. Follow Build a Task in Action Canvas to learn how to add, connect, configure, arrange, and remove Steps.
Unlike a standalone Action Canvas Task, a Waypoint Task belongs to a specific Waypoint and runs after the robot arrives there. Continue below to learn how to save the Task and select the file used during Mission Run.
Understand Waypoint Task Files
Each waypoint keeps its own Task files. A new waypoint normally starts with main.xml. Files created with Save Task As appear only for that waypoint, and renaming the waypoint keeps its Task files attached.
The Open Task dialog lists only files owned by the selected waypoint. Standalone Action Canvas files and files belonging to another waypoint are not shown.
Current Edits and Saved Files
| State or action | Effect |
|---|---|
| Current edits | Changes remain available when you select Back to Map, but they are not stored on the server until you save. |
| Save | Stores the Task currently open in the editor. For a new Mission or waypoint, Autonomy Studio may save the Mission first so that the Task has a waypoint to belong to. |
| Save Task As | Stores the Task with a new filename and opens that file in the editor. It does not change which Task is used during Mission Run. |
| Use for Run | Selects the current saved Task as the one to run at this waypoint. |
| Save Mission | Stores the Waypoints, route, and related Tasks together. |
Use Save when the selected file already has the desired identity. Use Save Task As to retain the current file and create an alternate version.
To select the Task used at this Waypoint during Mission Run:
- Use Open Task to select the required file, or create it with Save Task As.
- Save the file and confirm that the Mission already exists on the server.
- Click Use for Run.
- Wait for the
Used for Run:confirmation. - Reopen Open Task if you want to verify that the file now has the Run Task badge.
Use for Run is disabled when the selected file is already the default. It is also unavailable until both the Mission and the selected file have been saved.
Use for Run takes effect immediately and cannot be reversed with Design Undo. To switch back, open the previous Task and click Use for Run again.
Navigation-Only Waypoints
A Task with no Steps is treated as empty.
To make a waypoint navigation-only:
- Open its default Task.
- Click Clear twice within four seconds.
- Click Save.
- If you cleared an alternate file, click Use for Run to make it the default.
During Mission Run, the waypoint is reported as Nav only. The robot continues along the route without starting a Task at that waypoint.
Mission Run
Use the Run stage of Mission Canvas to execute a saved Mission. Run navigates through the Mission route and starts the default Waypoint Task at each applicable Waypoint.
Run a Mission
1. Load the Map and Mission
2. Localize the Robot
- Click Localize in the Run toolbar.
- Wait for the navigation runtime to start.
- On the map, press at the robot's approximate actual position.
- Drag in the direction the robot is facing, then release.
- Wait until Run Session reports Localization: Ready.
3. Start the Mission
Before enabling motion, check the complete route, Waypoint headings, and surrounding area. Then click Run Mission.
The button is available only when:
- A complete Run snapshot is loaded
- Localization is ready
- The Mission contains a connected route
- No Mission or Task Engine lifecycle operation is already active
Run Another Mission on the Same Map
After the current Mission finishes, you can run another Mission on the same map without loading the map or localizing the robot again.
- In Run Session, select another saved Mission from the Mission list.
- Wait for the new route and Waypoints to appear, then confirm that Localization still shows Ready.
- Review the new route and click Run Mission.
Stop the Mission
Click Stop to end the complete Run session. Stop:
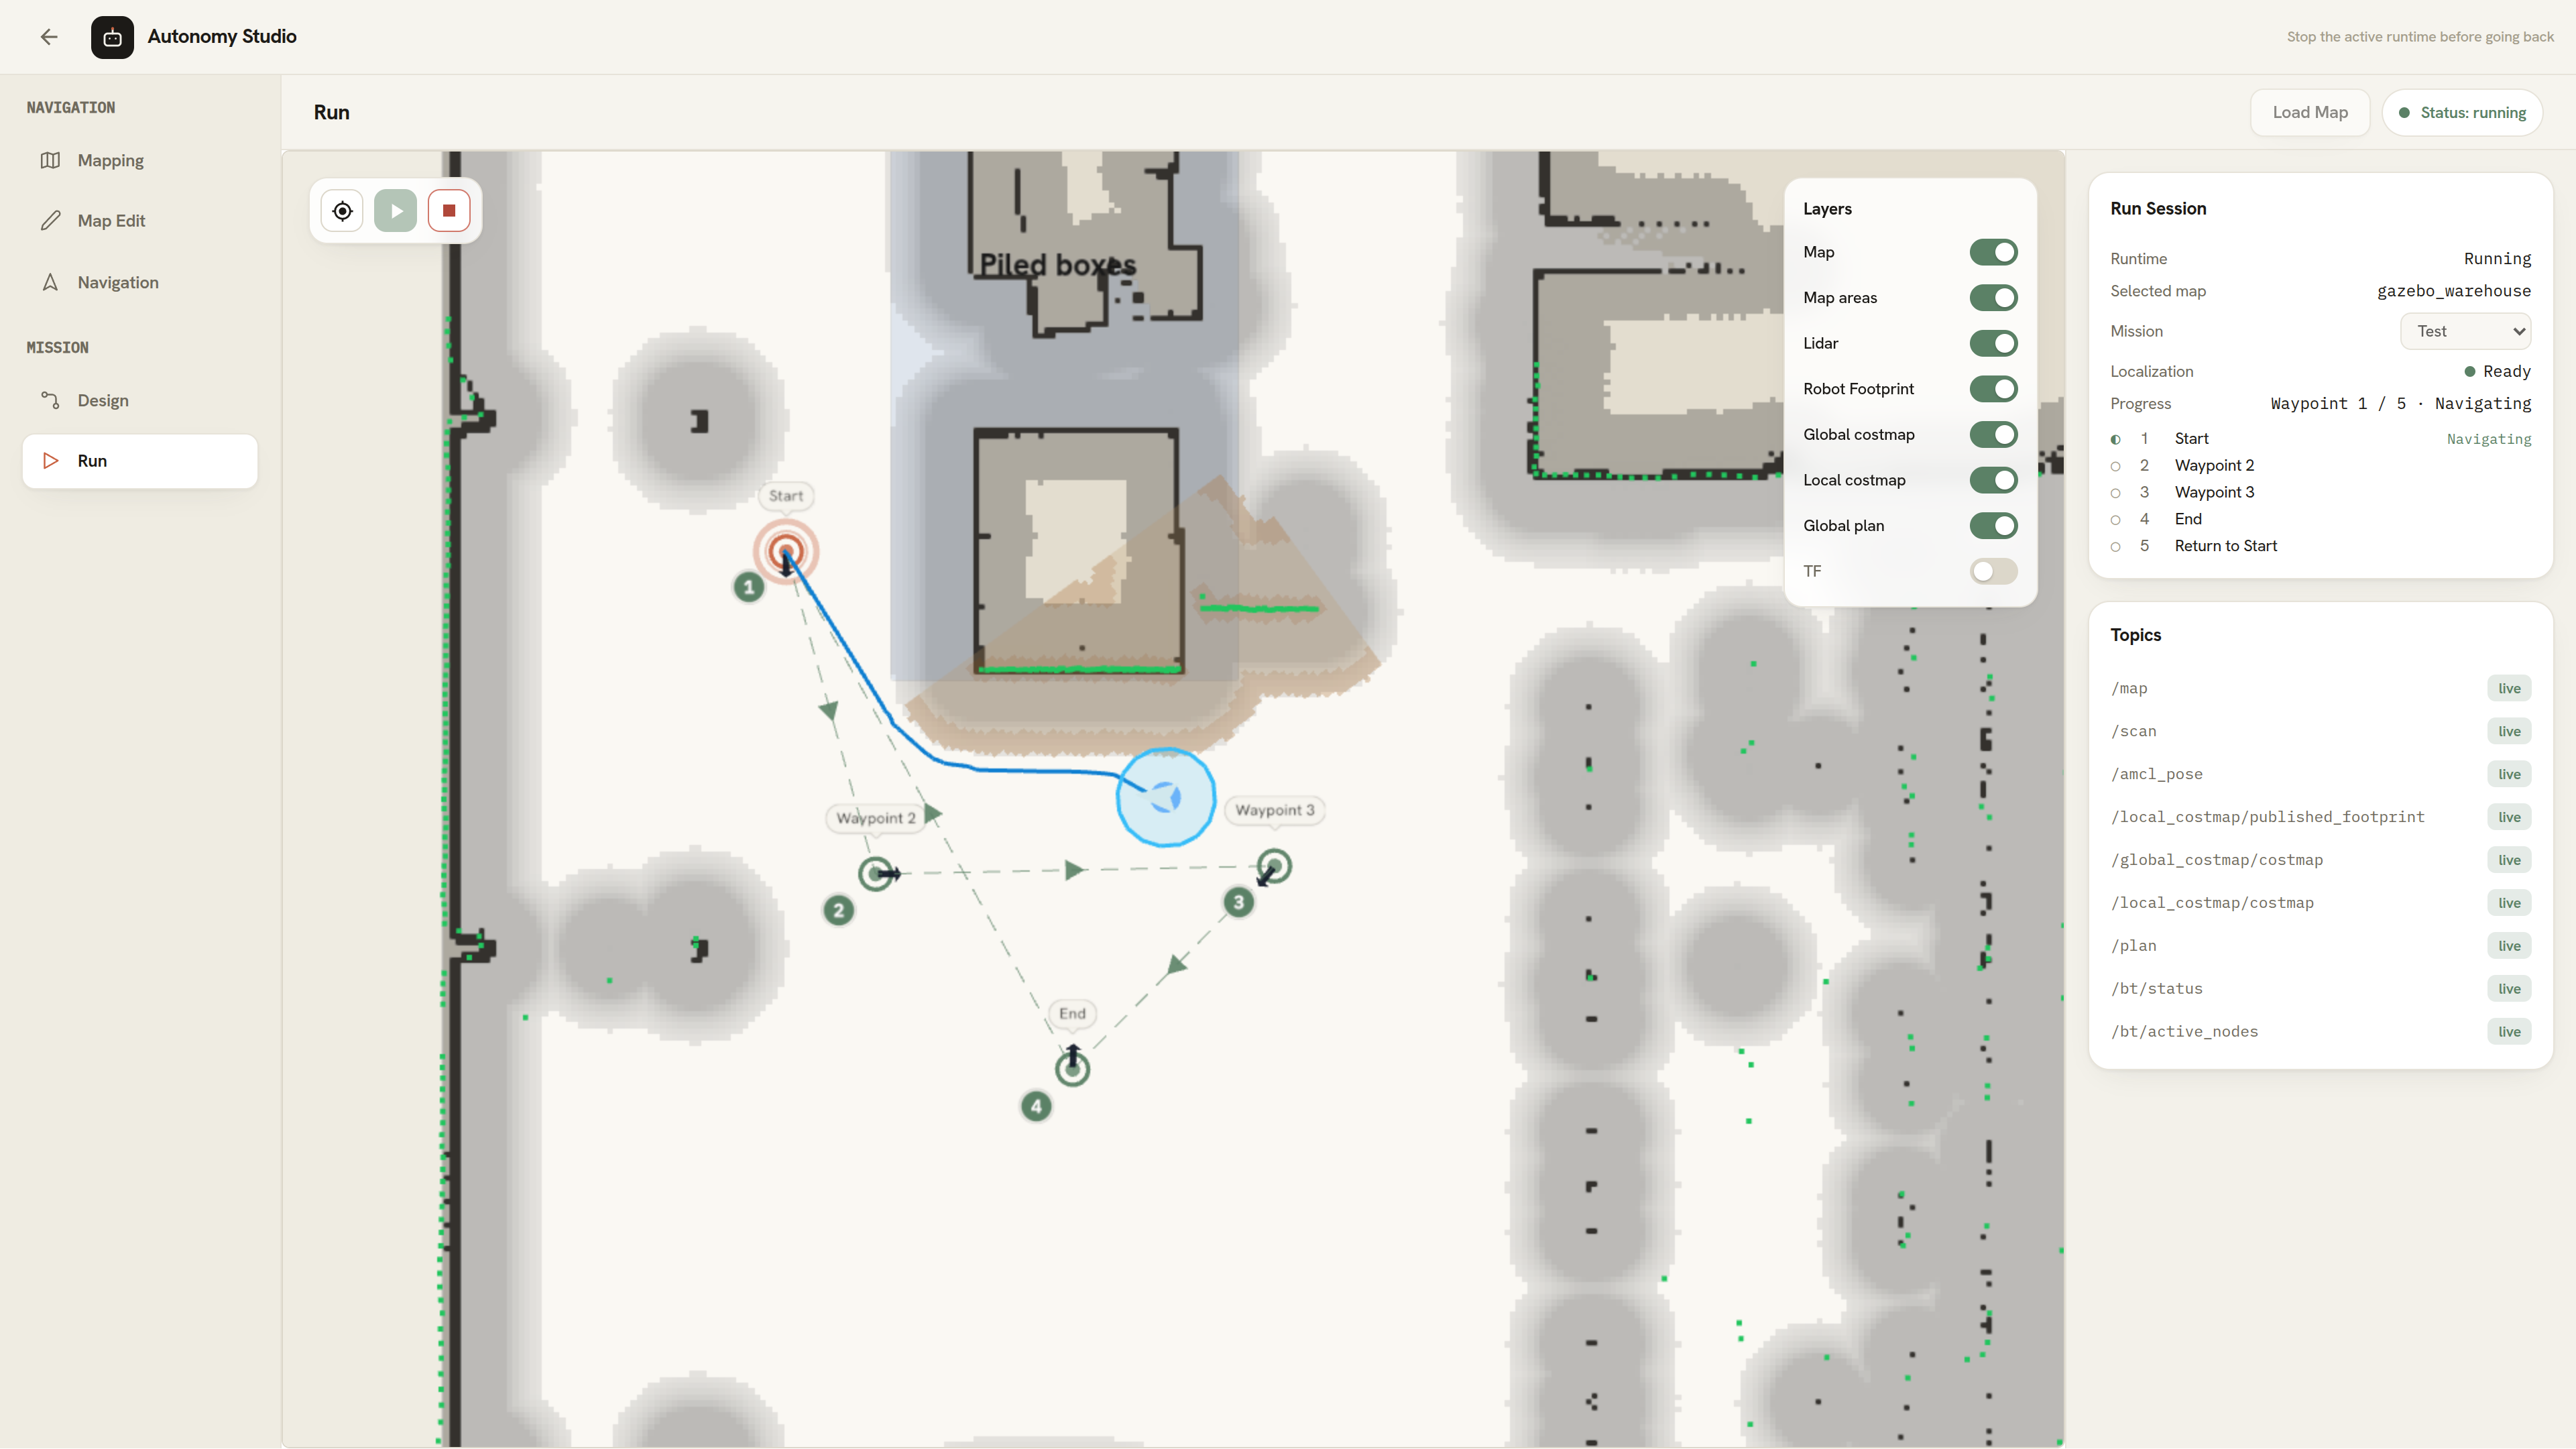
- Cancels the active Mission Runner loop.
- Cancels the current navigation goal.
- Stops a Waypoint Task engaged by this run.
- Stops the navigation runtime.
- Clears localization and the loaded Run snapshot.
- Releases a Task Engine process only if Run started it.
After Stop completes, select Load Map again before starting another Run session.