Overview

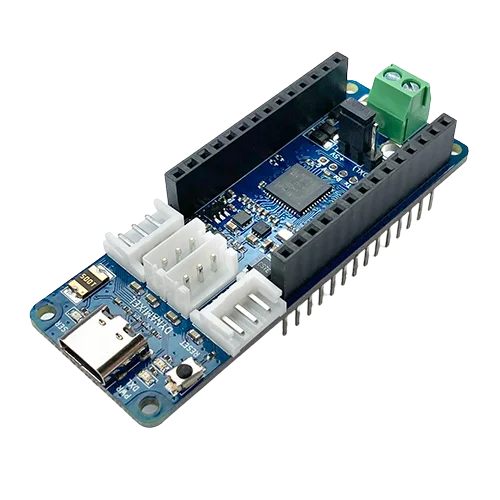
The OpenRB-150 is a new open source Arduino compatible embedded controller.
The controller features the same pinout and the form factor as the Arduino MKR to ensure compatibility with physical accessories, and has support for programming using the Arduino IDE.
The OpenRB-150 also features 4 dedicated DYNAMIXEL ports, and supports the DYNAMIXEL Wizard 2.0 testing and calibration software.
NOTE : Specialty firmware is required to utilize the OpenRB-150 with DYNAMIXEL Wizard. This firmware is included in the OpenRB board manager package.
Specifications
| Item | Specification |
|---|---|
| MICROCONTROLLER | SAMD21 Cortex-M0+ 32bit low power ARM® MCU |
| BOARD POWER SUPPLY | (USB 3.0) 5 V (VIN -or Terminal) 3.7 ~ 12.6 V |
| SUPPORTED BATTERY | Li-Po 1 - 3 cell (3.7 - 11.1 V) XT60 connector ready |
| DC CURRENT FOR 3.3V PIN | Max 300 mA |
| DC CURRENT FOR 5V PIN | Max 300 mA (Before change) Max 150 mA (After change) |
| DC CURRENT FOR DYNAMIXEL PORTs | 3,000 mA |
| CIRCUIT OPERATING VOLTAGE | 3.3 V |
| DIGITAL I/O PINS | 24 |
| PWM PINS | 12 (0, 1, 2, 3, 4, 5, 6, 7, 8, 10, A3 - or 18 -, A4 -or 19) |
| UART | 2 |
| SPI | 1 |
| I2C | 1 |
| ANALOG INPUT PINS | 7 (ADC 8/10/12 bit) |
| ANALOG OUTPUT PINS | 1 (DAC 10 bit) |
| EXTERNAL INTERRUPTS | 10 (0, 1, 4, 5, 6, 7, 8, A1 -or 16-, A2 - or 17) |
| DC CURRENT PER I/O PIN | 7 mA |
| FLASH MEMORY | 256 KB |
| FLASH MEMORY FOR BOOTLOADER | 8 KB |
| SRAM | 32 KB |
| EEPROM | no |
| CLOCK SPEED | 32.768 kHz (RTC), 48 MHz |
| LED_BUILTIN | 3 |
DYNAMIXEL TTL Port 1 | 4 (Max 1 Mbps) |
| Board Dimensions | 25 x 66 mm |
| Supported Software | Arduino IDE, DYNAMIXEL Wizard 2.0 |
Supported DYNAMIXEL2 | X Series, MX Series, AX Series, P Series |
1
| Baud Rate | Margin od Error |
|---|---|
| 1M [bps] | 0.000 [%] |
| 115,200 [bps] | -0.160 [%] |
| 57,600 [bps] | -0.160 [%] |
| 9,600 [bps] | 0.000 [%] |
1 RS-485 models will require DYNAMIXEL Communication Bridge to convert TTL to RS-485.
2 24V models require a separate power connection.
NOTE: The 5V regulator has been updated as of 2024, resulting in a modification to the DC current (5V) value from 300mA to 150mA.
- The current from the USB port is limited to 500mA with the built-in fuse, but a high current draw may cause damage to USB ports used to power the OpenRB-150.
- For applications requiring rapid movement or high torque, use of the terminal block to supply power is recommended.
- Always confirm the operating voltage of your DYNAMIXEL modules before connecting them to the OpenRB-150.
- The maximum voltage that the I/O pins can tolerate is 3.3V. Applying voltages higher than 3.3V to any I/O pin could damage the board.
- Do not connect or disconnect DYNAMIXEL actuator cables while power is being supplied.
![]()
DANGER
(Ignoring these warnings may cause serious injury or death)
- Never place items containing water, flammables/open flames, or solvents near the product.
- Never place fingers, arms, toes, and other body parts near product during operation.
- Cease operation and remove power from the product if the product begins to emit strange odors, noises, or smoke.
- Keep product out of reach of children.
- Check input polarity before installing or energizing wiring or cables.
![]()
CAUTION
(Ignoring these warnings may cause mild injury or damage to the product)
- Do not insert blades or other sharp objects during product operation.
![]()
ATTENTION
(Ignoring these warnings may cause minor injury or damage to the product)
- Do not disassemble or modify the product.
- Do not drop the product or apply strong impacts.
- Do not connect or disconnect DYNAMIXEL cables while power is being supplied.
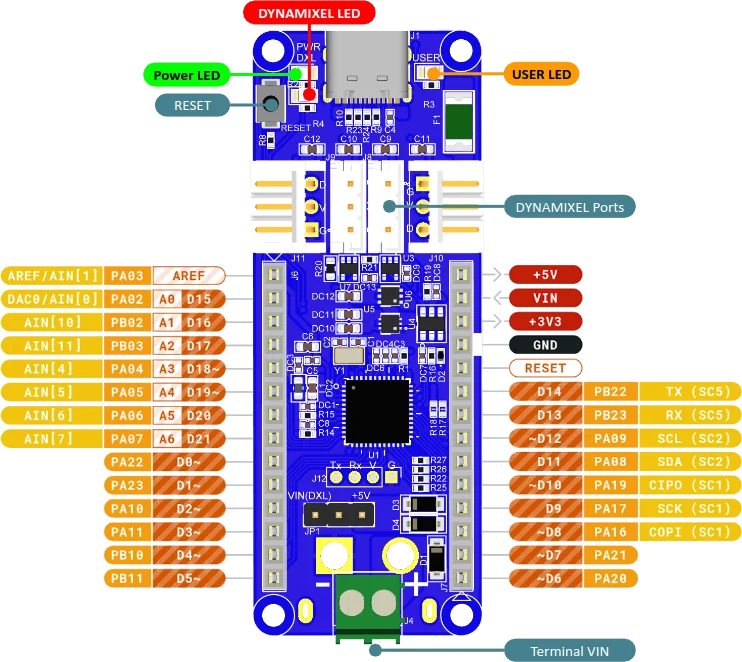
Hardware Layout
Pinout
Reset Button
Pressing the Reset Button hard reboots the microcontroller, double pressing the Reset Button reboots the microcontroller into bootloader mode.
The OpenRB-150 will not load it's Arduino sketch(or firmware) when in bootloader mode.
WARNING
Resetting the microcontroller will also reset the power of any connected DYNAMIXELs (Power Switch).
It is important to only reset the microcontroller when the acutators are in a safe postion, to avoid possible damage or injury when the acuators are reset.
DYNAMIXEL Power Switch
Power to the DYNAMIXEL ports is controlled by the FET on the bottom of the microcontroller.
The FET can enable and disable the power to the connected ports, by default the FET is turned off whenever the OpenRB-150 is powered on.
When the FET is turned on, the DXL RED LED will also be turned on to confirm the power supply status.

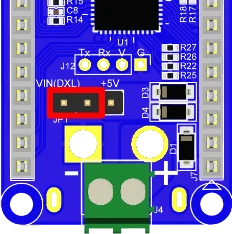
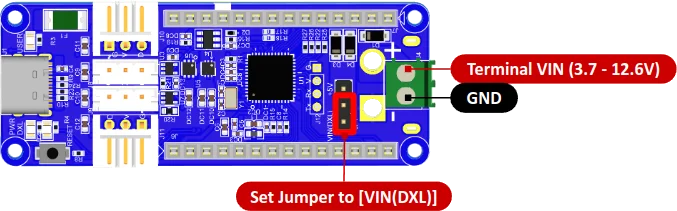
Terminal VIN
The included terminal block provides compatibility with a wide range of input power sources.
ROBOTIS recommends using the terminal block to supply power when possible.
To supply power to the OpenRB-150 controller via the Terminal VIN, set the jumper to VIN(DXL) side as shown below.
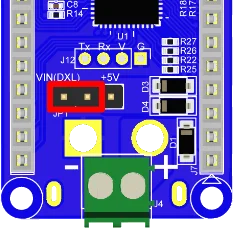
Terminal VIN jumper setting

Power input circuitry
CAUTION
Do not charge the battery when connected to the controller.
XT60 Connector
The XT60 connector is widely used in the RC products and it can be assembled on the back of the OpenRB-150 controller.
Please remove the Terminal Block before soldering the XT60 right angle connector.

XT60 Connector Ready
Power Source Jumper
OpenRB-150 can be powered with three sources.
In order to properly supply power to the controller and DYNAMIXEL, the power source jumper needs to be set properly.
| When using USB or VIN | When using Terminal Block or XT60 |
|---|---|
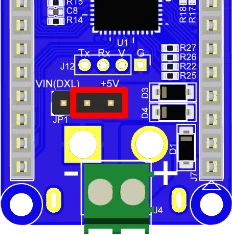 |  |
DYNAMIXEL Ports
4 DYNAMIXEL Ports are ready for any TTL supported DYNAMIXEL.
| Item | TTL |
|---|---|
| Pinout | 1 GND2 VDD3 DATA |
| Diagram | |
| Housing |  JST EHR-03 |
| PCB Header |  JST B3B-EH-A |
| Crimp Terminal | JST SEH-001T-P0.6 |
| Wire Gauge for DYNAMIXEL | 21 AWG |

NOTE: Above circuit is designed for 5V or 5V tolerant MCU. Otherwise, use a Level Shifter to match the voltage of MCU.
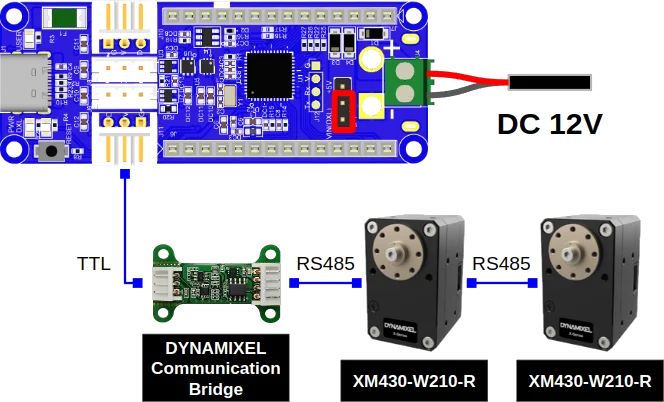
RS-485 supported DYNAMIXEL can also be used when connected with the DYNAMIXEL Communication Bridge.
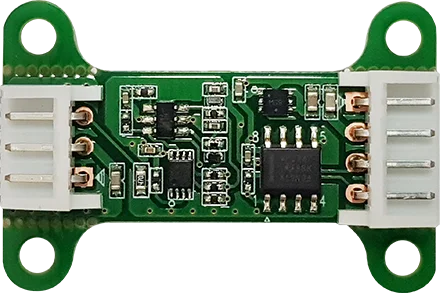
DYNAMIXEL Communication Bridge
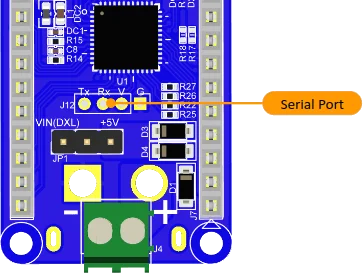
Serial Port
The Serial Port assigned to Serial2 can be used to connect various devices for debugging the code or controlling the controller.
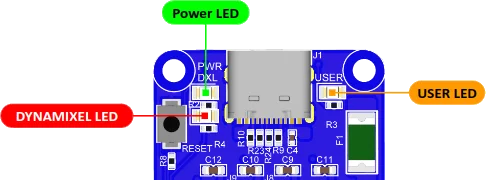
LEDs
Three LED indicates the status of the OpenRB-150 controller.
PWR(Green) : This LED is turned on whenever the OpenRB-150 is powered.USER(Orange) : This LED can be controlled by user via Pin32orLED_BUILTINin the Arduino sketch code.DXL(Red) : This LED will be turned on when the DYNAMIXEL port is powered on.
Pin Name Definitions
// Battery
#define ADC_BATTERY	(33u)

// LEDs
#define PIN_LED     (32u)
#define LED_BUILTIN PIN_LED

// DYNAMIXEL POWER FET
#define BDPIN_DXL_PWR_EN  (31u)
Connecting Power
OpenRB-150 controller can be powered with three power sources.
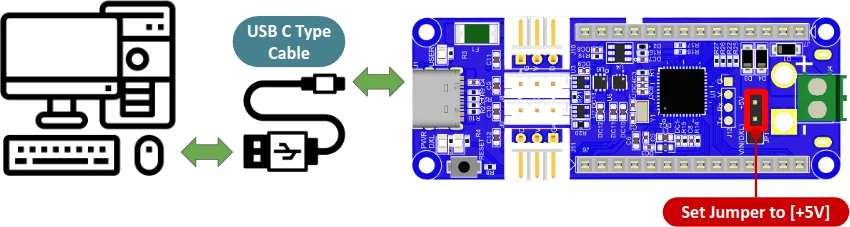
USB C
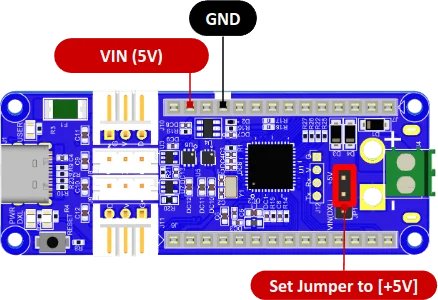
VIN
Terminal VIN
WARNING
-
Always check the polarity of any power supplies before connecting them to the OpenRB-150.
Incorrect polarity can permanently damage the microcontroller. -
Make sure to set the Jumper correctly depending on the power source.
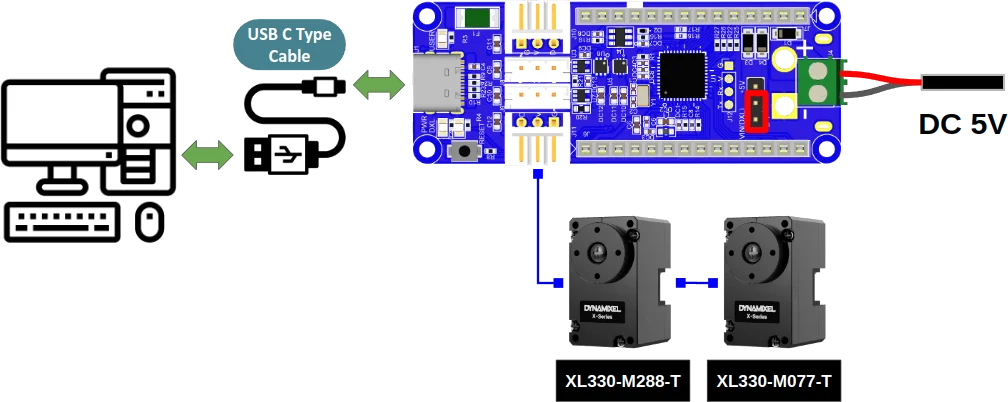
Connection Examples
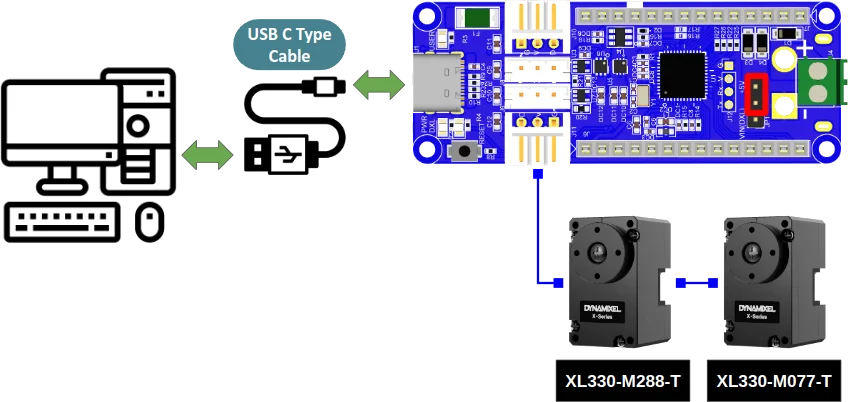
When running 5V DYNAMIXEL with the USB power
WARNING
For applications that require high velocity or torque, please supply power via Terminal VIN.
USB port is not a suitable power source for dynamic motor operation.
Drawing excessive power from the USB port may cause reboot or damage on the PC.
Using an external power source is recommended as shown below.
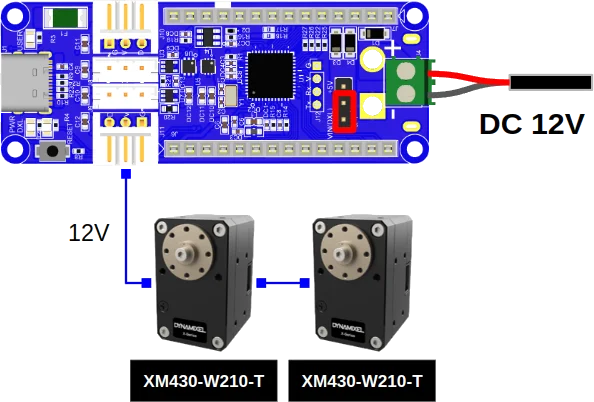
When running 12V TTL DYNAMIXEL
When running 12V RS-485 DYNAMIXEL
Development Environment
DYNAMIXEL Wizard 2.0
OpenRB-150 supports DYNAMIXEL Wizard 2.0.
In order to configure and manage DYNAMIXEL with DYNAMIXEL Wizard 2.0, please upload the usb_to_dynamixel sketch in the OpenRB-150 board manager example.
NOTE
usb_to_dynamixel sketch is uploaded to the OpenRB-150 as a factory default firmware.
Up to 1 Mbps baudrate is supported with usb_to_dynamixel sketch.
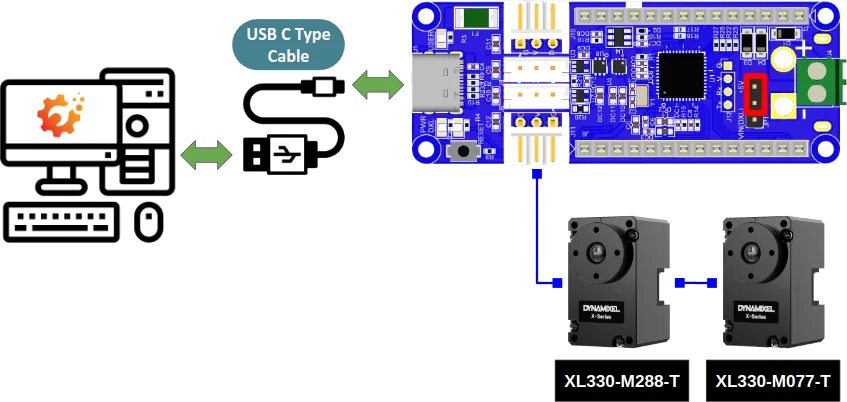
Connect the USB C cable to OpenRB-150 and Upload the usb_to_dynamixel sketch
OpenRB-150 supports most features of DYNAMIXEL Wizard 2.0 including testing DYNAMIXEL, firmware management, packet analyzing, data plotting, control table backup, etc.
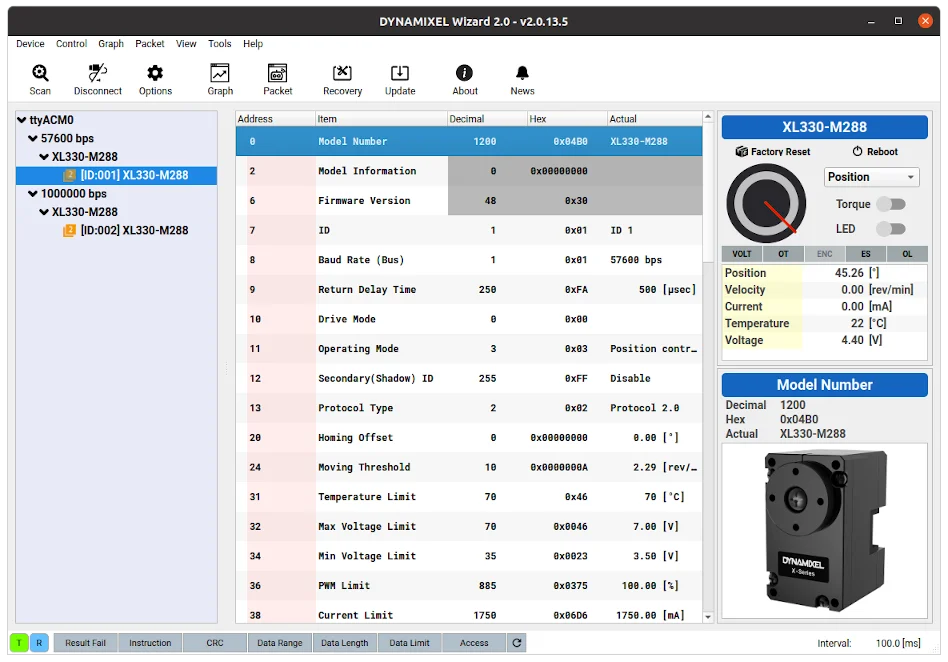
Various baudrates up to 1 Mbps are supported

DYNAMIXEL Firmware Recovery and Update are supported
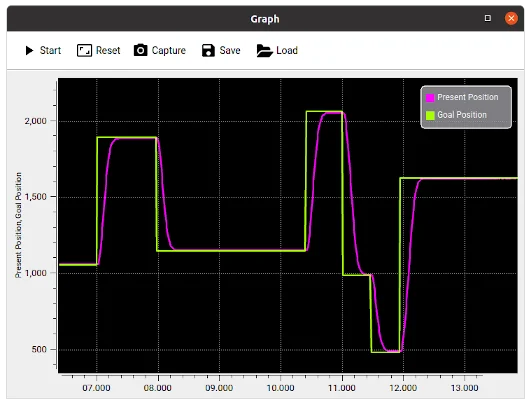
Graphing feature is supported
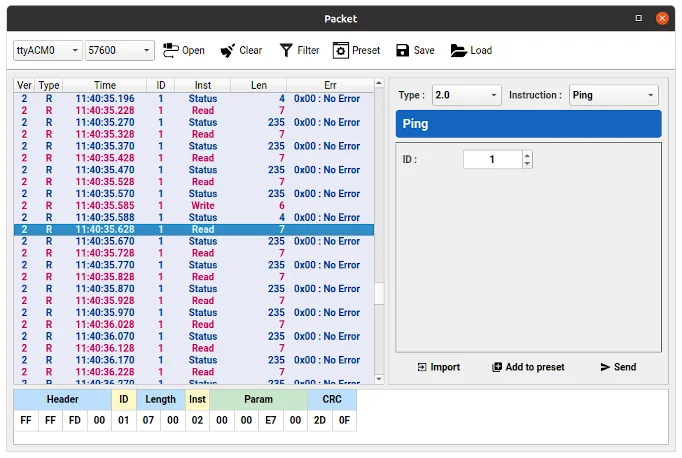
Analyzing DYNAMIXEL packet is supported
Install the Arduino IDE
Install on Linux
-
Download the
Linux 64 bitversion of Arduino IDE from the official Arduino download page.
 https://www.arduino.cc/en/software
 -
Extract the downloaded file to the desired folder and execute the install script as below in the terminal.
$ ./install.sh
- To run the Arduino IDE on Linux platform, enter the command below in the terminal.
$ arduino
Install on Mac
-
Download the
Mac OS X versionof Arduino IDE from the official Arduino download page.
https://www.arduino.cc/en/software -
Drag the downloaded Arduino file into the
Applications. -
Run the Arduino IDE.
Install on Windows
-
Download the
Windows Installer versionof Arduino IDE from the official Arduino download page.
https://www.arduino.cc/en/software -
Install the downloaded file.
-
Run the Arduino IDE.
Please refer to Arduino Software Installation instruction video
Install Board Manager
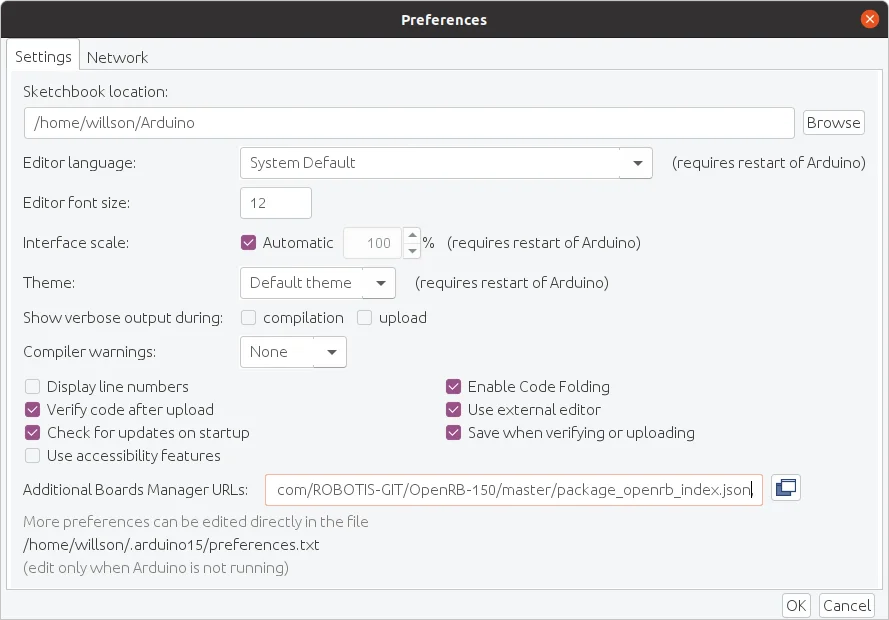
On the Arduino IDE, go to File > Preferences from the top menu.
When the Preferences window appears, copy and paste following address in the Additional Boards Manager URLs textbox.
https://raw.githubusercontent.com/ROBOTIS-GIT/OpenRB-150/master/package_openrb_index.json
Arduino SAMD Board Manager
The OpenRB-150 requires Arduino SAMD board manager for building and uploading sketches to the controller. Follow the instructions below to install the Arduino SAMD Board Manager.
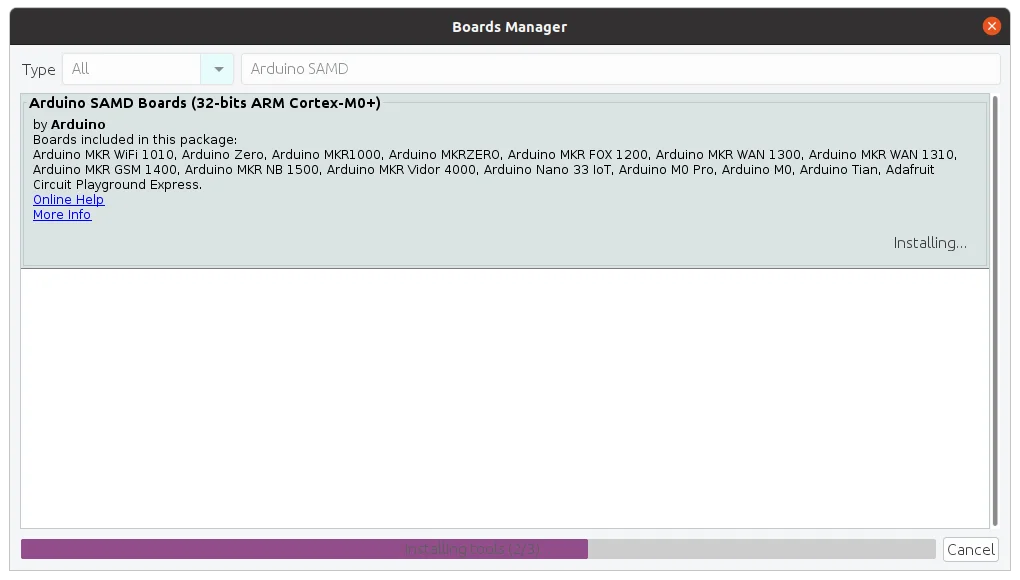
- Go to Tools > Board > Boards Manager.
- Search for
Arduino SAMDand Install the latest version.
OpenRB-150 Board Manager
Follow the instructions below to install the OpenRB-150 Board Manager.
- Go to Tools > Board > Boards Manager.
- Search for
OpenRBand Install the latest version.

Library API
There are three ways to add libraries to the Arduino IDE.
- Using the Library Manager
- Importing a .zip Library
- Manual installation
Each way is described in detail in the Arduino Official Guide, so please refer to it if necessary.
Below is an example of using the Library Manager.
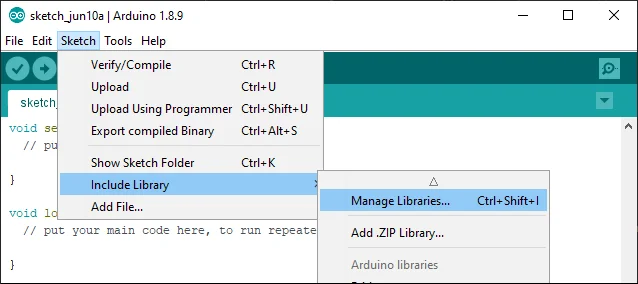
Search for DYNAMIXEL2Arduino from the Library Manager and install the library.
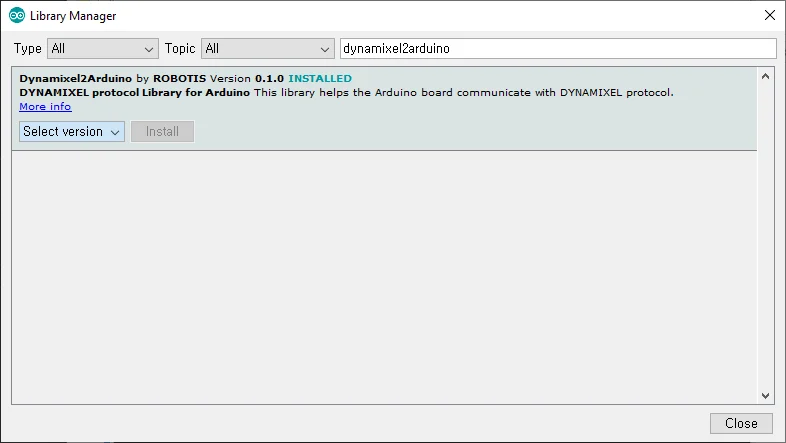
If the DYNAMIXEL2Arduino library has been successfully installed, useful examples to control DYNAMIXEL can be found under the DYNAMIXEL2Arduino category.
Dynamixel2Arduino Library
Dynamixel2Arduino Class
- begin()
- getPortBaud()
- ping()
- scan()
- getModelNumber()
- setID()
- setProtocol()
- setBaudrate()
- torqueOn()
- torqueOff()
- ledOn()
- ledOff()
- setOperatingMode()
- setGoalPosition()
- getPresentPosition()
- setGoalVelocity()
- getPresentVelocity()
- setGoalPWM()
- getPresentPWM()
- setGoalCurrent()
- getPresentCurrent()
- getTorqueEnableStat()
- readControlTableItem()
- writeControlTableItem()
Master Class
DYNAMIXEL2Arduino class inherits below public functions from the Master class.
Upload Sketch
Uploading a sketch to the OpenRB-150 is similar with Arduino controllers.
Connect the OpenRB-150 to the PC via USB cable, select the OpenRB-150 board and the port that is connected to the OpenRB-150, then click on the Upload icon.
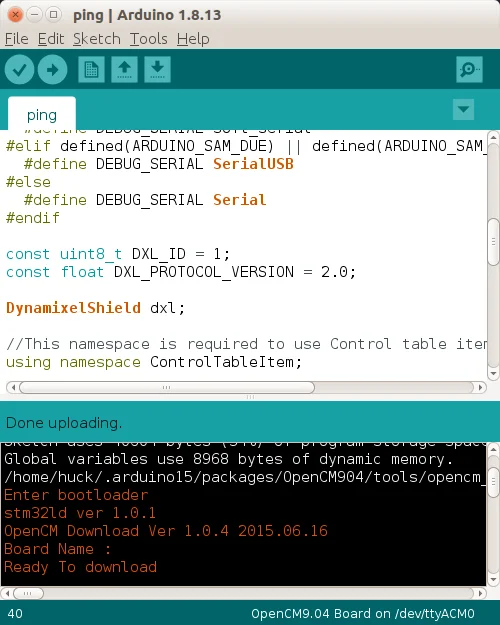
Note If error occurs during the Upload process, please try uploading the sketch in the bootloader mode by double clicking the Reset Button.
Downloads
- OpenRB-150 BOM (BOM)
- OpenRB-150 Schematic (PDF)
- OpenRB-150 2D Drawing (PDF, DWG)
- OpenRB-150 3D Modeling (STL, STEP)
- OpenRB-150 Gerber (GBR)
- OpenRB-150 Board Manager (GitHub Repo)
- DYNAMIXEL2Arduino Library (GitHub Repo)